“Error 1045 (28000) access denied for user root localhost” is a commonly encountered error when attempting to access MySQL through the WordPress CMS. However, this error can also occur in other situations.
The error you are encountering suggests that the “root” user does not possess the required authorizations to access the database from localhost. The reasons behind this issue can be multiple, including an incorrect password, an incorrect username, or inadequate permissions granted to the user.
Here are some steps you can take to resolve this error
1. Check the username and password
Make sure that you are using the correct username and password. The username should be “root” and the password should be the one you set during the installation process.
In case you are using WordPress you have to check your wp-config.php file. The file can be found in the main folder of WordPress.
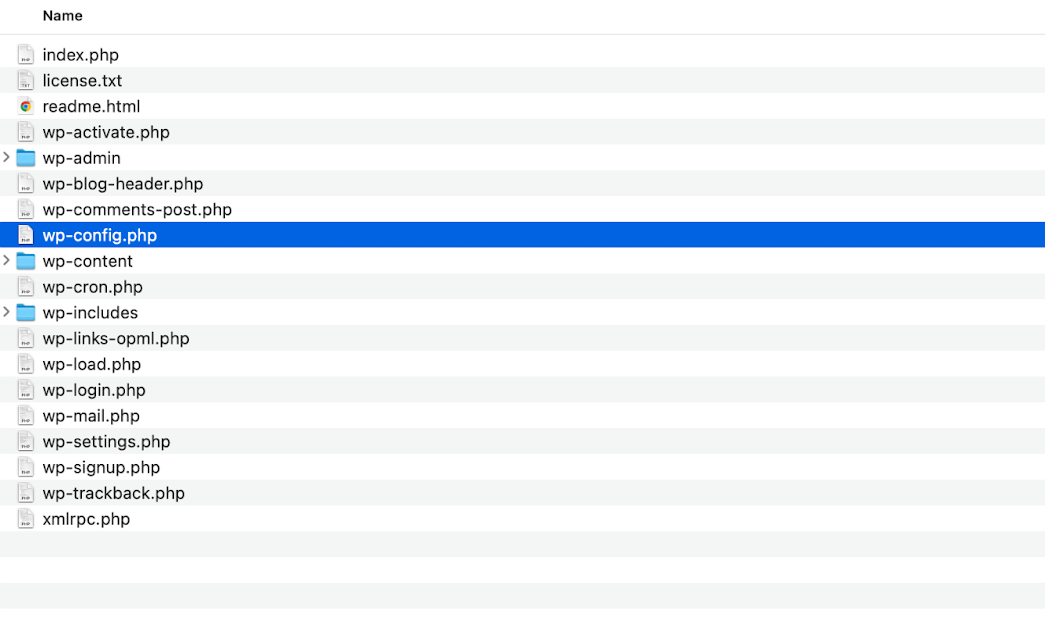
After opening the file and trying to edit it (Visual Studio Code) you will have this screen:
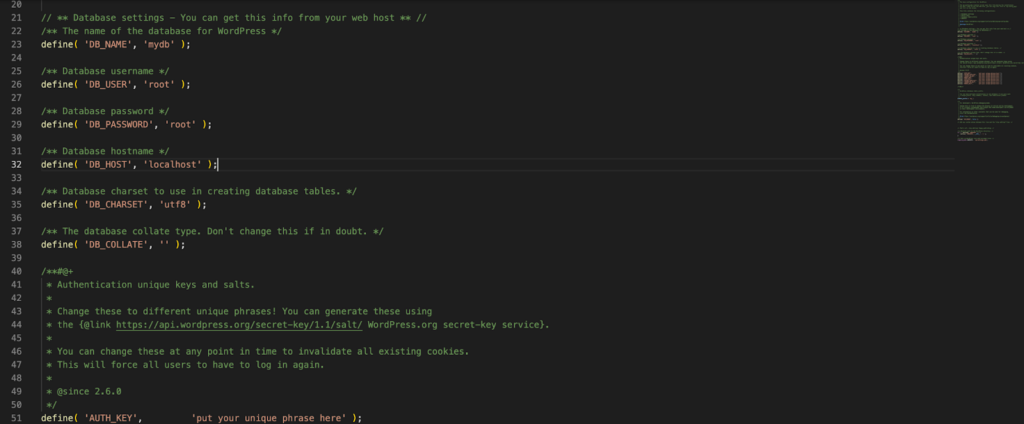
Check DB_USER and DB_PASSWORD if they have the correct values
/** Database username */

define( 'DB_USER', 'root' );
/** Database password */
define( 'DB_PASSWORD', 'root' );If you don’t know which is your username and password for the DB, Access cPanel > Database > Mysql and check it.

To change the password of the WordPress database please follow the tutorial: Change WordPress Password in PHPMyAdmin
2. Check if the user has the required privileges
Check if the user “root” has the necessary privileges to access the database.
Step1: First, you have to open your terminal and write ssh username@ipddress
ssh [email protected] Step2: After successful login write down this command
mysql -uroot -pStep3: After adding your password you can start adding your command from the mysql prompt
Step4: You can use the following command to check the privileges:
SHOW GRANTS FOR 'root'@'localhost';This will show you the list of privileges that the user “root” has for the “localhost” server. If the user does not have the necessary privileges, you can grant them using the following command:
GRANT ALL PRIVILEGES ON *.* TO 'root'@'localhost' IDENTIFIED BY 'password';Note: Replace ‘password' with the password you want to use.
To check if the user has the required privileges using phpMyAdmin, follow these steps:
- Log in to your phpMyAdmin account.
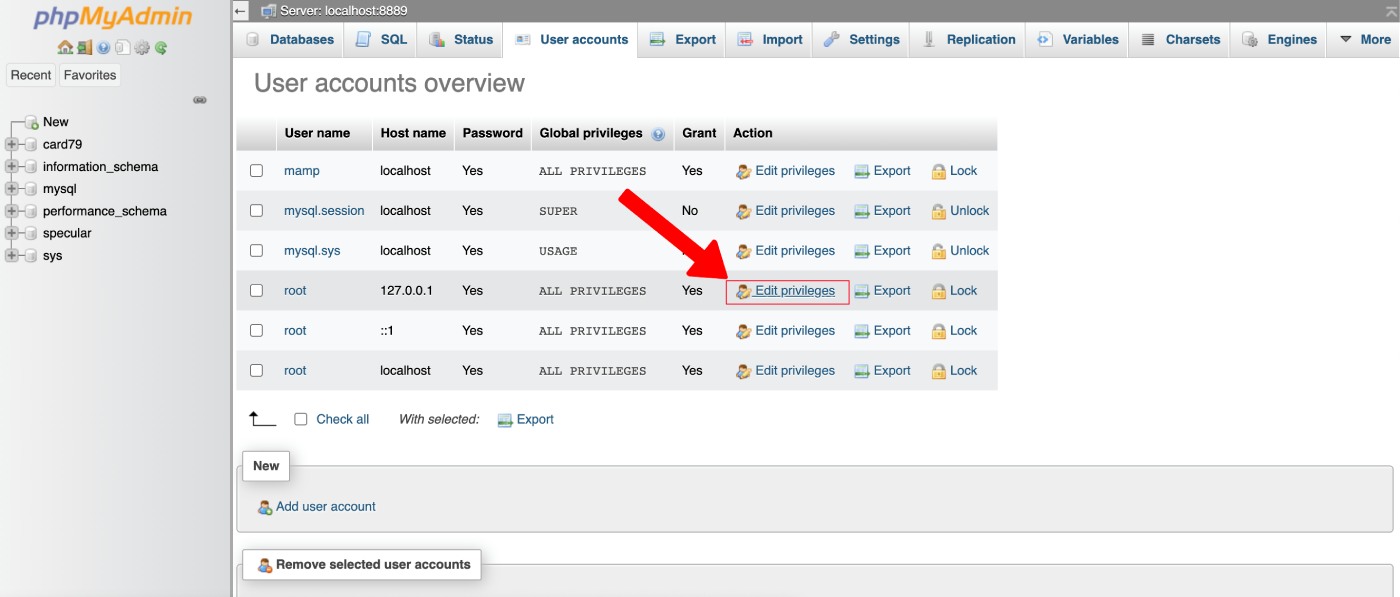
- Click on the “User Accounts” tab.
- Select on the user root (or the one you want to change the password)
- Click on the Edit privileges link
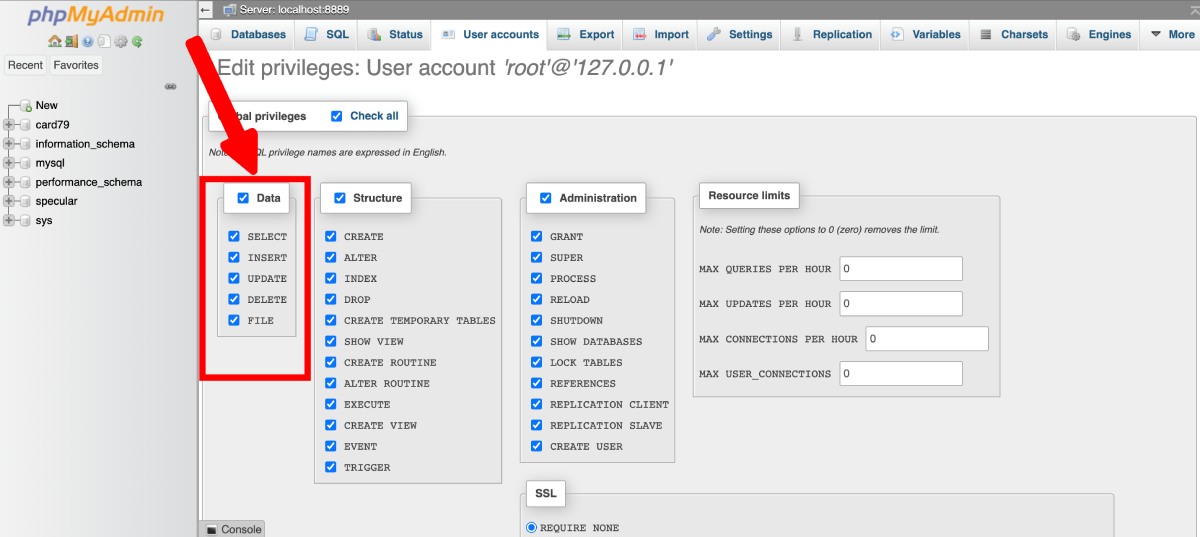
- Here you can see the list of privileges that the user has been granted.
- Make sure that the user has been granted the necessary privileges to access the database.
- If the user does not have the required privileges, you can grant them by selecting the relevant checkboxes and clicking on the “Go” button.
- Once you have granted the required privileges, try accessing the database again to see if the issue has been resolved.
The settings in the highlighted area should be checked:
Note: If you are unable to grant the necessary privileges through phpMyAdmin, you may need to access the MySQL command line interface to grant the privileges.
3. Check the MySQL server status
Make sure that the MySQL server is running. You can check the server status by running the following command after login in the server shell:
systemctl status mysqlIf the server is not running, start it using the following command:
systemctl start mysqlTo check the Mysql status on cPanel hosting you have to log in to your hosting dashboard. Another way is to contact directly your hosting provider.
4. Check if the MySQL server is listening to the correct port
Make sure that the MySQL server is listening to the correct port. The default port for MySQL is 3306.
To check if the MySQL server is listening to the correct port, you can follow these steps:
1. Open a terminal or command prompt on your server where MySQL is installed.
2. Connect to the MySQL server using the command line client. You can use the following command, replacing username and password with your actual MySQL credentials:
mysql -u username -p3. Once you are connected to the MySQL server, type the following command to display the port number that the MySQL server is listening on:
SHOW VARIABLES LIKE 'port';
This command will display the port number that the MySQL server is listening on. By default, MySQL listens on port 3306.
You can also check the port number in the MySQL configuration file.
The configuration file is usually named my.cnf or my.ini, and it is located in the MySQL installation directory.
To find the MySQL installation directory, you can follow these steps:
1. Open a terminal or command prompt on your server where MySQL is installed.
2. Type the following command to check if MySQL is installed:
which mysql
If MySQL is installed, this command will display the path to the mysql executable file otherwise you will receive an error message.
If MySQL is installed, you can use the which command again to find the installation directory. Type the following command, replacing /path/to/mysql with the path to the mysql executable file:
which mysql | xargs readlink -f | sed "s|bin/mysql$||" This command will display the MySQL installation directory. You can use this directory to locate the MySQL configuration file (my.cnf or my.ini) and other MySQL files and directories.
Alternatively, if you have access to the MySQL client, you can also execute the following query to find the MySQL installation directory:
SELECT @@basedir;
This will display the MySQL installation directory.
You can also check the MySQL configuration file to verify the port number that MySQL is configured to listen on. The configuration file is usually named my.cnf or my.ini, and it is located in the MySQL installation directory.
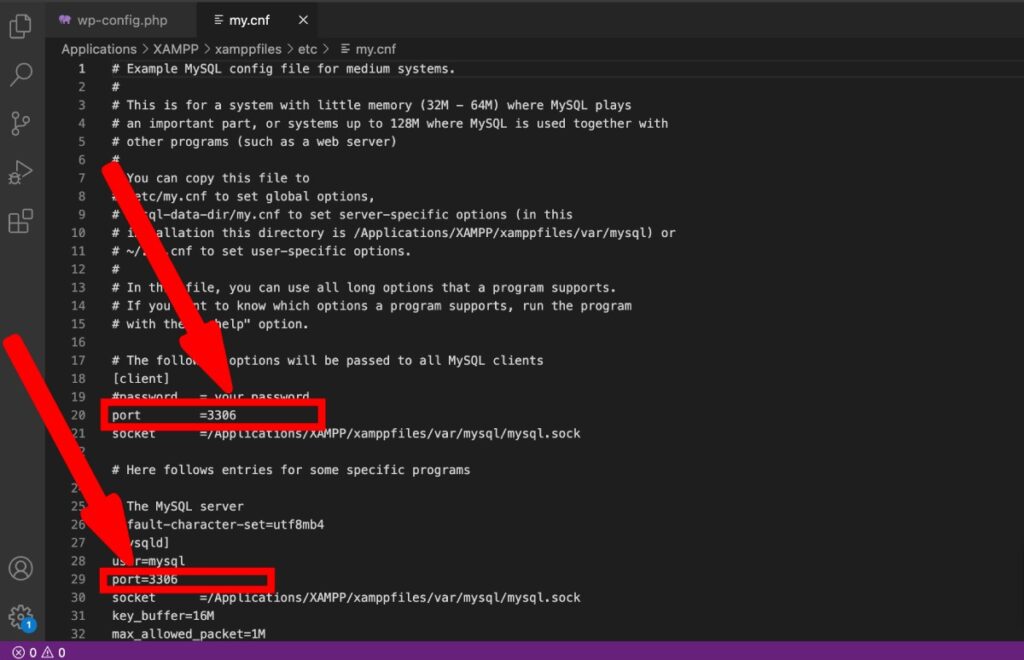
Open the configuration file with a text editor and search for the port parameter. The value of this parameter specifies the port number that MySQL is configured to listen on.
If the MySQL server is not listening on the correct port, you can change the port parameter in the configuration file and restart the MySQL server to apply the changes.
Don't forget to restart the Mysql service if you changed the port:
service mysql restart5. Reset the root password
If none of the above steps work, you can try resetting the root password. You can do this by following the steps in this article:
https://dev.mysql.com/doc/refman/8.0/en/resetting-permissions.html
Note: This method requires you to have access to the MySQL configuration file and the ability to restart the MySQL server.
You might be interested in reading:
How to Fix “Installation Failed: Could Not Create Directory” Error on WordPress
How to Fix WordPress Stuck in Maintenance Mode (SOLVED)
How to fix “Updating Failed. The Response is Not a Valid JSON Response”
How to Fix “Error Establishing a Database Connection”? – 2023
As one of the co-founders of Codeless, I bring to the table expertise in developing WordPress and web applications, as well as a track record of effectively managing hosting and servers. My passion for acquiring knowledge and my enthusiasm for constructing and testing novel technologies drive me to constantly innovate and improve.
Expertise:
Web Development,
Web Design,
Linux System Administration,
SEO
Experience:
15 years of experience in Web Development by developing and designing some of the most popular WordPress Themes like Specular, Tower, and Folie.
Education:
I have a degree in Engineering Physics and MSC in Material Science and Opto Electronics.




Comments