Creating a private area, reserved area or a password-protected page in a WordPress site is a common need.
In fact there are many users who have asked us about it.
The first thing you should do and understand well the need that you presented yourself:
- Do you need to protect the contents of a page or section?
- Who are the users who can access the page or the protected area?
- Do you need to protect different content depending on the user or are they the same for everyone?
- Is it okay for a single password?
I tell you this because, from past experience with many users, the trend is to complicate their lives when in the end, the simplest solutions, manage to solve the need without going to twist their WordPress site.
So in this article we'll analyze several cases. Look at them one by one because they might be the solution you're looking for.
One important thing to mention before we proceed is that when choosing your password you should always aim at a complex combination that is not easily guessable. Do not reuse older passwords, instead try coming up with a unique one for each account. A password manager might come in handy to do just that.
Protect a page with a single password
This is the simplest case, although many do not know it.
No need to install plugins because and everything already included in the functions of WordPress.
Thanks to this feature it is possible to protect the contents of a single page through a single password, valid for all users, registered and not.
Entering from the Administration panel, in edit page, in the right column, to the Public section, you find several entries, including Visibility.
Press the “edit” link in order to access the different functions.
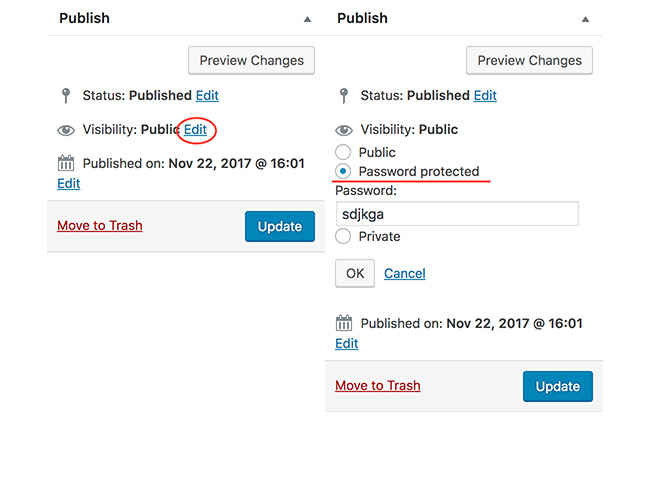
As you see in addition to the public state, you also have Password protected and private.
Activating the Password-Protected entry opens a field in which to enter the required password in order to access the content of the page.
Once saved, when the user requests this page, you can only do so if you have the password you just created.
The password entry form will be inserted directly into the page.

This solution is only perfect if you have content that can be placed on a single page.
For example, you may enter links, ebooks, coupons or other, which you have promised to the user in exchange for the newsletter subscription.
Once registered, in fact, in the registration confirmation email you will also send the password to access these premium content.
Also remember that you can create as many pages as you want, with as many different passwords.
Private page for administrators, publishers or other registered users
The Private function, however, does not require the password, but makes the page accessible only to members of your site who have as Administrator or Publisher role.
If you do not know what are the roles of WordPress, I tell you briefly that they are groups to which the different users are associated.
Each group can do certain things and others do not. Specifically, each group is associated with permits that we technically call “capabilities”.
At the hierarchical level, with the default roles of WordPress, we have to order of importance:
- Administrator
- Publisher
- Author
- Contributor
- Subscriber
When a user subscribes to your site, they will be assigned the role that you set under Settings > New user Default role, which by default is subscriber, that is, the one with lower possible permissions (I emphasize rightly with the recommendation Not to change it).
Returning to the private function of our page, when you choose this setting, only administrators and publishers can see it.
All the others will not even have the clue of the existence of the page, as they are shown a “404 ñ Page Not Found”.

Restrict Page Access by User Roles with PPWP Pro
Fortunately, BWPS team has turned this idea into action without any hassle by coming up with Password Protect WordPress (PPWP) plugins.
The plugin excels in generating passwords to secure your content. Other than that, it allows you to restrict page access by user roles as well. Simply put, logged-in users with particular roles can use passwords to access the locked content. Any attempt to access it from the remainders will stumble upon error messages.
After having PPWP installed and activated on your site, what you need to do is:
- Open your desired page or post.
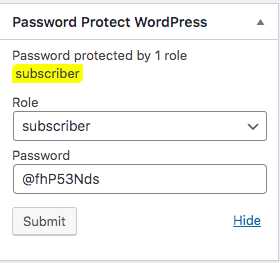
- Activate the “Password Protect WordPress” feature on the top right corner of your page.
- Choose a user role and input your password.
- Hit “Submit” to save your password and update your content.
In case you want to grant direct access to several specific user roles, let PPWP Pro carry that weight off your mind. Its Whitelist Roles features prove useful in saving user’s time and effort from entering passwords every time viewing the protected content.
Once you upgraded PPWP lite to the pro version, head to Settings > General.
In the Whitelist Roles section, select your desired user roles in the dropdown menu. Remember to save your changes.

As you can see, PPWP Lite and Pro come as a simple yet effective solution to restrict WordPress pages for specific user roles. It’s useful if you have collaborators, just as publishers, with whom you want to share privately the content.
The good news is the plugins are updated frequently and endorsed by millions of customers across the planet.
This solution could be useful if you have collaborators, just as publishers, with whom you want to share privately the content.
For example, you might have a page where you can sign all the goals or work to do for the week. Obviously this is just an idea, it's up to you to see if and the road you want to go.
What if I want to read the contents to “subscribers”?
In this case you come to help the members plugin, excellent work of Justin Tadlock.
Thanks to this plugin you can modify all the permissions (capabilities) for each role.
For the use that we need to do in this case, after you install it, go users > roles. You are presented with all the existing roles in your WordPress site.
Please note: If you have active plugins, such as WooCommerce, then you may find other roles than the default ones mentioned above (Customer, Shop Manager, etc…).
Press the subscriber entry to go to edit and on the next page go to articles.
Enable the Read Private posts permission (only that!) by placing the checkbox in the “Grant” column and saving the settings.
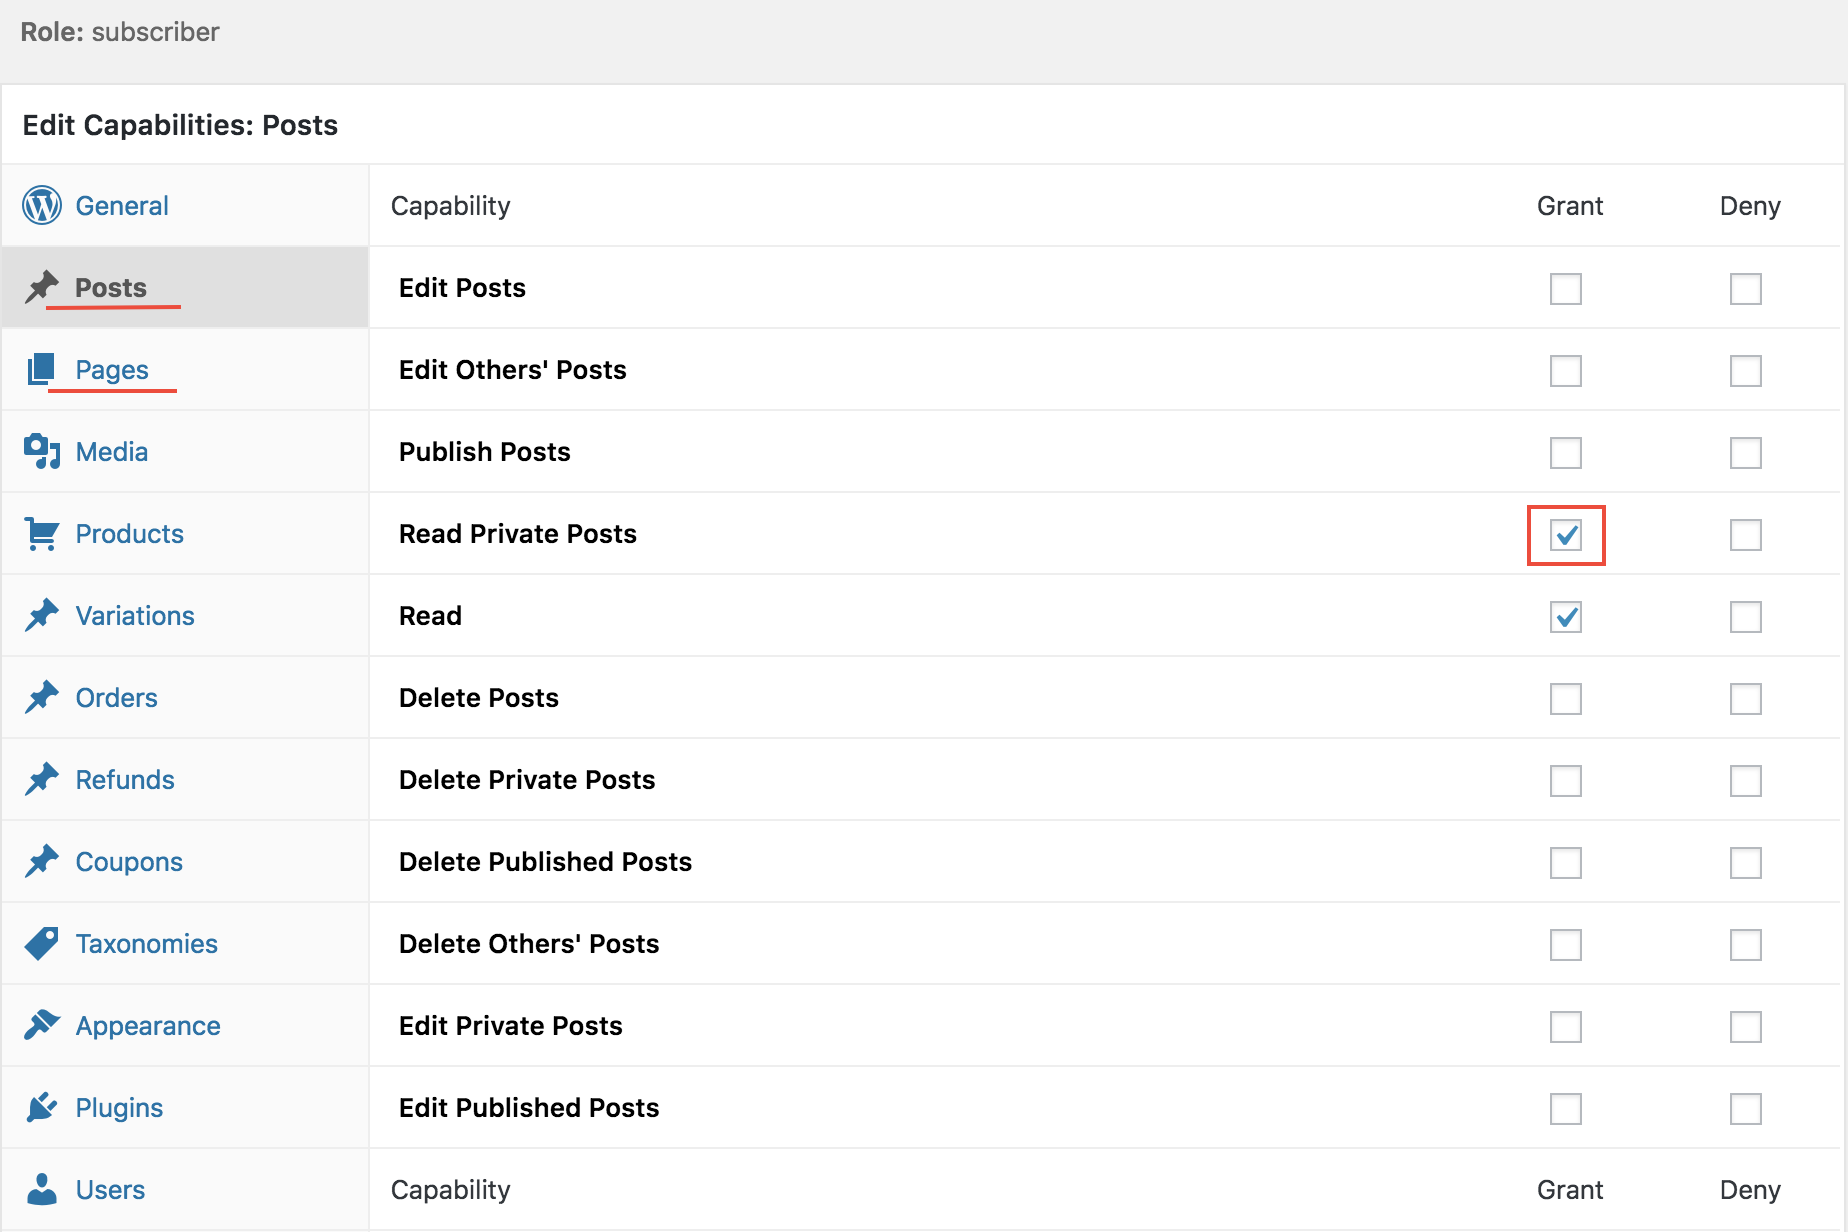
As you see articles and pages have the management of separate capabilities. Therefore remember to do the process for the pages, for the articles or for both, depending on the type of content that you will make private.
Be careful not to touch anything else! You are in the off limits area and if you enable something to someone wrong you may have serious consequences.
Having done this, now even users with the role of subscribers will be able to see the pages you have set as private.
Note: If you are doing tests as a subscriber and you have already gone on the page (before you have enabled this role to view the private pages) having so received a 404, then when you enable it it will take some time before this setting is active in your browser (to resolve immediately empty the cache).
Create a reserved area on the categories
A great idea was that of Jojaba, creator of the plugin Access Category Password.
Thanks to this plugin we can avoid assigning passwords for individual articles, but assigning a single password directly to the category.
The plugin is really simple. We have all the settings in one screen under the Settings > Access category Password.
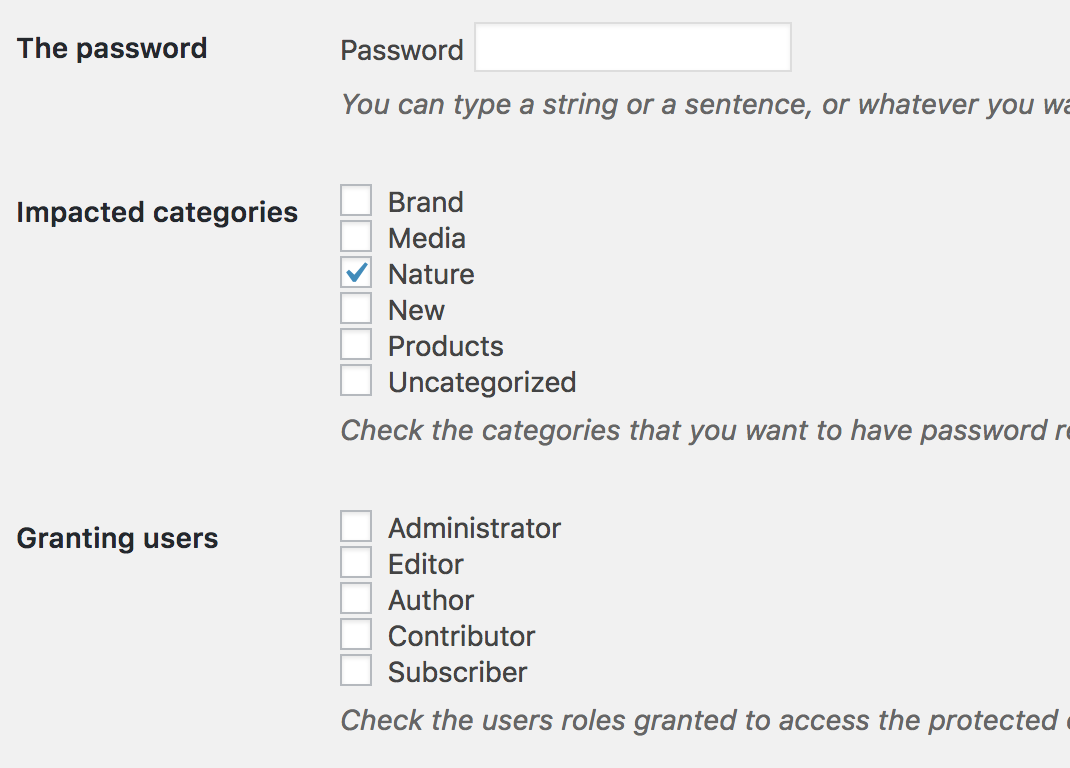
As you see you have the field for the password, the categories whose articles will be protected and enabling roles to avoid entering the password to you who are the administrator. There are also other settings such as fields to personalize the message, etc…
The user can browse the archive pages, but how much will try to access the individual content must enter the password to continue.
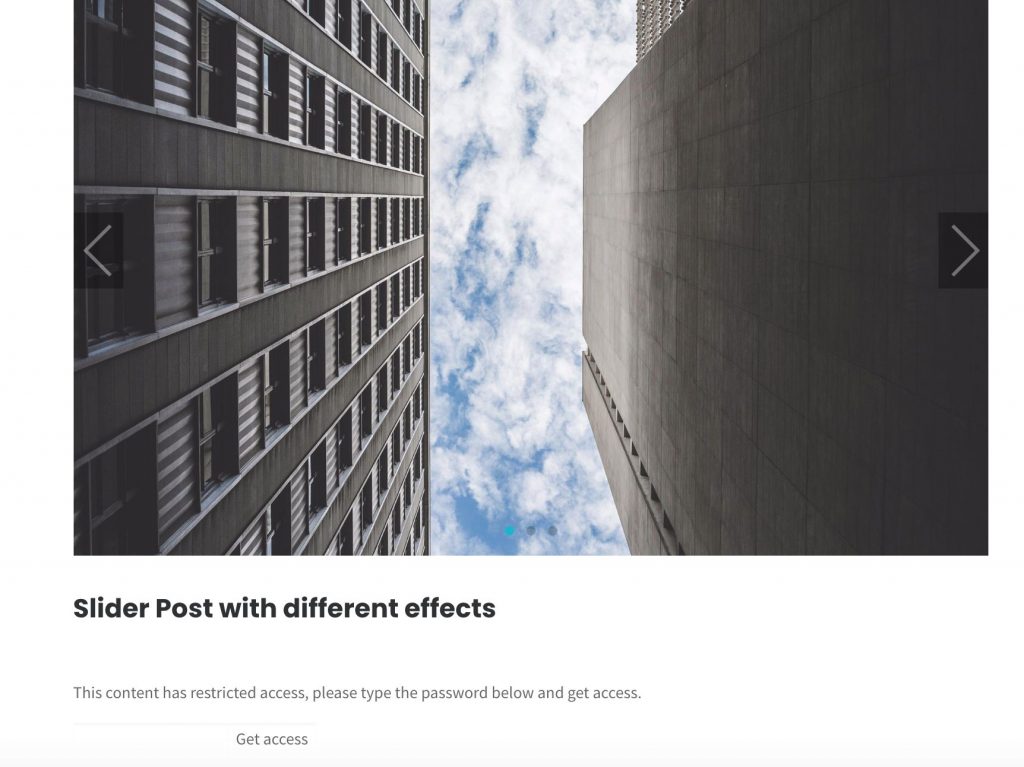
This plugin has not been updated for 2 years. Obviously it is not a point in its favor, but it remains the only one of its kind.
In the sites where we tested it did not cause problems, but we remain still waiting for its update.
Protect all WordPress site via password (semi reserved area)
Until now we have considered the cases in which you wanted to protect a page, an article or part of your site.
Let's now consider two different cases.
1. You want to protect your WordPress site through password.
2. You want to make only one part of the site private.
You may be wondering why I put these two cases in the same group that might seem quite different.
In fact and so, but we analyze a case study that happened to me frequently.
Mr. Mario has an activity for which he is essential to communicate to two different interlocutors: customers and suppliers.
For customers wants a WordPress site edited in detail, created with a premium theme, where the products and services will be presented.
For suppliers, however, the type of communication and the content to be included are very different and do not want to make them accessible to ordinary users of the network.
The solution and create two different WordPress installations.
Of course this involves more work, with a double management, but if you consider the target and the two different types of communication, you can understand how that for the suppliers has only purpose expressly technical.
Therefore, the one for vendors will be installed in a subfolder, for example yoursite.com/distributors/, in which the plugin Password Protected will be activated, which will allow access to the site only after entering the password.
Warning: You do not have to do the double installation. If you want to protect directly all your site quietly uses this plugin.
Note: To have two installations of WordPress in the same domain, you can use the CPanel or other software “one click Installation” That is proposed by your hosting. Most of them allow you to indicate the folder in which you want to install WordPress, in this case/distributors/.
That said proceed with installing the plugin. You will find its settings in Settings > Password protected.
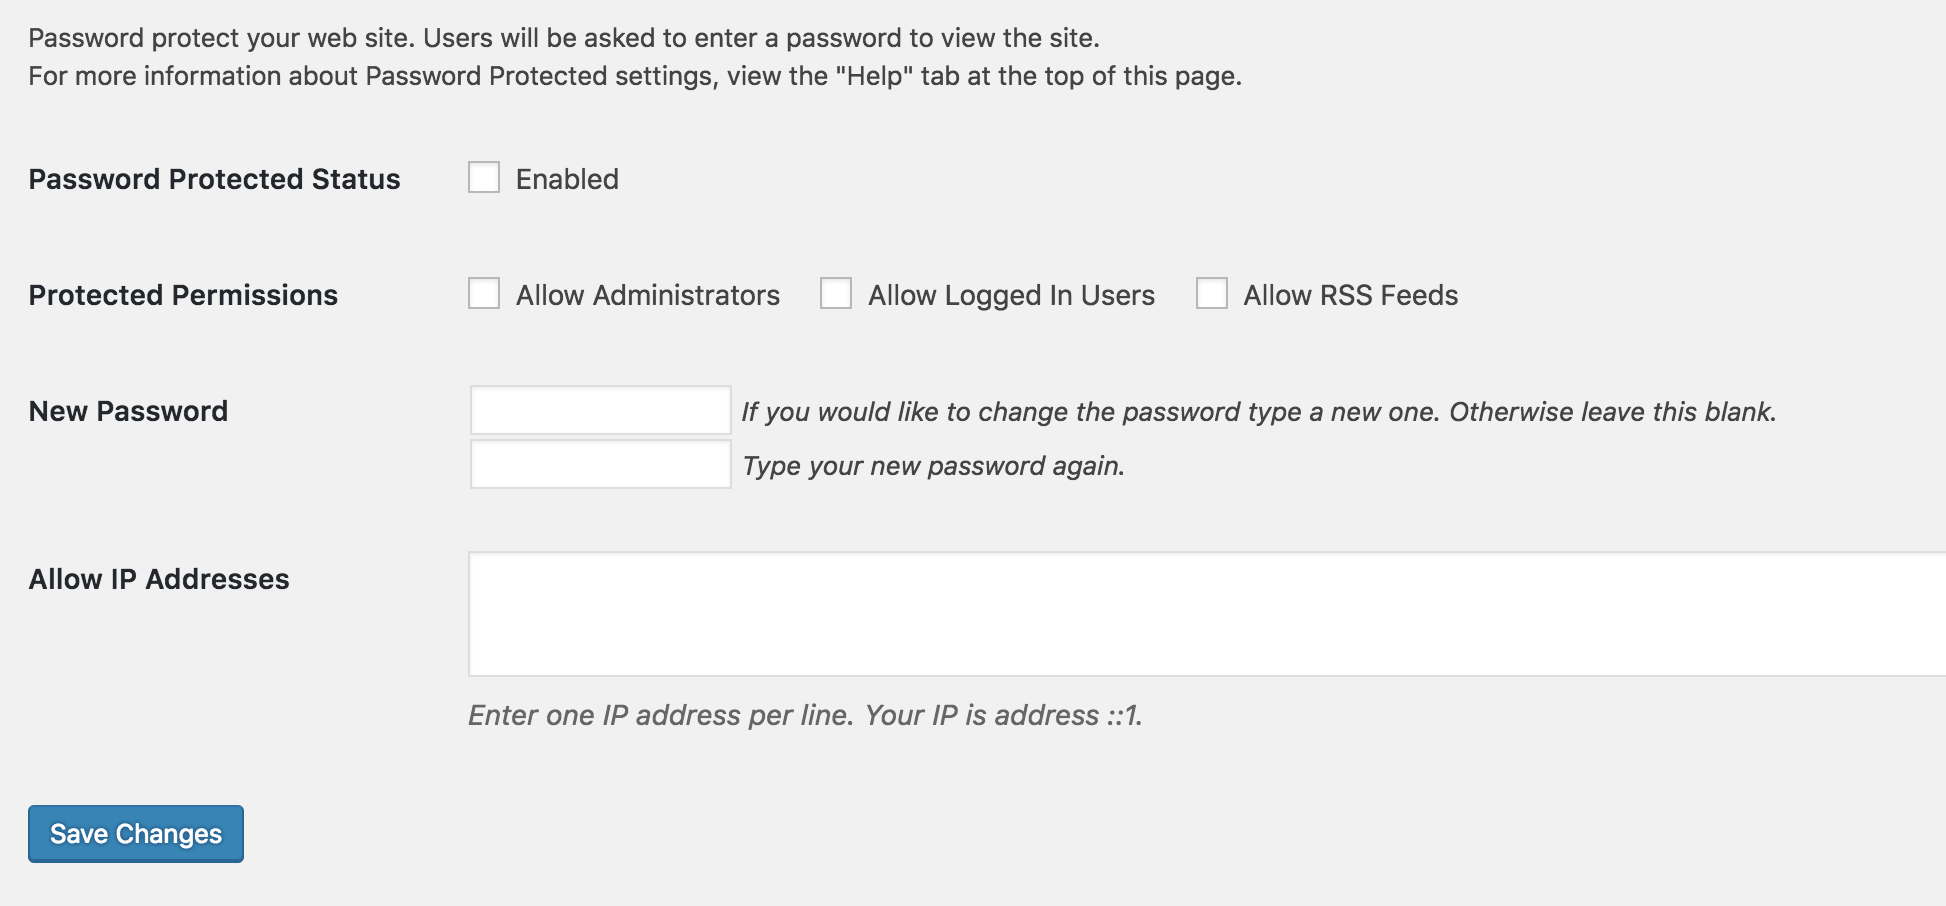
The first checkbox is used to enable password protection or not.
In fact, even if we activate the plugin, to make it working we must have this entry activated.
The second entry is used to enable the various roles and to avoid letting them enter the password continuously (enable administrators or all authenticated users).
Then we have the creation of the password and the field to indicate the possible IP address.
For example, you could enter the one in your office or home, to keep your password from being asked every time you're there.
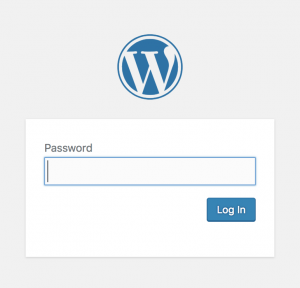
Having done this, the user is faced with a login form consisting only of the password.
All these solutions so far proposed are those that we call “quick and dirty” in jargon.
The intent was to meet a need in the shortest time without wasting too much time or upsetting your WordPress site.
Now let's analyze something more specific, a system equipped with all the necessary tools to be able to have a reserved area in a single WordPress site.
Create a restricted area with a Membership plugin
If the heart of your site is based on a real protected area, for which you want to have complete control of “who sees what”, even on the same page, then you need a plugin for Membership.
A membership plugin, as the word itself says, creates a structure based on members of certain groups (that is, membership, not to be confused with roles).
Each membership can be assigned rules for which users who are part of it see certain content or be blocked, unless they move on to the next membership.
Through a plugin to Membership you will be able to receive payments to ‘ subscribe ‘ to your site.
You can have different types of subscriptions, for example “Basic, Normal, Professional” or other names that your creativity will lead you to create.
Ludjon, who co-founded Codeless, possesses a deep passion for technology and the web. With over a decade of experience in constructing websites and developing widely-used WordPress themes, Ludjon has established himself as an accomplished expert in the field.


Comments
Restrict forms to members You can restrict forms to only logged in users which is ideal for membership sites. 0 Businesses can also use this to restrict support to paying customers.