There are many ways to change the font in WordPress. This article will explore what font means and how you can change the font in WordPress.
Your WordPress website is a part of who you are, and the text font you use will play a critical role in your site's overall brand identity and design. It can also help you improve your content's readability ratio and make your site appear professional and modern.
You can't change the font on your WordPress blog on a whim. You have to be sure of what your changes will entail. Using the right font can save the reputation of your business by making you stand out among the competition, boosting brand recognition and user conversions.
The wrong font can make your business lose its credibility and looks pretty bad. Thus, you need to be meticulous when choosing or changing the font in your WordPress.
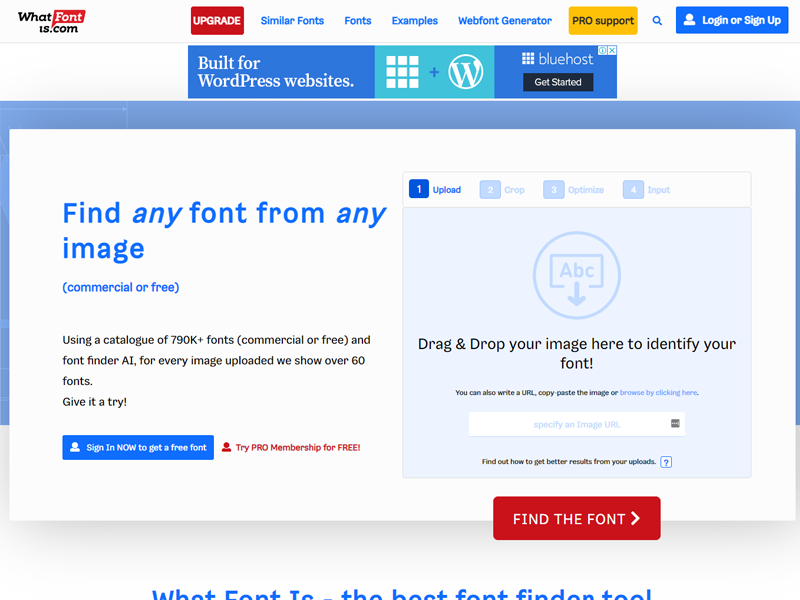
For more similar guides you can read our tutorial: How to Identify a Font: 5 Best Tools of 2023
Options to change fonts on WordPress
When changing your fonts, you can choose from either of the options below:
- The WordPress Site Editor
- The Global Styles Font Editor
- Changing Fonts With WordPress Customizer
- Using Font Plugins
- Using CSS Codes
- Add Google Fonts Manually
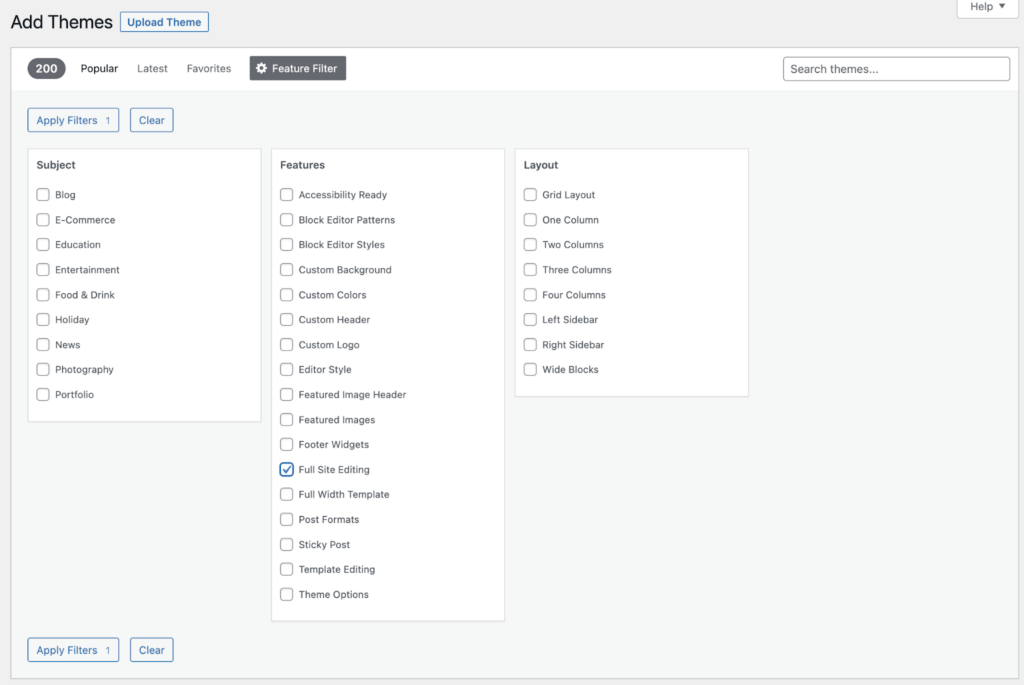
The WordPress Site Editor allows you to edit your website any way you want. With Site Editor, you can use blocks to edit your site's formation from the header to footers to sidebars and page content. Few websites have a theme that supports the WordPress site editor.
However, if your site has a theme that supports it, here is a simple step-by-step procedure for changing your font using the WordPress site editor.
If you want to access your Site Editor, you must use a block theme that uses blocks to navigate the website.
Using the WordPress Site Editor
Step 1: Log in To WordPress
Log in to WordPress with your username and password. Don’t forget to tick the Remember me box so you don’t get logged out after a while.

Step 2: Access Your Dashboard
After logging in and accessing the WordPress admin panel, you'll see an Appearance icon on the left-hand side of your dashboard. Hover the cursor over Appearance and click on the Editor option.

Clicking on Editor will open up your WordPress Site Editor.
Step 3: Navigate Your Site Editor Page
A white and black semi-circle box indicates your Style icon at the top right corner of your Site Editor page. Click on this icon, which should show you a couple of options.

Step 4: Choose Your Typography
After clicking on the Style icon, choose Typography, check for the font you want, and save it.

Step 5: You can also choose Text or Links if you want to change every font on your site.

Choosing text will take you to the screen with the font family, size, line height, appearance and other additions to your font.

The Site Editor gives you an easy, smooth and comprehensive method for changing fonts. It brings a new level of control to WordPress editing. You can change any fonts on your website with the Site Editor, including the footer, links, and headers.
The Global Styles Font Editor
Aside from using the WordPress Site Editor, you can use the Global styles font editor to change your fonts if your site has a theme that supports it. Below is a guideline to follow if you want to take this route.
Step 1: Add a New Page
After logging in and accessing your WordPress dashboard, click on the Pages icon. Then, You can either click on an existing page or the Add New Page tab. Doing this will give you access to your WordPress Editor page.

Step 2: Navigate to the Global Styles tab.
On your WordPress Editor page, you’ll see the Global Styles tab, which appears as an Aa icon. Clicking on the icon will bring a drop-down menu for Font Selection. On the Font Selection tab, you’ll see various font options you can select from, such as Base Font and Header Font.
For example, choosing the Heading Font will change the font of all the headings on your website. Headings can include posts, widget titles, comment headers, post headlines, and image titles. Choosing the Base Font will change all the fonts of the text in menus and main body texts on the website.
After choosing your preferred fonts from the dropdown menus, any changes you make should take effect immediately. You should reload your preview page to see your new fonts on your website.
Additional Step: You can adjust the font size using the Block Editor.

Using the Block Editor will make it easier to change the font size between the blocks on the site. You can choose freely between H1, H2, H3, etc., for your headings.

Changing Fonts With WordPress Customizer
While trying to publish your website for the first time using WordPress, you might have noticed discrepancies between the default customizers you were given and the customization options you heard about.
Changing your font with the WordPress customizer is one of the most user-friendly and convenient options. The customizer allows you to play around with the design and style of your fonts and page layout.
If you are interested in using the WordPress customizer to change your font, below is a step-by-step technique on how to do that.
Step 1:
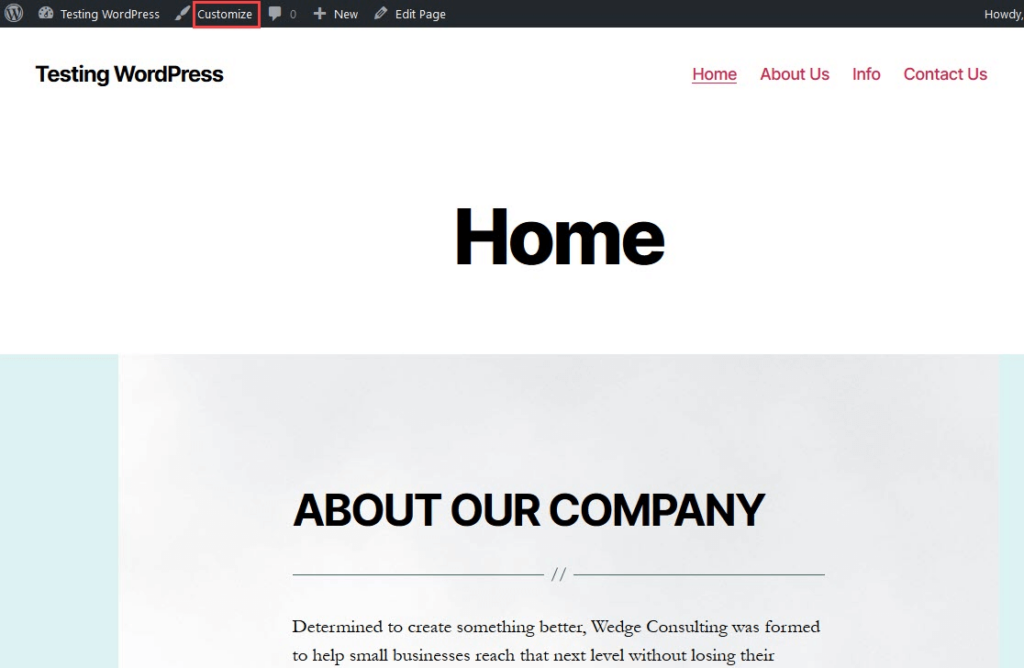
There are two ways you can access the customizer page after logging in to WordPress. You can click on the Appearance tab and select Customize, or you can click the Site Name and select Customize. Whichever route you take will take you to the customizer page.
Or

Step 2:
After selecting the customize tab, you will notice some drop-down options on the left sidebar menu. Click on the Fonts option.

Note that some website themes don’t support the customizer option. If your website is like that, you can choose from the other options in this guide.
Step 3:
Once you click on the Font tab, you can make all necessary font changes. For example, you can change the Headings and Base Font to suit your taste.

If you want to change the font size,
To change the font style for your headings, click the option to the left and below the font. There are various styles available depending on the font you choose.
You will be shown a live preview of your font as you click through the font options.

Note: On WordPress.com, you can change the Base fonts and Headings. You can change your blog's font, headings, and general lettering if you have a self-hosted website.
All you have to do in either case is select the fonts from the drop-down menus and, when you are done, click Save Changes at the top. This change will reflect on every page of your website.
Step 4: When you're satisfied with the fonts you've chosen, Publish your website, or save it as a draft if you want to make more changes later.
You can also reset fonts by clicking the X beside the custom fonts.

Customizer has a few setbacks, even though it provides a quick and easy way to change the fonts used throughout your WordPress website. To start with, it has limited font options.
Second, it loads fonts gradually as the page loads, which may cause a noticeable change to your website. Also, visitors may find this weird. It will reduce their experience with your website.
Using Font Plugins
Font plugins make it easy to change your fonts. You can install plugins on your website. WordPress makes it easy to change your website’s font when using plugins. Some of the plugins you can install are Google Fonts, Custom Adobe Fonts, OMGF, etc.
Many of these plugins allow you to manually add your fonts to your site. When checking out for plugins to choose from, check the ratings, the good comments and the response from their developers. You can delete or deactivate a plugin after testing. This will help you to choose the best plugin to work for you.

It would be best if you were on the WordPress Pro plan to use some plugins if you are going to use WordPress.com
Change Fonts with Google Fonts
One of WordPress's best tools for changing fonts today is Google Fonts. It grants you free and complete access to many fonts to choose from. You can give your website a fantastic look from the various categories of fonts available on Google fonts.
Easy Google Fonts plugin is the most widely used and popular plugin for changing fonts in WordPress. This plugin makes it easier for you to change your WordPress font and directly connects your website to google’s database.
The first step to using google font to change the font in WordPress is downloading the Easy Google Fonts Plugin from WordPress.org and installing and activating it. After installing and activating the plugin, go to the settings tab and browse through the list of font styles available. Select the font style you want and take note of its style and name.
The next step is to go back to your WordPress dashboard, click on the Appearance tab and go to Customize. On the Customize menu, there will be a new Typography option there. This option appears after you have installed the plugin.
In the new typography menu, you’ll find all the google fonts you need for your site. You can choose the font you searched for and wrote down from the plugin menu earlier.

Using CSS Codes
CSS is another tool you can use to change fonts in your WordPress. The various ways you can change your WordPress font using CSS will be explained below.
Through The Theme’s CSS Stylesheet
You will need tools like Font Pair and Web Font Blender to access your selected fonts.
Step 1: To edit the theme’s stylesheet, scroll down on the appearance menu and click on Editor.
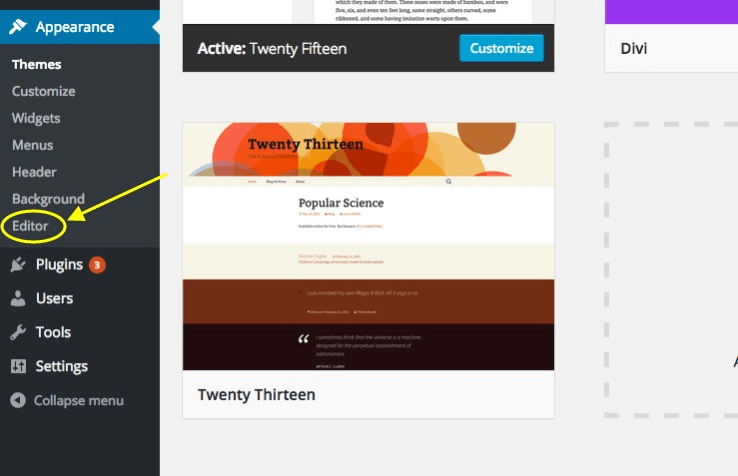
Step 2: After clicking on the Editor tab, you should see a list of options on the right side of the screen. Click on Stylesheet under the Styles option.

Or
You can copy the Stylesheet code as seen below:
@font-face {
font-family: ‘Raleway';
src: url( “fonts/Raleway-Medium.ttf”) format(‘woff’); /* medium */
font-weight: normal;
font-style: normal;
}

@font-face {

font-family: ‘Raleway';
src: url( “fonts/Raleway-Bold.ttf”) format(‘woff’); /* medium */
font-weight: bold;
font-style: normal;

}

@font-face {
font-family: ‘Merriweather';
src: url( “fonts/Merriweather.ttf”) format(‘woff’); /* medium */
font-weight: normal;
font-style: normal;
}
Step 3: Once you have the CSS Stylesheet, you can edit the font globally by entering the line of code with the font on top of your stylesheet.
E.g. * {font-family:”Garamond New”} or * {font-family:”Courier New”}

This is just one of the many ways to change WordPress fonts globally using CSS.
To change the font for specific theme areas, such as the input, body or button, you must have identified the code snippets in the CSS Stylesheet.
To change the font used in the body of your blog post, you’ll have to identify where the body’s font style is defined. Both of these processes can be very painful.

Or input the code below:
function add_my_font() {
wp_enqueue_style( 'add_my_font', 'https://fonts.googleapis.com/css2?family=Oswald:wght@200;700&display=swap', false );
}
add_action( 'wp_enqueue_scripts', 'add_my_font' );

and add in style.css this line of code to load the font for body and the headers
.body, .h1, .h2, .h3, .h4 { font-family: 'Oswald', sans-serif; }
Also here you have a full guide on how to add local fonts to your WordPress Theme
Add Google Fonts Manually
Step 1: The first thing you need to do is to copy and paste the codes for your WordPress theme files. Then, go to the Google Fonts library to select the font you want.

Step 2: For each chosen font, use the + select this style button to select the font style you want to use on the blog. Then, click on the Embed tab in the sidebar to copy the code for that font style.

Your website’s theme might not support the font you're looking for. If this occurs and you don’t like page builders or are unfamiliar with coding, a dedicated font plugin is your best bet.
You can choose from two types: the “uploaders” and font embedding plugins. Plugins that embed fonts in your website do this by drawing from specialized directories like Google Fonts. An example of such a plugin is Google Fonts Typography.
You can edit the header.php file of the theme and paste the code before the <body> tag, as indicated in the image below. You can also install the WPCode plugin to make it easier.

Click on save changes once you are done to ensure all changes you made are saved.
You might be interested in learning on how to add a custom font in Revolution Slider Plugin: How to add a Custom Font in Revolution Slider
What Do Fonts Mean?
Most people view fonts as typefaces. However, the two couldn't be more different despite some similarities. A font is a set of displayable or printable text characters or typography in a specific size and style.
Every font has its unique purpose and personality and can be used to display readability while emphasizing a particular feeling or idea.
On the other hand, a typeface is a style of text design that constitutes a myriad of text characters of varying weight and size,
Examples of Some Common Font Styles
There are an unlimited number of font styles available for use nowadays. Aside from the free, ready-made fonts, graphic designers also often design their fonts for use. Below are two of the most common font styles in use today.
Serif fonts
Serif fonts are some of the old fonts. Their advanced age is frequently associated with a classic, romantic, elegant, formal, and established mood. Popular serif typefaces include Times New Roman, Georgia, and Garamond.
Serif fonts have a traditional appearance and are commonly used in printed books and newspapers. Serif fonts are those with small lines on the edges of the characters. Because the word “sans” means “without,” sans-serif fonts lack these extra lines.
Sans-serif fonts
Sans-serif fonts have a more modern look and are commonly used online. They are described as “sans,” which means “without,” because they lack the strokes that distinguish a serif typeface. Sans serif fonts help denote neatness, simplicity, approachability, or modernity.
Why do you need a new font?
Choosing a font is an excellent way to give your website a distinct appearance. There are numerous reasons for changing fonts, but most boil down to a few simple preferences. You most likely want to be noticed, make an impression, or stand out.
A font cannot usually do any of these things on its own, but when combined with other design elements, it can make a significant difference. You should use a different font than the default font for a theme or starter website.
Almost all WordPress themes include changing font, font size, and color options. These options, however, are unique to each theme. When changing the font on a WordPress site, the built-in typography settings of your theme are the quickest and best place to start.
If the theme you choose has a few customization options, try one of the other options in this guide. You will get different options based on the themes you use. Some themes make it easy to customize yourself, and others will require you to use advanced options.
Font selection, in particular, has two significant effects on web design. First and foremost, it is necessary for usability. If you use a difficult-to-read font on your website, it will need help to achieve its main goal of informing visitors.
The legibility of your font will determine whether visitors stay on your website and learn more about your brand or leave in frustration and visit a competitor's site. It also impacts how accessible your website is because users with dyslexia or visual impairments may struggle to understand small print or complicated scripts.
Fonts set the right tone for your website. Font selection has a second effect on how well-designed your site is regarding branding. Although we frequently focus on the content of text-based content, it is also prudent to examine it from a visual standpoint.
Final Words
Fonts are a way to recognize your website. Just as identity is to a person, font is to a person. Deciding to change your WordPress font means that you want something different, and you are willing to improve your website’s typography. As you have learned in this guide, you can change your fonts using different options.
The manual options are easy to access and do not require prior knowledge. Google Fonts and other plugins also allow you to have seamless transitions between fonts. Changing your font with CSS codes will require a bit of technical knowledge.
This guide has been helpful to you. Why not start changing your fonts today?
As one of the co-founders of Codeless, I bring to the table expertise in developing WordPress and web applications, as well as a track record of effectively managing hosting and servers. My passion for acquiring knowledge and my enthusiasm for constructing and testing novel technologies drive me to constantly innovate and improve.
Expertise:
Web Development,
Web Design,
Linux System Administration,
SEO
Experience:
15 years of experience in Web Development by developing and designing some of the most popular WordPress Themes like Specular, Tower, and Folie.
Education:
I have a degree in Engineering Physics and MSC in Material Science and Opto Electronics.




Comments