- Understanding the Warning
- Verify the Server’s Identity
- Solution 1: Remove the Old Host Key Manually (Windows, Mac, Ubuntu)
- Solution 2: Clear the Entire known_hosts File (Windows, Mac, Ubuntu)
- Solution 3: Ignore the Host Key Check Temporarily (Windows, Mac, Ubuntu)
- Solution 4: Add the New Host Key Manually (Windows, Mac, Ubuntu)
- Solution 5: Check for DNS or IP Address Changes (Windows, Mac, Ubuntu)
- Best Practices to Avoid This Issue in the Future (Windows, Mac, Ubuntu)
- Conclusion
When you attempt to connect to a remote server using SSH, you might come across the error message: “Warning: Remote Host Identification Has Changed!”. This message is a security feature that SSH uses to protect you from man-in-the-middle attacks, where a third party could intercept your communication with the server.
In simple terms, this warning tells you that the server’s fingerprint (a unique identifier stored on your local machine) does not match what SSH has previously recorded. It could be a legitimate change, such as the server being reinstalled or its IP address changing, but it could also signal a potential security threat. SSH blocks the connection to protect your system until you verify the server’s authenticity.
In this article, we’ll walk through how to safely resolve this issue on Mac, Ubuntu (Linux), and Windows systems, ensuring you can continue connecting securely without ignoring potential risks.
You might be interested in reading: How to fix Error Permission Denied (Publickey)
Understanding the Warning
Why Does the Warning Appear?
SSH stores a fingerprint of the remote server’s key in a file called known_hosts on your local machine. This fingerprint is used to verify that you’re connecting to the same server each time you use SSH. If the server’s fingerprint changes, SSH will show you the warning because it can’t be certain if the server’s identity has changed legitimately or if someone is attempting to intercept your connection.
Common Scenarios for the Warning:
- Server Reinstallation or Upgrade: If the server has been reinstalled, reset, or upgraded, it might generate a new SSH key, which won’t match the one stored in your
known_hostsfile. - IP Address Change: If the server’s IP address has changed (e.g., due to moving to a new hosting provider or network), SSH might flag this as a suspicious change.
- DNS Changes: If there are updates or misconfigurations in the server’s DNS records, SSH might interpret this as a different server.
- Server Configuration Changes: Sometimes, server administrators change their SSH key configuration, resulting in a new key that doesn’t match the previous one.
- Potential Security Threat (Man-in-the-Middle Attack): The warning could be a signal of someone attempting to intercept your connection to the server. If you’re unsure about the changes, it’s essential to verify the server’s identity before proceeding.
The Role of the known_hosts File:
The known_hosts file is where SSH stores information about remote hosts you’ve previously connected to. The file is typically located in the ~/.ssh/ directory on Mac and Ubuntu, and for PuTTY users on Windows, it stores host keys in the Windows Registry.
Verify the Server’s Identity
Before making any changes to resolve the “Remote Host Identification Has Changed!” warning, it’s crucial to verify whether the server's identity has legitimately changed. This step ensures that you’re not falling victim to a man-in-the-middle attack.
Why You Should Verify the Server's Identity First
Ignoring this step could result in connecting to a compromised or malicious server, which could put your data or credentials at risk. Always treat this warning seriously, especially if you’re unsure about recent changes to the server.
Steps to Verify the Server’s Identity:
- Contact the Server Administrator: If you’re not the one maintaining the server, reach out to the administrator or hosting provider and ask if any recent changes were made, such as an IP address change, server reinstallation, or key regeneration.
- Compare the Host Key Fingerprint: Use the following command to check the server’s host key manually:
ssh-keygen -lf /etc/ssh/ssh_host_rsa_key.pubThe output will show the host key fingerprint, which you can compare to the one in your
known_hostsfile or request from the server administrator.
Solution 1: Remove the Old Host Key Manually (Windows, Mac, Ubuntu)
For Mac and Ubuntu (Linux):
- Open the terminal.
- Open the
~/.ssh/known_hostsfile using a text editor:nano ~/.ssh/known_hosts - Search for the line that corresponds to the remote server’s hostname or IP address.
- Delete the line that contains the old host key.
- Save the file and close the text editor.
- Reconnect to the server using SSH:
ssh <username>@<hostname>
Automated Removal (Mac and Ubuntu):
Instead of manually editing the known_hosts file, you can use the following command to remove the old host key automatically:
ssh-keygen -R <hostname or IP>For Windows (Using PuTTY):

- Open PuTTY.
- Press Windows + R, type
regedit, and press Enter. - Navigate to the registry path:
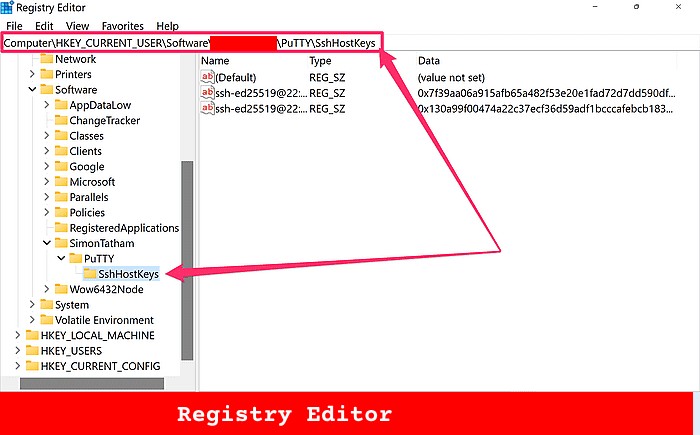
HKEY_CURRENT_USER\Software\Myusername\PuTTY\SshHostKeys - Locate the entry associated with the remote server’s hostname or IP address.
- Right-click on the entry and select Delete.
- Reconnect to the server in PuTTY, and it will prompt you to accept the new key.
For Windows (Using Git Bash):
- Open Git Bash.
- Run the following command:
ssh-keygen -R <hostname> - SSH will prompt you to accept the new key the next time you connect.
Solution 2: Clear the Entire known_hosts File (Windows, Mac, Ubuntu)
For Mac and Ubuntu (Linux):
- Open the terminal.
- Run the following command to remove the entire
known_hostsfile:rm ~/.ssh/known_hosts - Reconnect to the remote server using SSH:
ssh <username>@<hostname>
For Windows (Using PuTTY):
- Open PuTTY.
- Press Windows + R, type
regedit, and press Enter to open the Registry Editor. - Navigate to:
HKEY_CURRENT_USER\Software\SimonTatham\PuTTY\SshHostKeys - Right-click on the
SshHostKeysfolder and choose Delete. This will remove all stored host keys. - Reconnect to the server using PuTTY, and you’ll be prompted to accept the new host key.
For Windows (Using Git Bash):
- Open Git Bash.
- Remove the
known_hostsfile by running:rm ~/.ssh/known_hosts - When you reconnect to the server using SSH, you will be prompted to accept the new host key.
Solution 3: Ignore the Host Key Check Temporarily (Windows, Mac, Ubuntu)
If you need to connect to the server quickly and don't have the time to remove old host keys manually, you can temporarily bypass the host key verification. While this method works in a pinch, it is not recommended for regular use as it can expose you to potential security risks.
For Mac and Ubuntu (Linux):
ssh -o StrictHostKeyChecking=no <username>@<hostname>For Windows (Using Git Bash):
ssh -o StrictHostKeyChecking=no <username>@<hostname>For Windows (Using PuTTY):
- Open PuTTY.
- Navigate to Connection > SSH > Host Keys.
- Disable host key checking by selecting Always accept.
- Reconnect to the server without verifying the host key.
Solution 4: Add the New Host Key Manually (Windows, Mac, Ubuntu)
For Mac and Ubuntu (Linux):
ssh-keyscan -H <hostname> >> ~/.ssh/known_hostsFor Windows (Using Git Bash):
ssh-keyscan -H <hostname> >> ~/.ssh/known_hostsFor Windows (Using PuTTY):
Unfortunately, PuTTY does not have a direct equivalent for ssh-keyscan. To add the host key manually, you’ll need to connect to the server and allow PuTTY to prompt you for the new host key.
Solution 5: Check for DNS or IP Address Changes (Windows, Mac, Ubuntu)
For Mac and Ubuntu (Linux):
nslookup <hostname>dig <hostname>For Windows (Using Git Bash):
nslookup <hostname>dig <hostname>For Windows (Using PuTTY):
- Open Command Prompt or PowerShell.
- Use the following command to check the DNS or IP address:
nslookup <hostname> - Compare the IP address in the output with what PuTTY shows in the registry.
- If the IP address has changed, delete the old host key from PuTTY’s registry by navigating to:
HKEY_CURRENT_USER\Software\SimonTatham\PuTTY\SshHostKeys - Reconnect via PuTTY, and it will prompt you to accept the new key.
Best Practices to Avoid This Issue in the Future (Windows, Mac, Ubuntu)
- Use Static IP Addresses: Configure your servers with static IP addresses to prevent unexpected changes that can trigger the warning.
- Regularly Clean or Update
known_hosts: Periodically review and clean up old or obsolete host keys. - Consider Using SSH Certificates: Use SSH certificates for scalable host key management, reducing the chances of this warning.
- Monitor for DNS or IP Changes: Keep an eye on changes to DNS records or IP addresses and update
known_hostsaccordingly.
Conclusion
The “Remote Host Identification Has Changed!” warning is an essential security feature in SSH that prevents unauthorized access by verifying the identity of remote servers. While it can be alarming, it’s important to take the necessary steps to verify the server’s identity before proceeding with any changes.
By using the solutions outlined in this article, you can safely resolve the warning whether you’re on Windows, Mac, or Ubuntu. Always remember to verify the server’s authenticity first, and then choose the solution that best fits your situation, whether it’s removing the old host key, clearing the known_hosts file, or bypassing the check temporarily.
Additionally, following best practices like using static IP addresses, regularly updating known_hosts, and considering SSH certificates can help minimize the occurrence of this issue in the future.
As one of the co-founders of Codeless, I bring to the table expertise in developing WordPress and web applications, as well as a track record of effectively managing hosting and servers. My passion for acquiring knowledge and my enthusiasm for constructing and testing novel technologies drive me to constantly innovate and improve.
Expertise:
Web Development,
Web Design,
Linux System Administration,
SEO
Experience:
15 years of experience in Web Development by developing and designing some of the most popular WordPress Themes like Specular, Tower, and Folie.
Education:
I have a degree in Engineering Physics and MSC in Material Science and Opto Electronics.


Comments