When creating content on your website, highlighting your most important content is essential to ensure it gets through the reader's eyes. You can add a featured post in WordPress using multiple options with your ease.
Research shows 38% of people will not engage with a website if the content is not up to the mark, so don’t leave your readers with unanswered questions. Add featured posts related to your existing content to keep the readers engaged.
This guide will teach you how to add a featured post to your WordPress website.
What is a Featured Post?
A featured post is a post that is highlighted in your post's pages. It is for showing new content or important content. Featured posts are typically used to showcase products, services, and more.
Why Should You add a Featured Post to Your WordPress Site?
The featured posts section of your WordPress site is a great way to display your best content. It helps ensure that your visitors can find the best content on your site and also help you earn more links from other sites.
Google and other search engines love featured posts because they make the content look in-depth and informative and educate the reader wholly about a topic. They also have a unique angle that distinguishes them from other posts on your website.
Featured posts give your site more credibility and authority in the eyes of search engines. This means pages with featured posts will rank higher in search results than others.
How to Add Featured Posts to Your WordPress Website?
You can feature a post using multiple styles. Here are our recommended options for adding featured posts:
- Using Gutenberg Blocks
- Using Menu
- Using Sidebar Widget
- Using Plugins
1. Using Gutenberg Blocks
The Gutenberg block is the easiest way to feature any post on your website.
Here’s what you need to do:
First, head over to the page where you want your featured articles to appear.
Step 1: To create a new WordPress block, Click the + button on the editing screen.
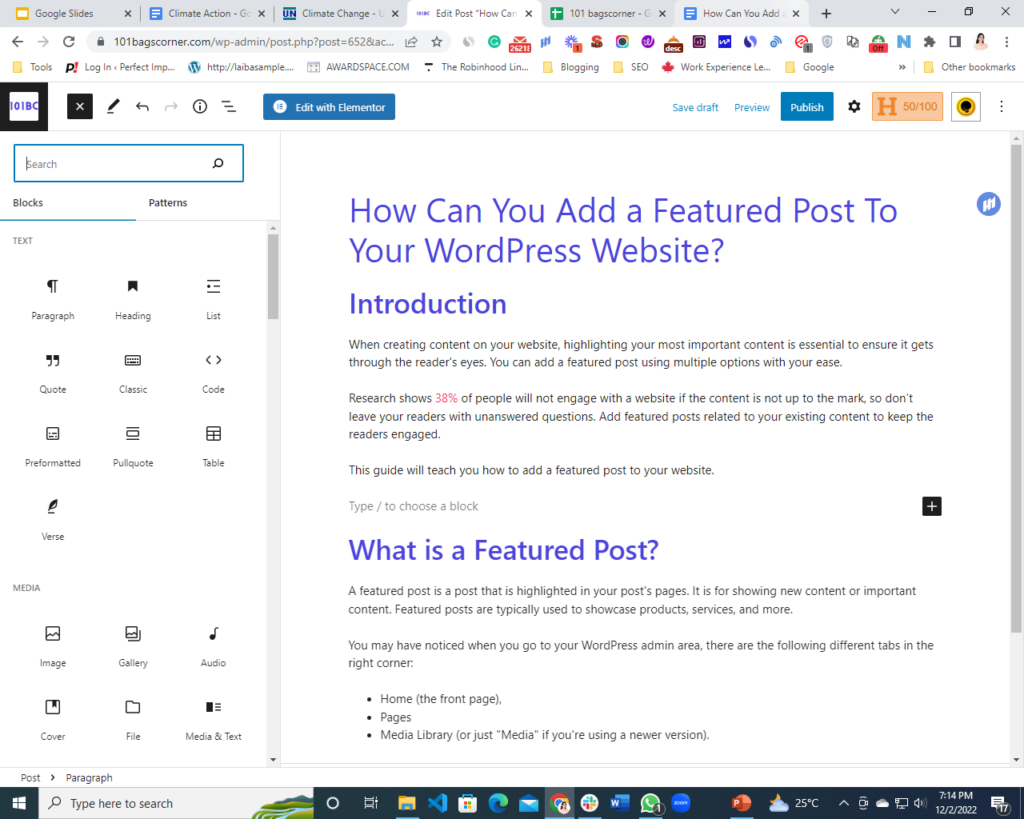
There will be a list of available blocks when you Click on the + sign.
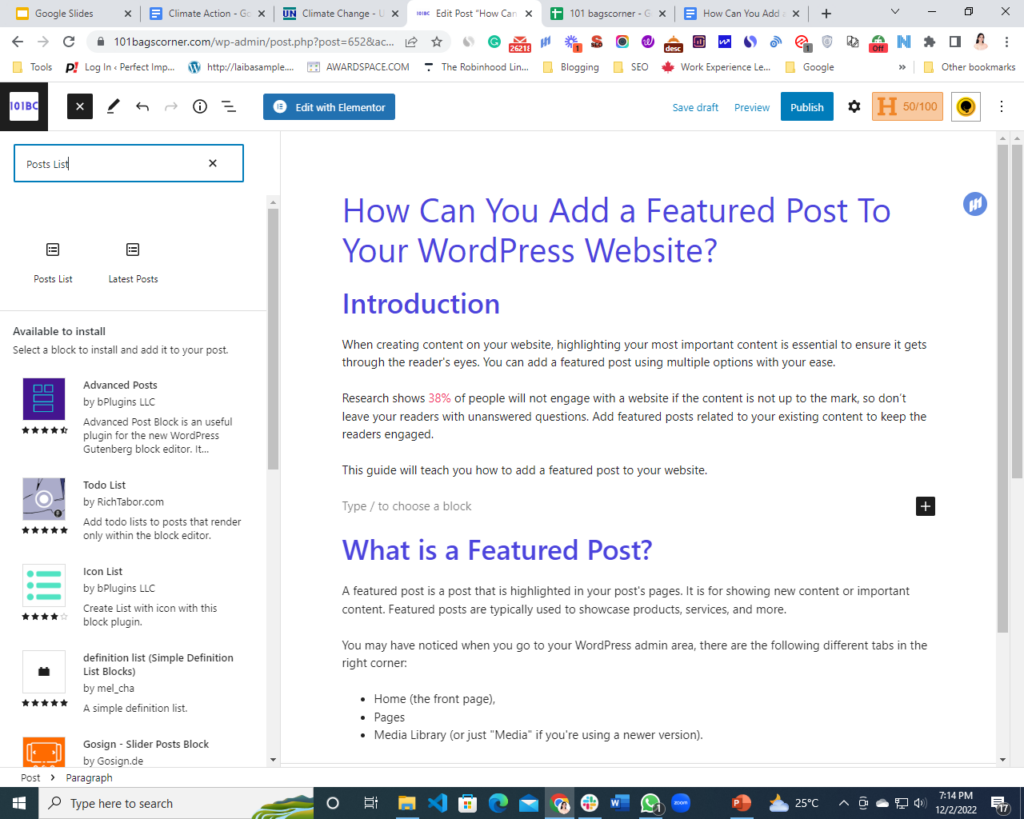
Step 2: From here, Choose Blocks >> Posts Lists. You can also type Posts List in the search bar and click the option to add it to your blog page.
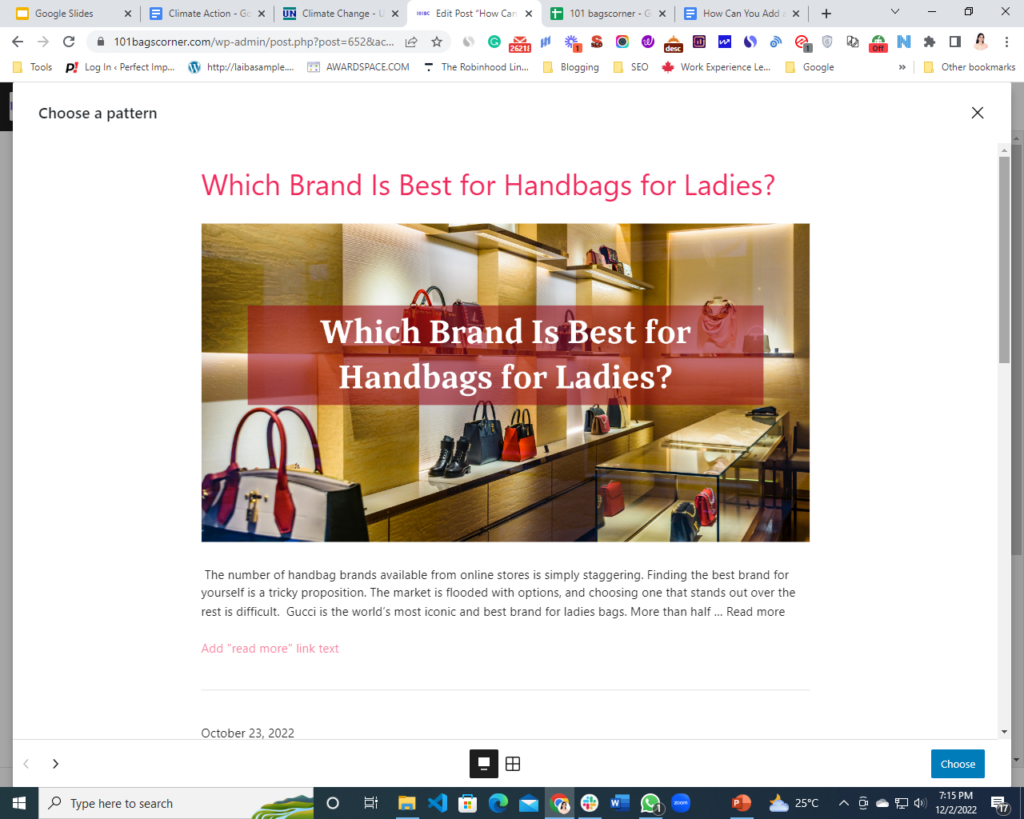
Step 3: Next, you’ve to choose a pattern from two available options, and that’s it. Your featured posts will appear in the article.
2. Creating Sticky Post Using Gutenberg Block
Sticky posts stay at the top of your blog page. Unlike ordinary posts, they will remain on your front page for as long as the sticky status is activated on the specific post.
Step 1: Head over to the posts tab and edit the post you want to feature at the top of your blog.

Look to the right-hand sidebar on the Gutenberg post edit screen. Your Document settings will be shown. Head over to the Status and Visibility tab.

Step 2: Next, checkmark the “Stick to the top of the blog.”

Step 3: After this, update your post, and that’s it.
Check your blog page, and you’ll find your post at the top.
3. Using Menu
Adding featured posts using the menu is also the simplest way to make your work quicker.
Here’s everything you need to do:
Step 1: You will have a “Create a new menu” option on the Appearance » Menus page. Select that option to start creating a new menu.

Step 2: Next, give your menu a name that will make it simple for you to remember it anytime you need to add it anywhere.
Step 3: After adding a name, press the “Create Menu” button to proceed.

You will now have a brand-new, empty menu created by WordPress.
Step 4: To enlarge the “Add Menu Items” window, you must now click on the “Posts” option in the left column. From here, you must choose the posts you want to feature. To locate and pick them, use the search feature.

Step 5: Click the “Add to Menu” button after choosing the posts you want to include.
Your posts will now appear in the right column, and you can edit them by clicking on each title. Additionally, you can reposition them by merely dragging them up or down.
Step 6: To save your changes, click the “Save Menu” button when you are finished.
Your menu is now accessible for use.
4. Use Sidebar Widget
The sidebar Widget helps you add featured posts without using any plugins on your website and all you need to do is explained below:
Step 1: Drag a List widget into your WordPress sidebar from the Appearance » Widgets page.

A visual editor with a few formatting buttons is included with this widget. You can add the names of the posts you wish to highlight as a list of bullets.
Step 2: Select the post title and then click on it to add a link to the blog post to add your featured posts as list items.
Step 3: You can give the featured list a heading by including a Heading widget just above the list.
Step 4: To enhance your formatting, you can combine the Heading and List widgets as a group, so they function as a single block. Selecting both widgets is as simple as clicking the Group icon. The next step is to choose “Group” from the pop-up menu.

Step 5: To save your changes, don't forget to click the “Update” button.
5. Using Plugins to Add Featured Posts to Your WordPress Website
You can use a WordPress plugin if you want a different approach and a more aesthetically pleasing list of featured posts. There are a variety of featured posts’ plugin alternatives available. Still, we'll use Featured Post Creative and Spectra
You can use any WordPress plugin if you want a different approach and a more aesthetically pleasing list of featured posts. There are a variety of featured posts’ plugin alternatives available.
Here we’re using the two most commonly used plugins to help you show featured posts in your blog without any hassle.
1: Using the “Featured Post Creative” Plugin
Using this plugin, you can place your featured post or list of featured posts using WordPress shortcodes.
Here’s what you need to do:
Step 1: First, download the plugin from the WordPress Plugin Directory. Head to Plugins > Add New in your WordPress dashboard. Find “Featured Post Creative“ by searching for it; it should be the first result.
To finish the installation process, click Install and then choose Activate.
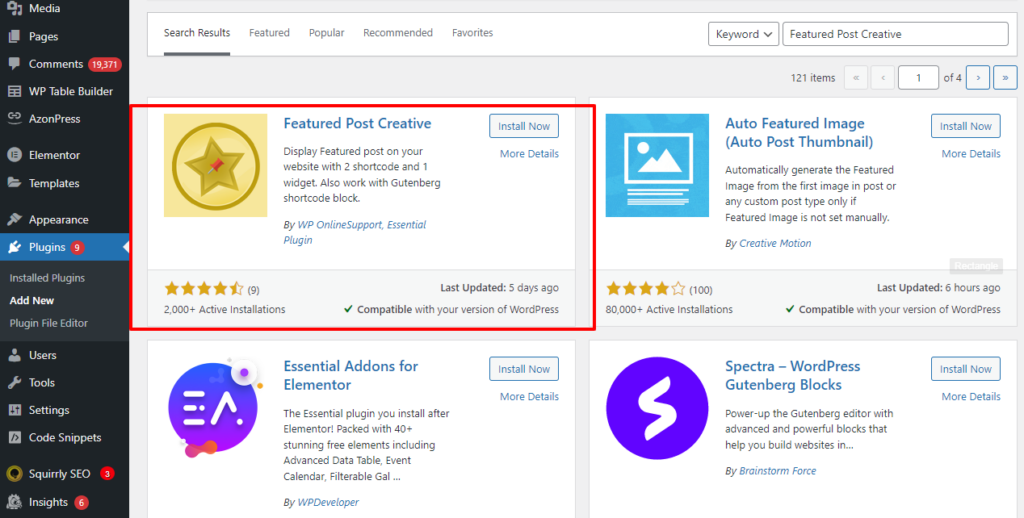
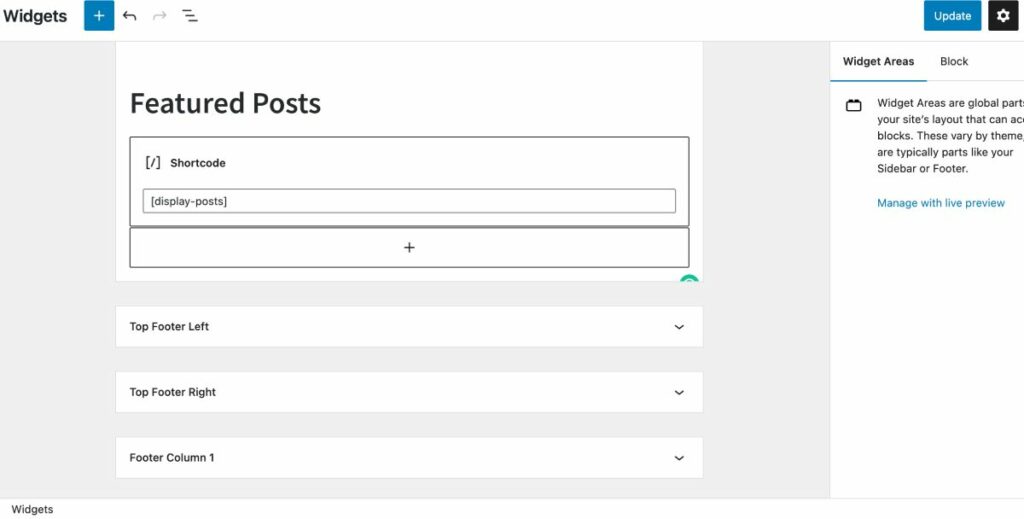
Step 2: The featured posts list is shown using shortcodes by the Featured Post Creative plugin. You'll need to use a text widget to add the list to a widget area like the sidebar.
To add the Text widget to the area where you want to display the list, go to Appearance > Widgets and choose it.
Step 3: To display your list, you can finally insert the proper Shortcode widget element and add the shortcode [display-posts].
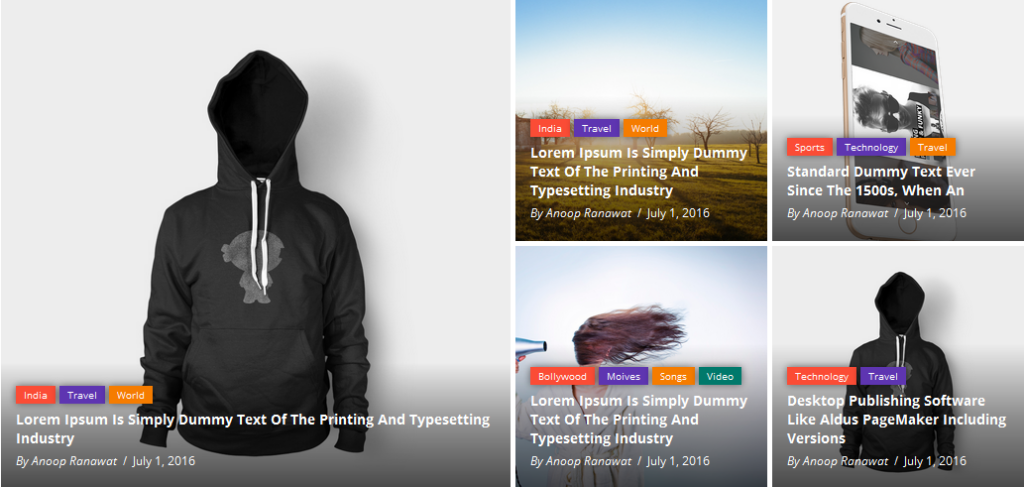
This is how your featured posts will appear after using the Featured Post Creative plugin:
2: Using “Spectra” Plugin
You can also use a plugin called “Spectra.”
Step 1: Install it from Plugins >> Add New by searching for Spectra. Rember to activate it.
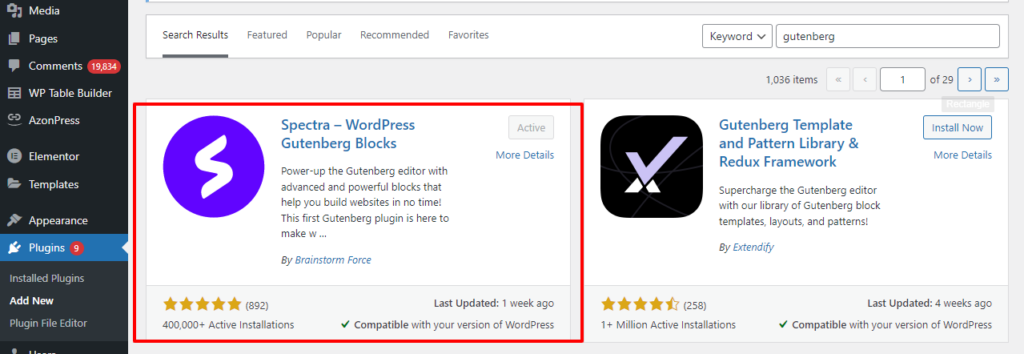
Step 2: Head over to the page where you want your featured articles to appear. To create a new WordPress block, click the + button in the top-left corner of the editing screen.
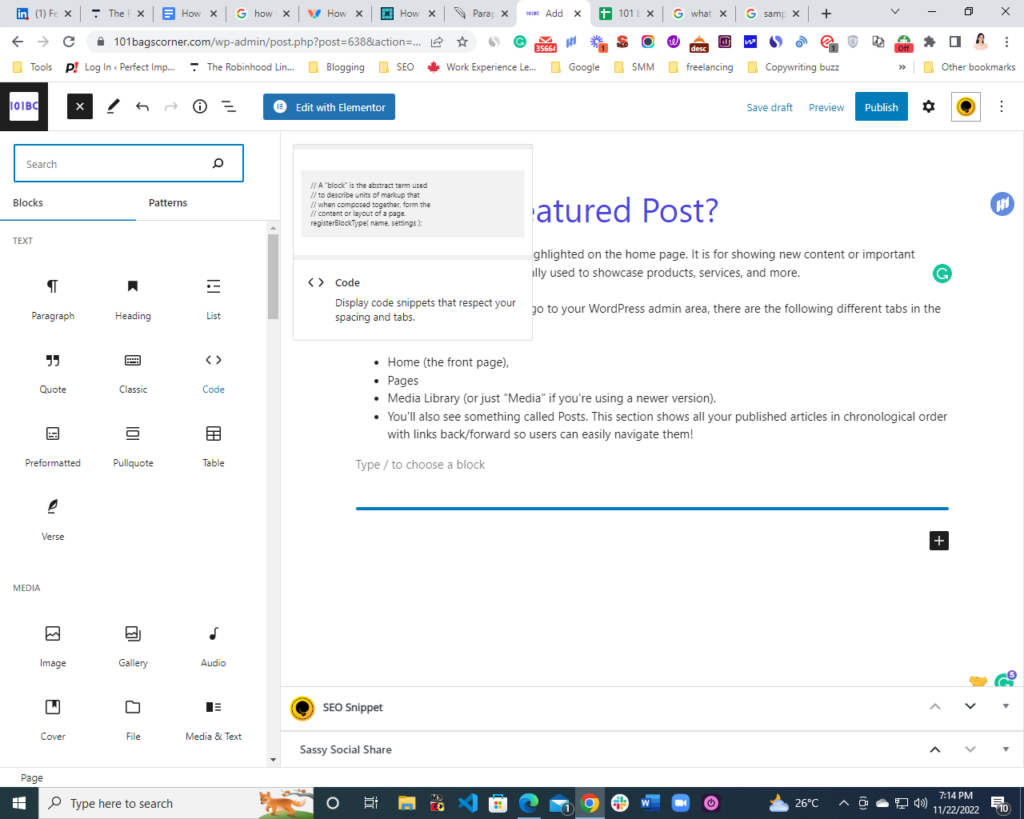
There will be a list of available blocks when you click on the + sign.
Step 3: From here, choose Blocks >> Post Carousel. By selecting the post carousel option, you can feature your best posts.
Step 4: Don't forget to click Publish or Update button.
Here’s how your posts will appear in an article.

FAQ
Using featured content, you may select some posts to showcase them distinctively. In a Featured Content area of specific themes, you can also place pages or portfolio projects in addition to posts.
You'll need to do the following steps:
Click Posts in your dashboard.
To add a post to a category, click on it.
The Category option may be found by expanding Post Settings on the right.
To designate a category for a post, choose the checkbox next to it.
To update the post with the modifications, click Update or Publish.
To open the editor, click the edit pencil in the post's top right corner. Then, click Set Featured Image. The options to select a picture from your website's Media Library, Google Photos, Pexels Free Photos, or Openverse will appear. After this, please choose your favorite image and save it as a featured image.
Conclusion
Featured content, whether product listings, articles, videos, or a combination of all of these, is a great way to drive new visitors to your site. Setup is easy and affordable with the plugins mentioned above.
Leveraging your content for increased traffic to your website is always a win for you and beneficial for your users.
You may be interested in similar guides:
How to Create a WordPress Website
How to Change Font in WordPress (Ultimate Guide)
How to Change Background Color in WordPress (Easy)
How to Reset a WordPress Password from phpMyAdmin
Laiba Siddiqui is an SEO Content Writer who’s helping Tech businesses build brand image through content. Her work has been featured on Hackernoon and Thrive Global.





Comments