If you're looking to give your WordPress website a new look and feel, installing a new theme is a great way to do it. In this guide, we'll walk you through the steps of installing a WordPress theme, from choosing a theme to activating it on your site.
Step 1: Choose a Theme
The first step in installing a WordPress theme is to choose a theme that meets your needs. A WordPress theme is a collection of files that define the design and layout of your website, including the colors, fonts, and page layouts.
There are many free and premium themes available for WordPress, and choosing the right one can be a daunting task.
Here are some things to consider when choosing a theme:

Purpose: What is the purpose of your website? Are you creating a blog, an online store, or a portfolio site? The theme you choose should be appropriate for the type of website you are creating.
Design: What design style do you prefer? Do you want a minimalist look, a bold and colorful design, or something in between? Make sure the theme you choose matches your design preferences.
Features: What features do you need on your website? Do you need a responsive design, custom page templates, social media integration, or other specific features? Look for a theme that includes the features you need.
Reputation: Look for themes from reputable sources like WordPress.org, Themeforest, or Codeless.co.
These sources have high-quality themes that are regularly updated and supported.
Marketplaces like ThemeForest offer a wide variety of premium themes to choose from. These themes are created by professional developers and designers and offer advanced features and customization options.
Premium themes are a great option if you are looking for a more polished and professional look for your website. Here you can also read about the differences between Premium Vs Free WordPress Themes
Codeless.co is a great example of a company that offers high-quality premium themes. We specialize in creating WordPress themes for a variety of industries, including business, e-commerce, portfolio, and blog sites.
Codeless themes are designed to be easy to use and customize and come with helpful documentation and support. With a Codeless theme, you can quickly and easily create a professional-looking website without having to write any code.
In summary, choosing the right theme is an important first step in creating a great-looking and functional WordPress site.
Take the time to consider your needs and preferences, and look for themes from reputable sources like ThemeForest or Codeless.co. With the right theme, you can create a website that looks great and works well for your audience.
Here are some of our collections of premium and free themes that can help you choose:
- Best Popular WordPress Themes
- Blog WordPress Themes
- Portfolio WordPress Themes
- Business WordPress Themes
Step 2: Download a WordPress Theme
After you have found the perfect theme, you can download it to your computer. There are two main options: free or premium.
Download Free Theme
To download a free WordPress theme, navigate to the official WordPress.org themes directory. Here you can browse through thousands of themes that have been reviewed and approved by the WordPress community.
Find the best free WordPress themes in our collection here.
Once you have found a theme that you like, simply click on the “Download” button. The theme will then be downloaded to your computer as a ZIP file.
Download a Premium WordPress Theme
If you decide to go for a premium WordPress theme, you will need to purchase it from a theme marketplace such as Themeforest.
These marketplaces offer a wide range of high-quality premium WordPress themes that come with additional features, functionalities, and support.
To download a premium WordPress theme from Themeforest, follow these steps:
- Navigate to Themeforest and search for the theme you want to purchase.
- Once you have found the theme, click on its thumbnail to view its details page.
- On the details page, click on the “Add to cart” button to add the theme to your cart.
- Follow the checkout process to complete your purchase and download the theme to your computer.
Once you have downloaded your chosen theme, you are ready to proceed with the installation process.
Step 3. Upload the Theme to WordPress
Now that you've downloaded the theme files, it's time to upload the theme to your WordPress site. There are two ways to do this: via the WordPress dashboard or via FTP (File Transfer Protocol).
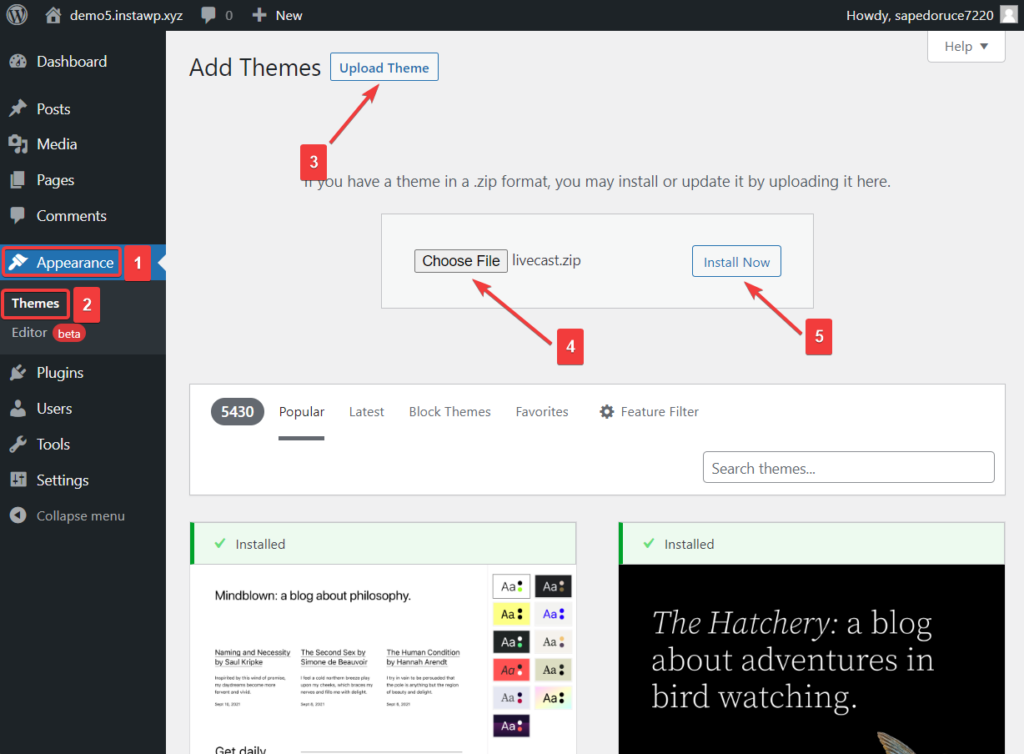
To upload the theme via the WordPress dashboard, go to Appearance > Themes > Add New. From there, click on the “Upload Theme” button and select the theme's ZIP file from your computer. WordPress will then handle the rest of the installation process.

To upload the theme via FTP, you'll need to connect to your site's server using an FTP client like FileZilla. Once you're connected, navigate to the wp-content/themes directory on your server. Then, upload the unzipped theme folder to this directory.
Troubleshooting tips for common upload issues
If you encounter any issues during the theme upload process, here are some troubleshooting tips:
- Ensure that the theme you're trying to upload is compatible with your version of WordPress.
- Check that the ZIP file you downloaded is not corrupted. If it is, re-download the theme and try again.
- If you're uploading via the WordPress dashboard, ensure that your server's PHP upload limit is not exceeded. If it is, you may need to increase the limit in your server's php.ini file or contact your web host for assistance.
- If you're uploading via FTP, ensure that the folder and file permissions are set correctly. The wp-content/themes folder should have a permission of 755, and theme files should have a permission of 644.
- “The uploaded file exceeds the upload_max_filesize directive in php.ini” error: This error occurs when the theme file is larger than the maximum file size allowed by your server's PHP settings. To fix this, you will need to increase the maximum file size allowed by your server. You can do this by editing the php.ini file or by contacting your hosting provider.
- “Are you sure you want to do this?” error: This error occurs when you try to upload a theme that is too large for your server to handle. To fix this, you can increase the maximum file size allowed by your server, or you can upload the theme via FTP.
- “Unable to create directory” error: This error occurs when WordPress is unable to create the necessary directories to upload the theme files. To fix this, you can manually create the necessary directories on your server, or you can contact your hosting provider for assistance.
By following these tips, you can ensure a successful theme upload and avoid any potential issues.
Step 4: Install the Theme
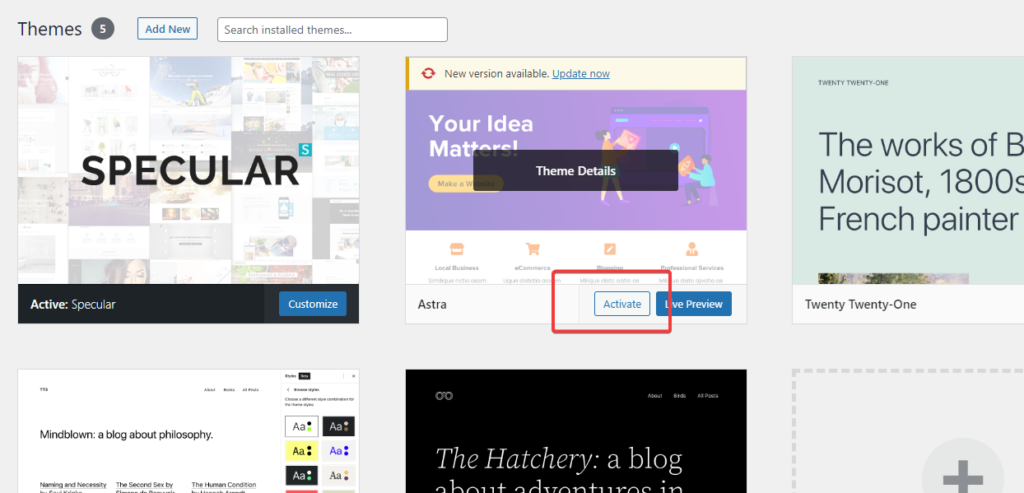
Once you've uploaded the theme, the next step is to install it on your WordPress site. To do this, navigate to the “Appearance” section in the WordPress dashboard and click on “Themes.” Here, you should see the theme you just uploaded.

To activate the theme, simply click on the “Activate” button. Once the theme is activated, you can begin customizing it to your liking.
The next step is installing the demo data of the themes: How to import Demo Data in WordPress
Tips for customizing and configuring the theme
The first thing you should do after installing a new theme is to review the documentation that comes with it. This documentation will provide detailed instructions on how to customize and configure the theme.
To customize the theme, you can use the built-in WordPress customizer tool. This tool allows you to make changes to various aspects of the theme, including colors, fonts, and layouts.
You can also configure the theme by installing and activating any recommended plugins that come with the theme. These plugins may be necessary to add additional functionality to the theme, such as contact forms or social media sharing buttons.
Finally, if you run into any issues while customizing or configuring the theme, be sure to check the theme's documentation for troubleshooting tips. You can also contact the theme developer or support team for further assistance.
By following these steps, you can successfully install and customize a WordPress theme, allowing you to create a unique and visually appealing website.
Step 5: Customize the Theme
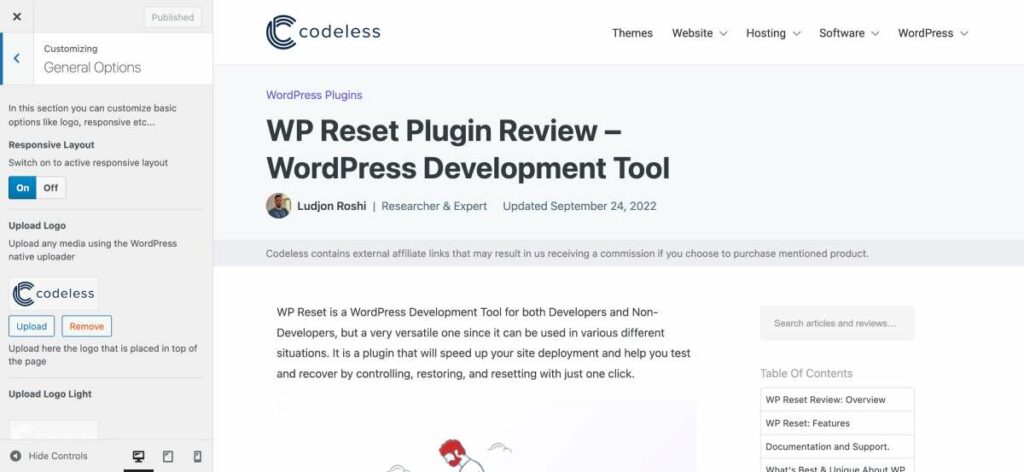
Once the theme is installed and activated, you can start customizing it to fit your needs. Most themes will come with their own customization options, which you can access by going to the Appearance > Customize section of your WordPress dashboard. From there, you can change the site title and tagline, upload a logo, change the colors and fonts, and more.

Read More: How to Create WordPress Website
Conclusion
Installing a WordPress theme is a simple process that can be completed in just a few steps. By choosing a theme that fits your style and customizing it to fit your needs, you can give your website a fresh new look and feel.
So, go ahead and start exploring the thousands of free and premium themes available for WordPress and give your website a much-needed makeover.
As one of the co-founders of Codeless, I bring to the table expertise in developing WordPress and web applications, as well as a track record of effectively managing hosting and servers. My passion for acquiring knowledge and my enthusiasm for constructing and testing novel technologies drive me to constantly innovate and improve.
Expertise:
Web Development,
Web Design,
Linux System Administration,
SEO
Experience:
15 years of experience in Web Development by developing and designing some of the most popular WordPress Themes like Specular, Tower, and Folie.
Education:
I have a degree in Engineering Physics and MSC in Material Science and Opto Electronics.


Comments