If you are looking forward to creating a professional email address for free, here are tips and guide for you. A business email address is not generic instead it uses the name of your company.
In this post, you will find a guide to use Gmail for WordPress emails. Google’s Productivity Suite (G Suite) allows you to create and use your professional email address.
Why do you need a professional email address?
An email address for your business uses your company name. Using a business email account without the domain name does not look professional at all. Anyone can easily create an email account with a generic name, thus it is hard for a customer to look for the originality of the account. Some of the reasons for why exactly you need a business account are followed:
- It helps you gain trust by proving to be a legitimate business.
- It looks more professional
- You can easily promote your brand with your email account.
There is no excuse for not getting it as you can have one absolutely free.
Method 1: Creating a Professional Email Address for Free
This is an easy method and is accessible for all the site builders. It lets you create a free professional email address. When you start creating a website for your small business, the primary requirement is signing up for webhosting and purchasing a domain.
Before starting with the website, let us tell you that most of the WordPress hosts offer free professional email in their package. The most reasonable web hosting starts with $7.99/month and the domain name costs about $14.99/year. You only need to pay an additional amount of $5 for a paid email address.
The best feature about the most recommended Bluehost as the WordPress hosting company is that it offers the WP users a free domain name and over 60% discount.
See, you can start your business website in only $2.75 per month. You can create a free business email address in the following steps:
Step 1. Setup a Domain name (Business address)

“Get started Now” from BlueHost will lead you to the pricing page to help you start with the domain name.
Here, click on the “Select” button to choose the right plan for you. Plus and basic plans would suit best for the small business start-ups.

After this, you will be directed to select your domain name. For this, add the name of your business and then click ‘Next’.
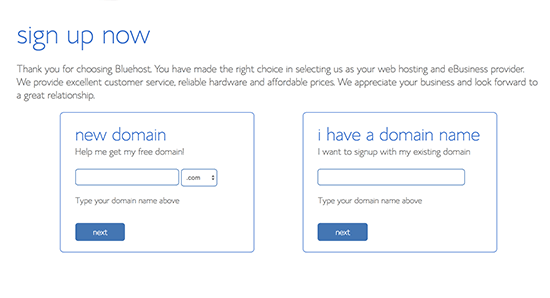
Bluehost will tell you if your chosen domain name is available or not. In case, it isn’t, you will get some suggestions to select from. We offer you some tips to choose a good domain name for your business.
- Your domain name should have a .com suffix.
- It should be short and easily pronounce-able and remember.
- Avoid using hyphens or numbers in the domain name.
- Using business location and keywords will make it more unique.
It is critical to choose a good domain name but avoid spending a lot of time in this. Now, add all the account information before finalising towards the complete process.
Here, you will have other options that ask you to purchase this. It is not necessary to choose them at this step because you can always add them later.
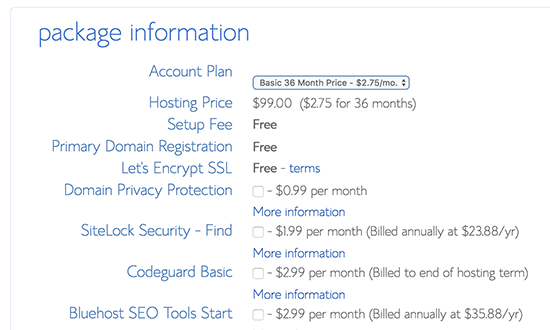
Finally, enter the information for complete payment and ending the purchase.
After completing the entire process, you will get a confirmation email to guide you login the control panel. This control panel will help you manage all the stings including business email accounts, and website management.
Step 2. Create a free professional email address
In the dashboard of your hosting account, click on the “email” option and then click “Add email Account” option:
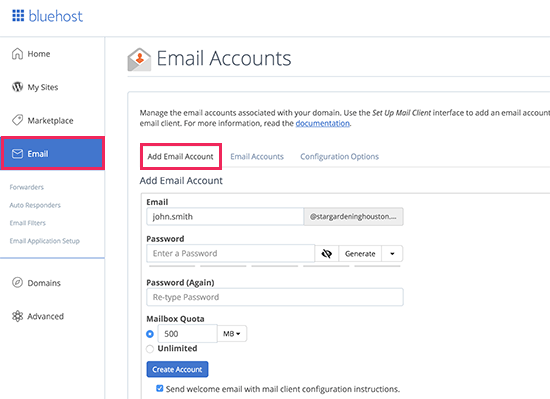
Here, enter your password with email for the email account and then move forward with the “Create Account” tab. Tadaa! Bluehost has created an email account for you and you will receive a confirmation notification as well.
Step 3. Use created email address
After creating your free email account, move ahead with the tutorial for sending and receiving emails. Your hosting account provides you an “email” option, click on the “Email Account” option here. You will find your email address there.
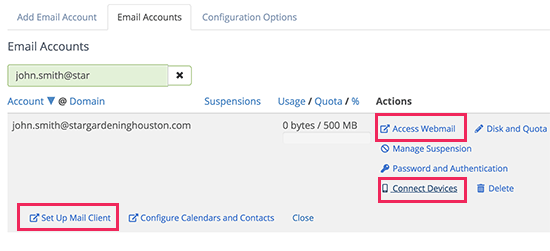
Click on the “access webmail” option and you will direct to the webmail interface. The major drawback with this option is that you will have to login every time you use your hosting account. Click on the “connect devices and then on the “set up mail client” option.
You will find the information for a professional email address which you can use to connect your email with any mail app including Gmail or Outlook in either desktop or phone.
Method 2: Using Google Apps for the business email address
You may have a question in your mind of why to set up Gmail with WordPress while most of the hosting sites offer their email accounts for free.
Using Google apps would be secure and reliable whereas other hosting sites are unreliable, less secure, isolated and restrictive. You will never get to know if your email is delivered or not. This is where WordPress Google apps play their part.
It uses your domain name on Gmail so that you can create your professional email address. Here are some of the advantages of using Gmail for WordPress emails.
- Works flawlessly with WordPress.
- 24/7 professional support without advertisements.
- Use voice and video calls, hangouts for chats and Google Calendar with your business account.
- Can easily sink with Outlook.
- The best part is no delaying, high deliverability and no spamming
Step 1. Creating a business email address with Gmail
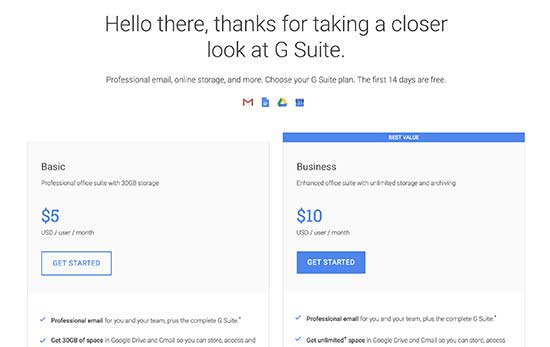
Sign up with G Suite, it costs $5/month each year. It costs $50/month if you pay annually. It also offers a 14-day trial period during which you can test-drive everything and decide according to your choice.
It includes all the commonly used features, i.e. Calendar, Drive, Gmail etc. But this time it’s for your business. Check for the most suitable plan for your website from the G Suite Website.
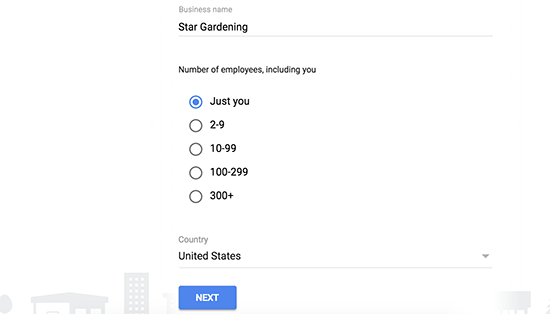
Next, enter your country, the number of your employees and the name of the business.
Click “Next” on this screen:
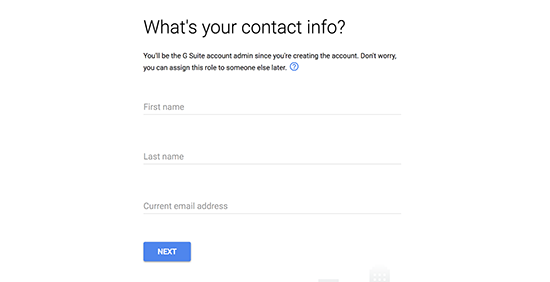
The next step will ask your personal information and contact details.
Next, choose a domain name. If you already have a domain name then check “Yes, I have one I can use.” If you want to register a new domain check, “No, I need one.” registering a new domain will charge you extra.
If you are using the existing one, then you will be directed to the verification process for the domain name.
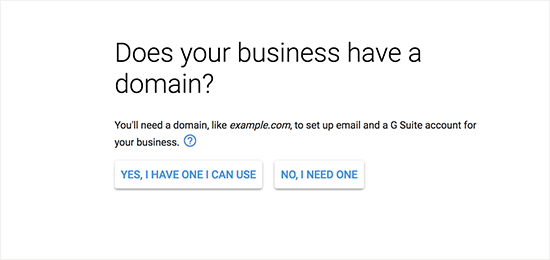
A new domain name would ask you to pay the registration charges for a new name. The cost of a new domain name is usually displayed and the lowest one is $14.99.
Step 2. Configure Google Apps (G Suite) with WordPress
Here, we will show you a step by step method of setting up Google Apps with WordPress.
First, you will be asked to verify the ownership of your domain name as soon as you start activating your professional email address. Next, you are required to build your Gmail user account. The username you used here will be your professional email address too.
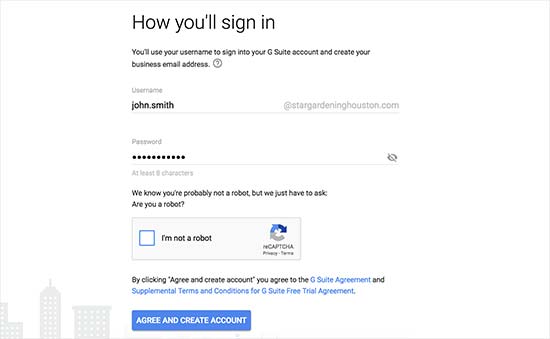
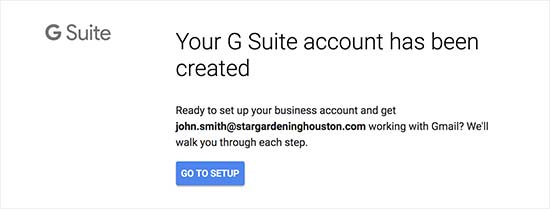
You now have your G Suite account. Now click on “Go to Setup.” From this screen, you can add more people and create accounts for your departments and employees.
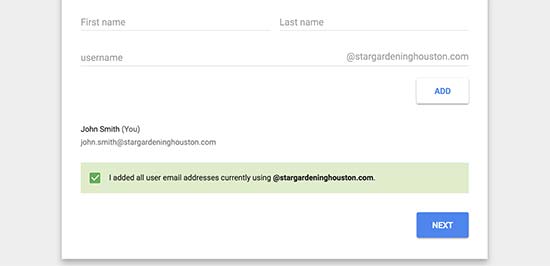
After adding all the user email addresses, click “next.” Now, you will get an HTML code snippet which you will need later in your WordPress website.
Step 3. Setting up Google Apps on WordPress
This is the final step of your G Suite setup and you can complete it by adding your domain and website names. Move to the setup screen where you can add more people.
You can create more email accounts for different departments and employees. Simply click on the “I have added all user email addresses” and then “Next”.
You can even add or create new user accounts later.
If your G Suite lies on the existing domain name, then you would need to verify the domain name. An HTML code snippet will help you to verify this.
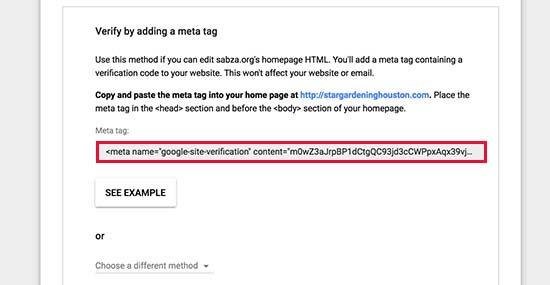
Your ownership can also be verified by uploading an HTML file with FTP file manager or client on to the website through the dashboard. Use MX record in case you do not have a website. Let’s assume you already have a WordPress blog.
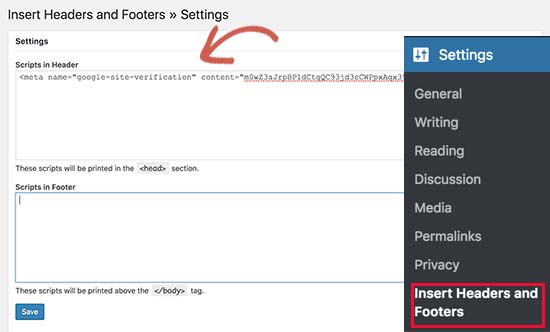
It would need you to switch to the admin area in WordPress with a new browser tab. Install and activate the plugin of “Insert Header and Footer.” Before that, you need to install a WordPress Plugin.
After activation, paste the HTML code of the G Suite from Settings>Insert Header and Footer under the “Scripts in Header.” “Save” to store these settings.
Now, go back to the setup screen of Gmail account and then check the tab with “I added the meta tag to my homepage.”
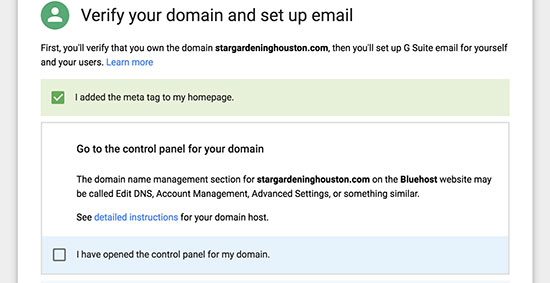
Next, you need to add MX record entries if you already have a domain name. If you have a registered domain name in Google, you do not need MX records.
Moreover, your emails will be restricted to your domain name if you are not registered with Google.
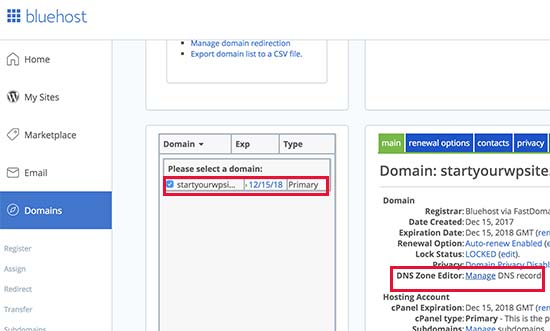
Google will receive and send you business emails when you have an MX record set rightly with your domain name. To add MX record you need to first log in to your domain host account and then click “Domains.” Now select the domain name and then “manage” option next to the DNS Zone Editor.
Now go back to your G Suite panel and select the checkbox saying, “I have opened the control panel of my domain name.” You will get your MX records with a documentation link that will guide you to add the records of the domain and hosting service providers.
This is how you will add the Bluehost DNS settings:
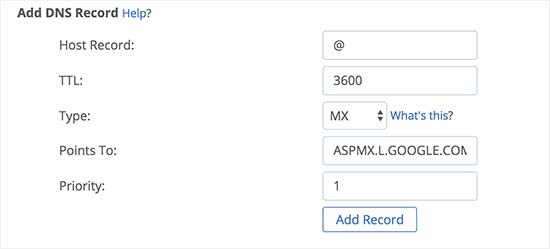
After you are done, click “Add Record” button. Now, go back to G Suit and check the “I created the new MX records” option.
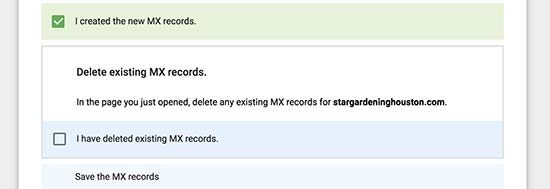
Next, you are asked to delete any existing records. You can still go back to MX records to edit the DNS zone editor. Scroll down to the MX records section. Here, both the new and old MX records will be available.
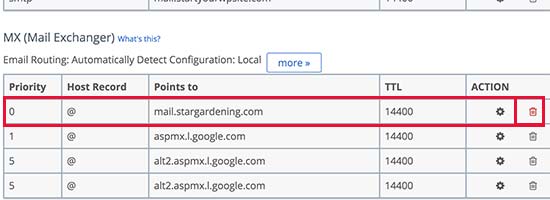
Click on delete button with the old MX records. Then switch back to the setup screen and check box saying “I deleted existing MX records”.
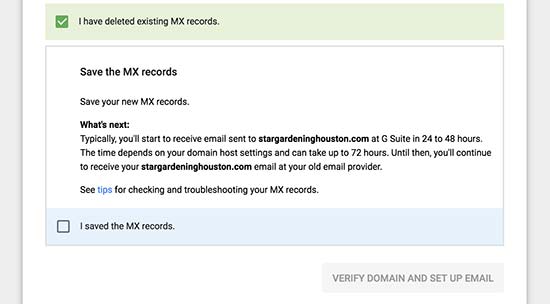
Now, an option to save MX records will appear. After saving, check the box saying “I have saved MX records.” Next, click on “Verify domain and setup email” to exit the wizard.
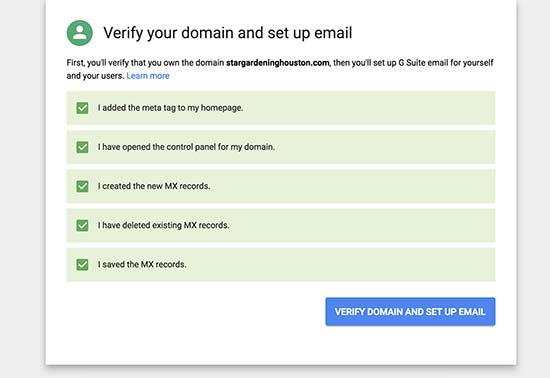
Finally, verify the domain by clicking on “Verify domain and setup email. And then Exit the wizard.
Recap: Google Apps with WordPress
Setting up Google Apps on WordPress is no difficult once you are registered. Here is a simple way:
- Open the admin control panel in WordPress and go to a plugin page
- Look for “Google Apps login”
- Install
- Activate from the plugin
- Go to “Settings>Google Apps Login” from the admin area of your WordPress
- You will receive two codes as you follow the instructions on this page.
- Submit back the two URLs to Google.
If you are to install from ZIP file instead of WordPress Plugins then follow the following steps:
- Directly upload the ZIP file to the plugins section or upload the contents and directory from googleappslogin to WP>plugins>directory
- Go back to step 4 from above and follow the instructions.
Google apps are linked to the personalised instructions in the plugin to configure. It can be done with WordPress admin panel after the plugin is activated.
WordPress and Google Apps seem to be integrated naturally as partners particularly for the businesses that strive to follow the content publishing through a cloud.
This integration is made easier with the instructions provided in the Google App Marketplace and the WordPress Plug-in Directory. However, the following options will only work with the self-hosted WordPress versions.
Google Forms and WordPress
HTML code also helps to embed Google form into WordPress. The free plugin of WordPress Google Form helps you embed WordPress page to Google forms. A published google form is pulled with a short-code [gform form=’ ‘] which is rendered to the WordPress sites.
This plugin provides better control over formatting and styles while taking away the feeling of Google Forms.
WordPress Docs
Docs to WordPress is in beta but specifies the options of integration among WordPress and Google Docs. The plug-in specifically helps to grab the documents from the collection and then publish them to WordPress.
This plugin is not yet tested on the latest versions. Also, the last update was released in 2011 which makes it unreliable.
Google Docs Embedder
This WordPress plugin is very similar to SlideShare or Scribd which allows you to embed multiple files with the blog post or WordPress page. You don’t need a new browser to launch Google Apps as this plugin has its reader.
There is an option of direct download after embedding the document on the WordPress page. You can also download or view the popular image and document formats.
Ludjon, who co-founded Codeless, possesses a deep passion for technology and the web. With over a decade of experience in constructing websites and developing widely-used WordPress themes, Ludjon has established himself as an accomplished expert in the field.






Comments