Have you encountered the “installation failed: could not create directory” error on your WordPress website?
The “installation failed: could not create directory” error is a common WordPress error.
Unlike other WordPress errors, it tells you the exact cause behind its appearance, i.e. the inability to create directories or folders on your site.
To remove the error, you need to find out what’s preventing the creation of the directories and then enable the creation of directories on your website.
The solution may sound vague at this point, but we assure you that by the end of the article, you would have removed the error from your WordPress site.
Let's get started.
What Causes the “Installation Failed: Could Not Create Directory” Error
You may already know that WordPress websites are made of files and folders. These files and folders are stored on a hosting server.
When plugins and themes are installed on a website, they add new files or folders to the hosting server. The “installation failed: could not create directory” error typically appears when the plugin or theme you are trying to install, fails to add a new folder to your server. This occurs when your hosting server prevents the addition of new files and folders.
It’s worth noting that you may also encounter a variation of the error when trying to update a plugin or theme. During an update, old folders are replaced by new folders. And since the server blocks the addition of files and folders, the update fails and you are likely to encounter the following error: “update failed: could not create directory.”
So why is your hosting server preventing the addition of new files and folders? There are two possible reasons:
1. Incorrect File Permission
File permissions specify who can read, write, and modify the files and folders of your WordPress website.
All WordPress files and folders are bound by file permissions. It prevents ill-use, and accidental modifications and helps reduce security risks.
As we mentioned earlier, a WordPress website is made of hundreds of thousands of files and folders. These files and folders are located inside one another.
Plugins and themes are also made of files and folders. When you install a plugin or a theme into your site, the corresponding files and folders are added to a WordPress folder called the wp-content.
The wp-content folder is further divided into plugins, themes, and a few other folders.
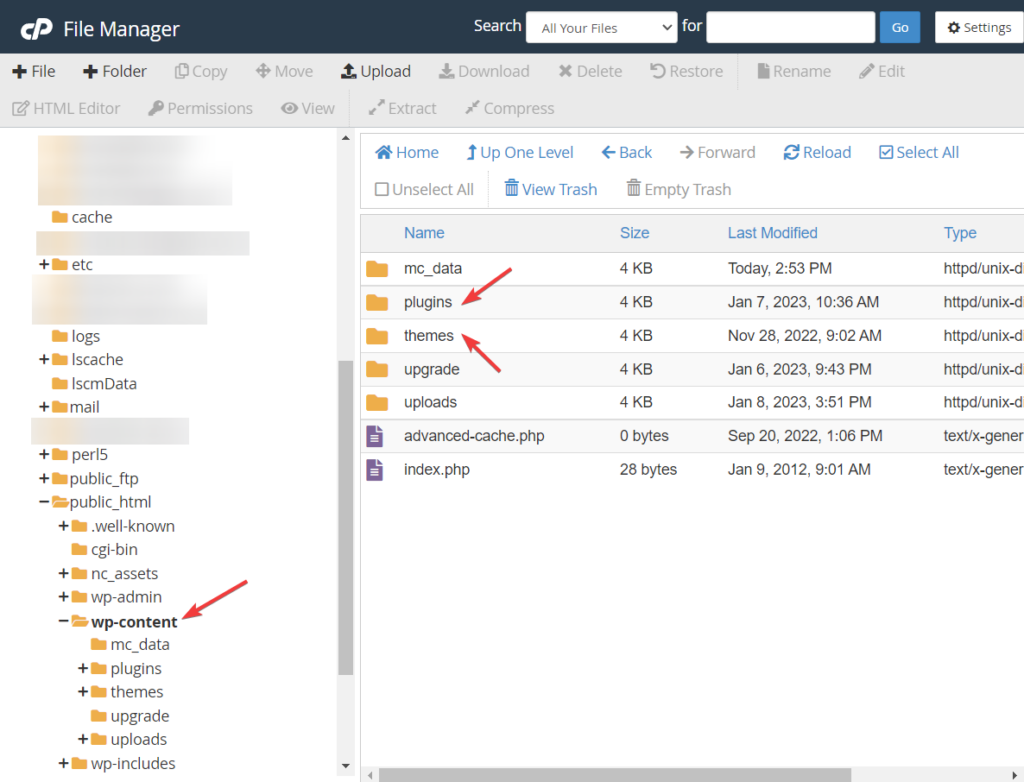
All three folders, i.e. wp-content, plugins, and themes are writable. In other words, you are allowed to add new files to these folders. But if the folders were tampered with causing the file permission to change, it would prevent new folders or directories from being created.
So if you or any of your admins accidentally changed the file permission of your WordPress folders (specifically wp-content, plugins, and themes) then that’s what’s causing the “installation failed: could not create directory” error.
2. Lack of Disk Space
Disk space refers to the space allotted to your website by your hosting provider.
Hosting services offer several hosting plans and depending on the plans you choose, you are allotted disk space.
Small websites typically signup for the cheapest plan and are allotted the lowest disk space which is often sufficient for small websites. But fast-growing websites tend to use disk space quickly and need to subscribe to higher plans to continue their growth trajectory.
Even if your website is not the fastest-growing site in your niche, you can still run out of disk space if you have accumulated a large number of files, folders, and other content (i.e. images, texts, CSS and Java files, etc) over a long period.
So the “installation failed: could not create directory” error could be a sign that your site’s disk space is near 100% consumption and there’s no room for new files and folders.
Now that you know the exact reason that caused the error, let’s find a way to remove it from your site.
How to Remove the “Installation Failed: Could Not Create Directory” Error From WordPress
There are two ways to remove the error from your WordPress site and prevent it from appearing in the future. Those are:
1. Resetting file permissions
2. Adding disk space
We are going to show you how to implement both solutions but before you proceed with any of the steps below, take a backup of your entire WordPress website. In the following tutorial, you will be asked to go to the backend of your site and make modifications. This is a risky procedure. If things go wrong the backup will help get your website back to its normal state. So please take a backup.
Let’s start with the tutorial.
1. Reset File Permissions
Let’s first find out whether incorrect file permission is the real culprit and then you can proceed to reset the permissions.
You can find out whether your WordPress folders have incorrect file permission from your site’s admin panel.
Check File Permissions
Open your WordPress admin panel and go to Tools > Site Health and click on Info. Scroll down to the last section Filesystem Permissions and expand it.
It will show you the major directories of your site along with file permissions allotted to each directory. By default, all directories should be writable, meaning one can access and modify them.
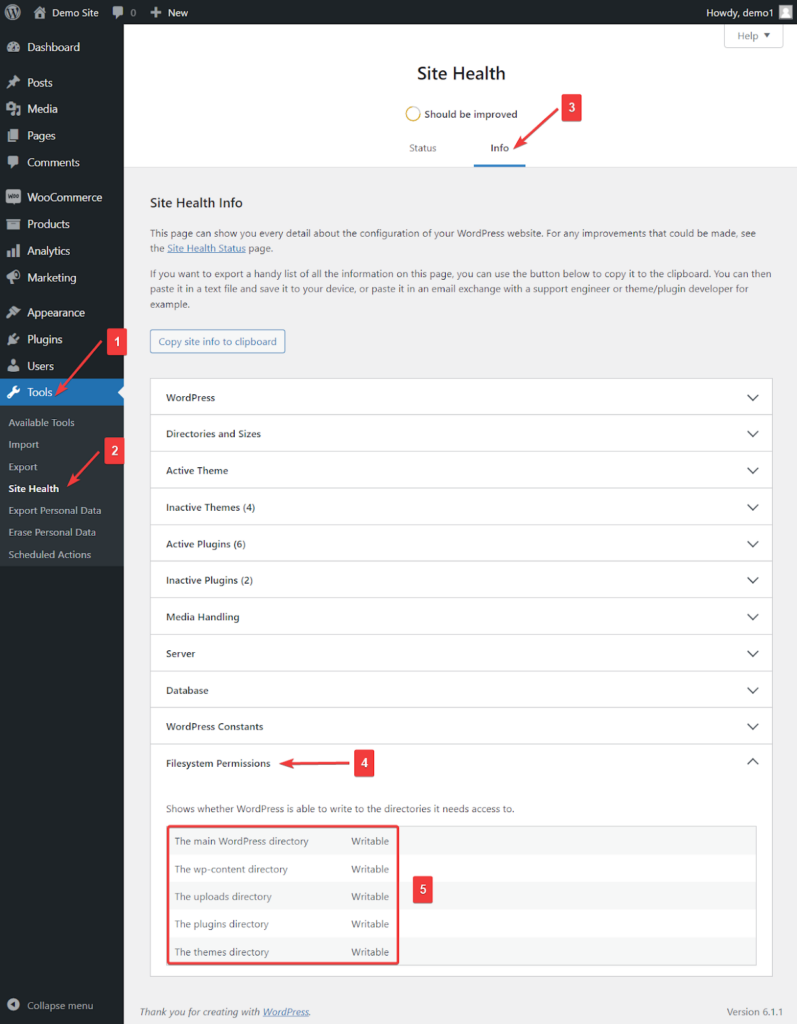
If the wp-content, plugins, and themes directories are tagged as anything other than writable then it proves that the incorrect file permission is causing the error.
If the directories are allotted proper file permission then incorrect file permission is not the culprit and we suggest you skip the following steps and move to the next section, i.e. Add Disk Space.
Reset File Permissions
To rest file permissions, you need to go to the backend of your site and access your WordPress files. This can be done via your hosting account cPanel or an FTP client like Filezilla.
In this tutorial, we will show you how to use the hosting account cPanel but if you prefer an FTP client then follow this guide. We also recommend reading the tutorial below as it will offer you an idea of how to reset your file permissions using an FTP client.
If you are searching for cPanel hosting: 7 Best Cheap cPanel Web Hosting 2023 (Shared or VPS)
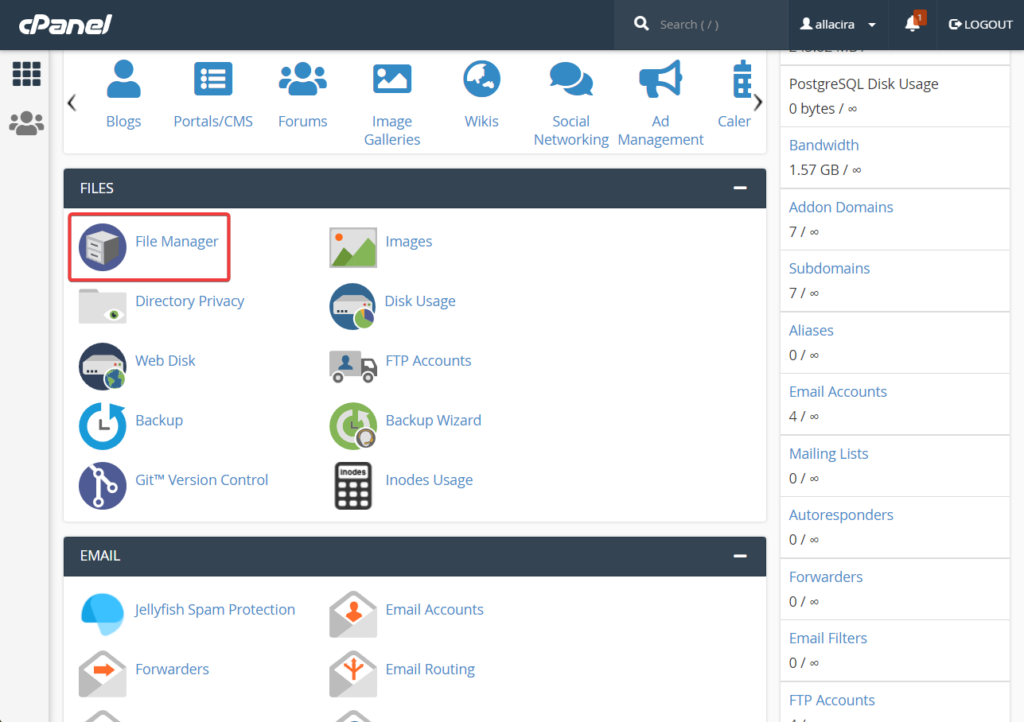
Open your hosting account and go to cPanel. The location of the cPanel will differ from hosting to hosting. If you can’t find it then check the help documents of your hosting provider.
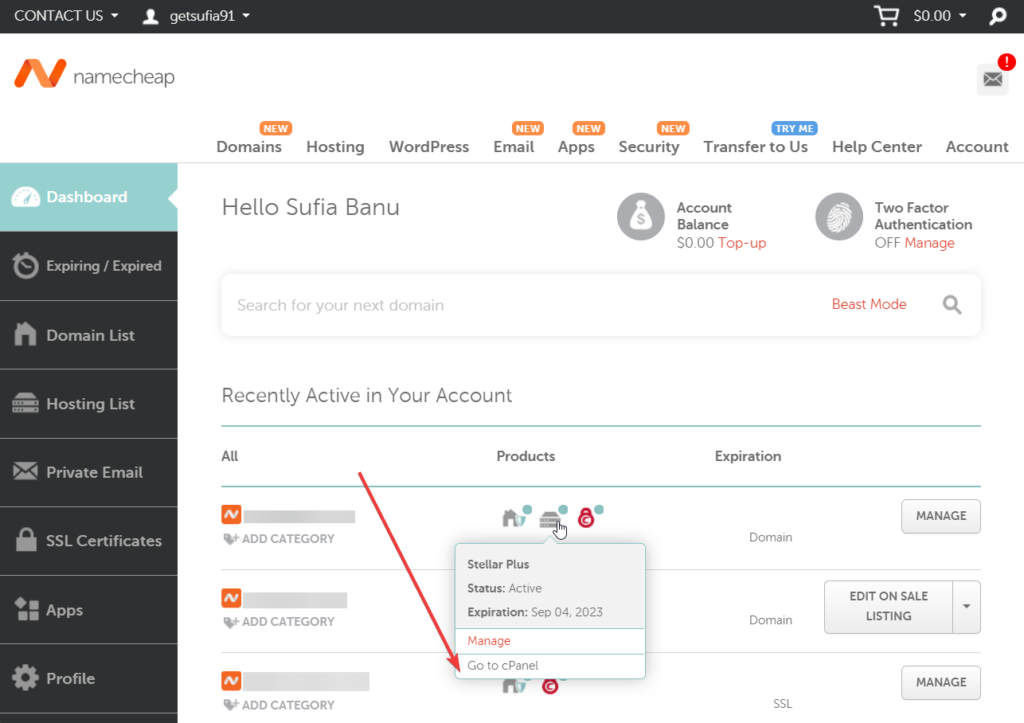
In the cPanel, go to File Manager.
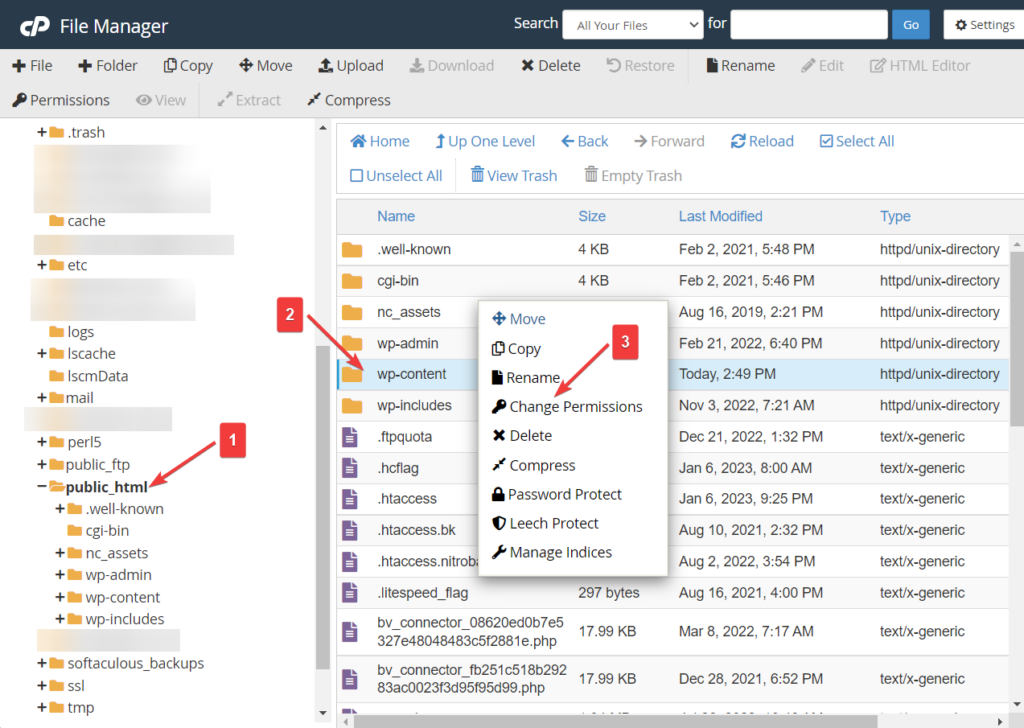
Then on the File Manager select the public_html folder located on the left-hand menu. Inside that folder, you will find the wp-content directory.
Right-click on the directory and select the File Permissions option.
A new popup window will appear on the screen. Go to the Permissions option and insert this value: 755. Hit the Change Permissions button.
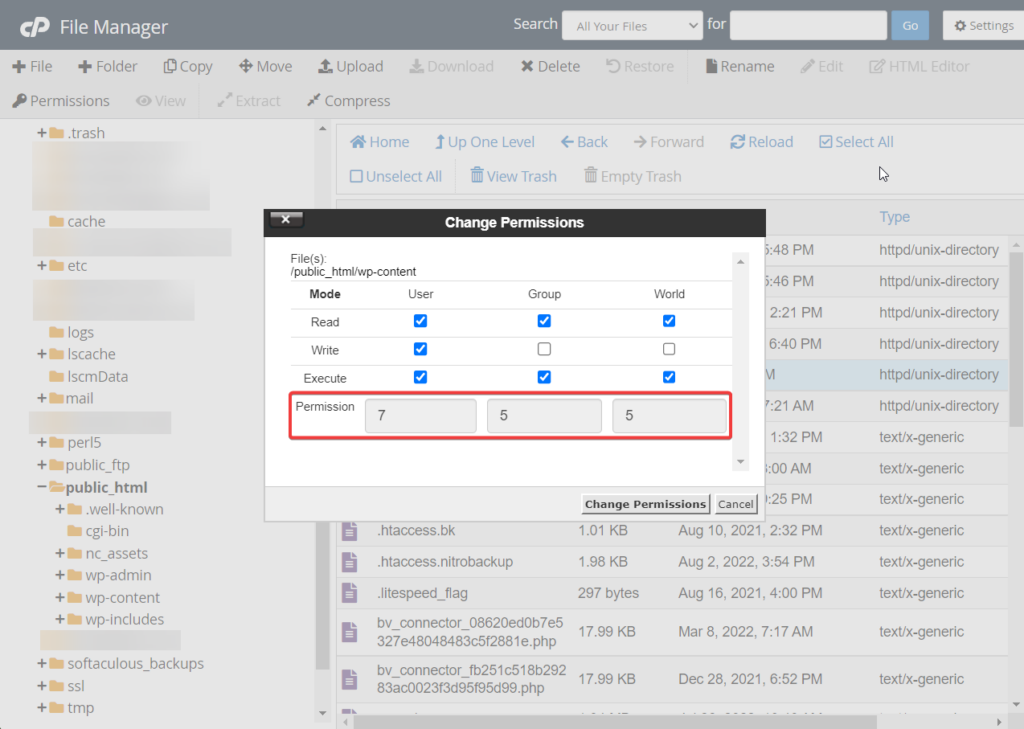
That’s it, folks, you have made the wp-content writable. The plugins and themes directories are located inside the wp-content folder, they are automatically set as writable when you changed the wp-content file permission.
Now, return to your WordPress site, and try adding or updating plugins and themes. You should able to do it without any hindrance. If you face any issues, let us know in the comments below.
2. Add Disk Space
If incorrect file permissions are not the culprit then it must be a disk space issue. And to solve this issue you need to upgrade to a better plan with more disk space.
But before you go over to your hosting account and start the upgrading process, please verify with your hosting provider that you have really used up all your hosting space.
Some of you are probably operating new websites so depleting your disk space this quickly is impossible. In such cases, the real culprits are hackers who have hacked into your site and are using your disk space to store their files.
You need to run a malware scan and get your site cleaned immediately. You can seek help from your hosting provider or use independent security plugins to scan and clean your site.
In the future, have a WordPress security plugin installed on your website at all times to protect your site from hack attempts.
Here you can find unlimited hosting providers.
Conclusion
The “installation failed: could not create directory” error is a common WordPress error and it appears when adding or updating a plugin or theme to your WordPress website.
The error is triggered when a plugin or a theme cannot add new files and folders to your site. This occurs when your file permissions have been tampered with or when you are running out of disk space.
Resetting the correct file permission or upgrading your hosting plan for more disk space will remove the error from your site and allow you to continue adding or updating plugins and themes.
That’s it for this one folk! If you have any questions, let us know in the comment section below.


Comments