Gmail and Outlook are two different email services. Connecting or syncing them together means being able to get the best out of the two. This guide takes you through the process of adding a Gmail account to Outlook versions 2010 to 2016.
In case you are interested in creating a professional email account for your business with your personalized domain i recommend you read our article here: How to Create a Professional Email Address (2-Methods)
Setup Gmail in Outlook 2010-2016
Enable Gmail IMAP
Before starting this process, you should make some changes to your Gmail account to enable IMAP. Go to the settings of your Gmail account and click on the ‘Forwarding and POP/IMAP’ option. Under the IMAP Access column, choose the radio button corresponding to ‘Enable IMAP’. Click on save changes.
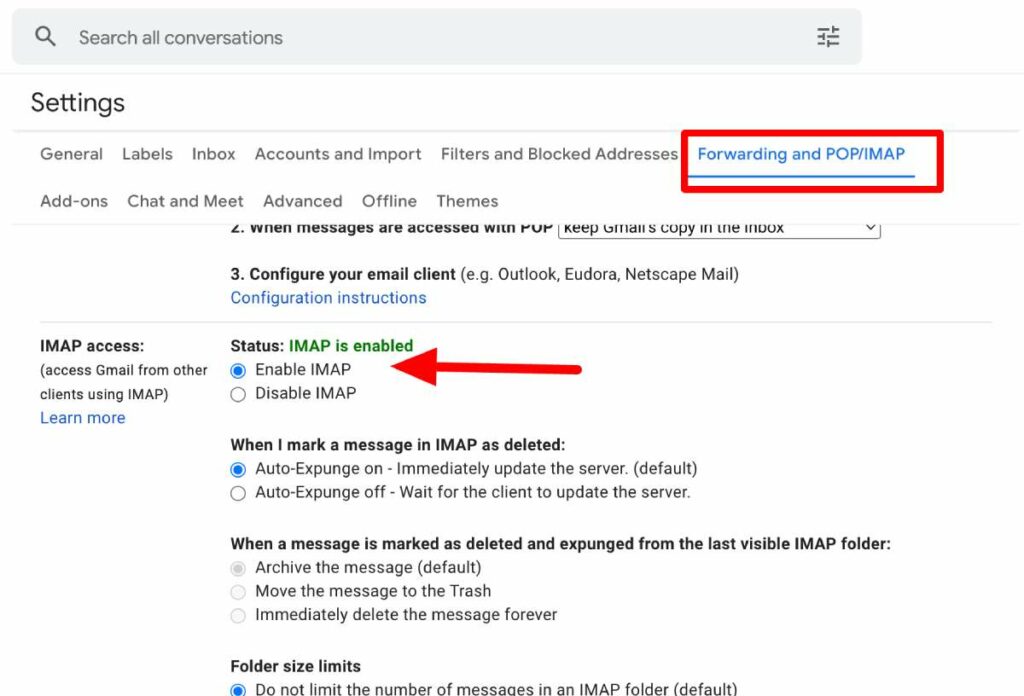
Once you have enabled IMAP, you can successfully add your Gmail account to Outlook by following the steps below. If IMAP is not enabled and you try to add your Gmail to Outlook, you may get the ‘Can’t Add Gmail to Outlook’ error.
Configure the Gmail account on the Outlook
1. The first step is to open Outlook, select File and choose ‘Add Account’.
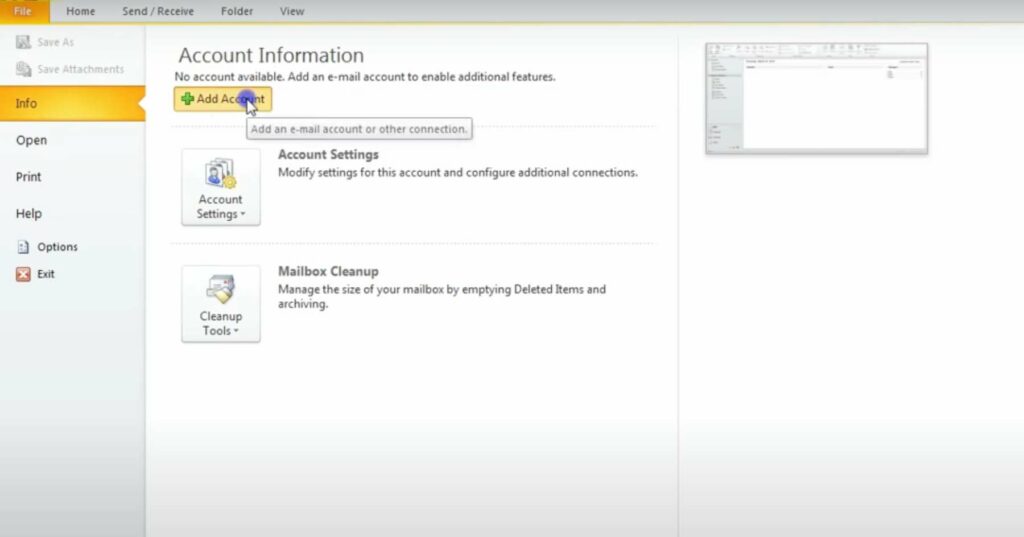
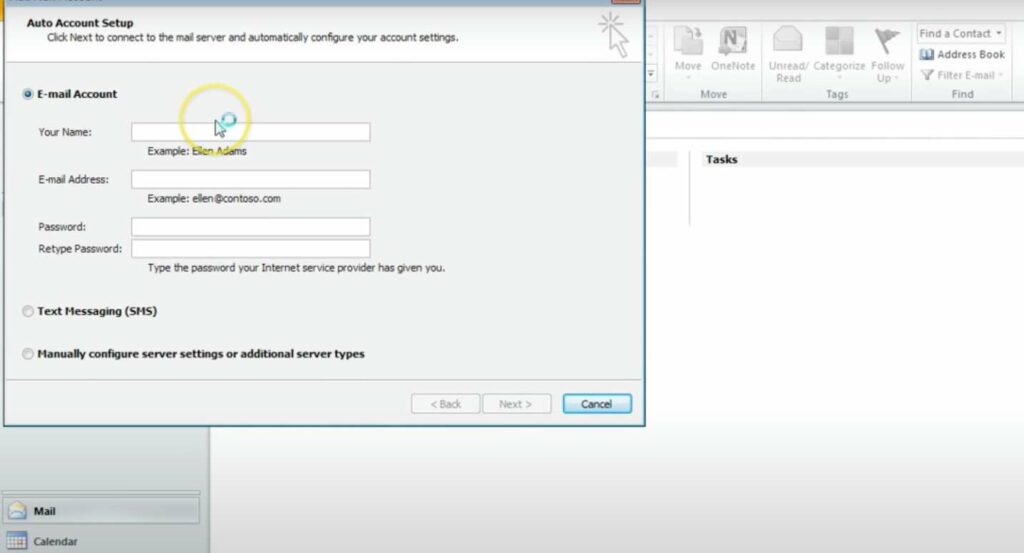
2. Enter your email address in the field. Click ‘Connect’ After clicking connect, Outlook will launch a Gmail window. This window asks for your password, which you should enter and then click ‘Sign in’ to proceed.
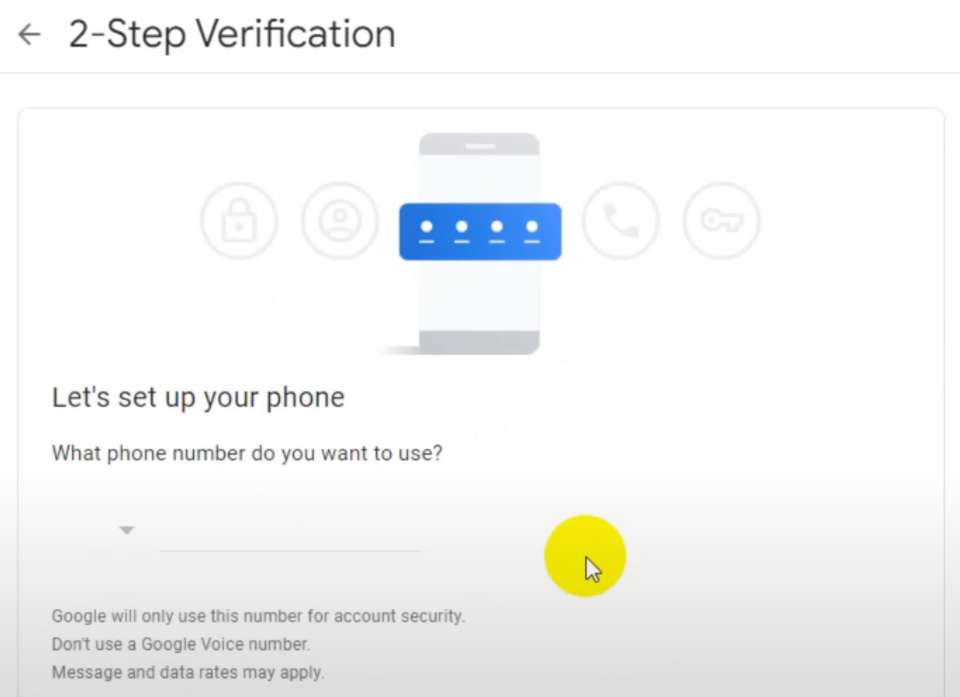
3. The next step will depend on whether you’ve previously enabled two-factor authentication on Gmail. If you’ve previously enabled this security feature, you’ll be prompted to enter the code sent to your phone. If you did not enable two-factor authentication, you can skip this step.
4. After entering the code for those that enabled two-factor authentication, or after step 2 for those that did not, the Google account permissions window appears. You’ll be presented with two options at the bottom – Deny or Allow. Click ‘Allow’. This is the action that triggers the addition of your Gmail account to Outlook.

5. If this is the only Gmail account you want to add to Outlook, select Done at the bottom of the window that appears. If you want to add another Gmail account, you can do so by entering the address in the address box that prompts for another email address, and then clicking ‘Next’.
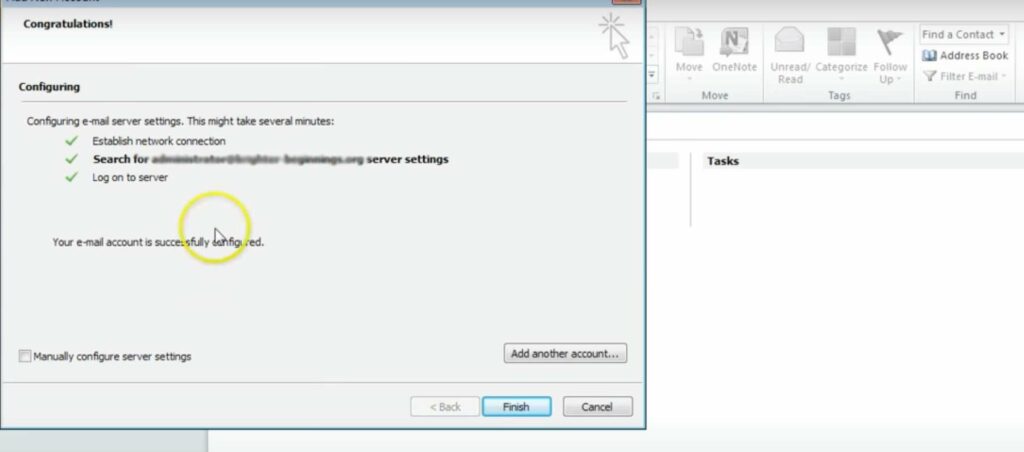
The steps above complete the process of automatically adding a Gmail account or several Gmail accounts to Outlook.
Sometimes this doesn't work if you have an older version of Outlook so please jump to the manual configuration
Password not Accepted Issue
Sometimes, Outlook may not accept your password when setting up your Gmail account on the platform. If that is the case and you’re sure you entered the correct password, you might be using an older version of Outlook.
Older versions of Outlook do not support the above process of adding a Gmail account. You’ll have to enable two-factor authentication on your Gmail account to bypass this setback. Use the code and an app password to verify ownership of the Gmail account.
Although Google allows users to add their account to Outlook without setting up two-factor authentication and using an app password, you must turn on the setting that allows less secure apps to connect to your Gmail account. However, Microsoft, which owns Outlook, does not recommend this setting. Microsoft recommends turning on two-factor authentication and using an app password.
Enable two-factor authentication
Follow the steps below to enable two-factor authentication and get an app password:
1. Visit your Gmail account on your preferred browser and select the Google apps icon. The icon looks like this:
2. Select your account, then select ‘Security’.
3. Look at ‘Signing into Google’ and check if two-step verification is off. If it’s off, click the > next to off to turn on two-step authentication. If two-step authentication was already On, you can skip this step.
4. Once you start the process of enabling two-factor authentication, click ‘Continue’ on the first screen. You may be prompted to enter your Gmail password, which you should enter and click ‘Next’. The next step is to enter your phone number and choose whether you want to receive the verification code by phone call or SMS.
Click ‘Next’ and enter the code you receive. After that click ‘Next’ again. Click ‘Turn On’ to finish the process of enabling two-factor authentication.
5. Click the left arrow to return to the previous screen. Select the > on the extreme right of the App Passwords line.
6. Enter your Gmail account password. Select ‘Sign in’ and a new screen will appear. Select ‘Mail’ and ‘Windows Computer’ from the drop-down list at the bottom of the screen. Click on ‘Generate’.
7. Once you complete all the above processes up to step 6, Google will display an app password. Copy the password – without spaces – and enter it when Outlook prompts you for a password.
Setting Up Gmail in Outlook Manually
The first process outlined in this guide is the automatic process of adding Gmail to Outlook.
You can also add Gmail to Outlook manually by following the steps below:
1. Open Outlook and select File, then choose ‘Add Account'.
2. Click ‘Manual setup or additional server types in the ‘Add Account’ dialog box. Click ‘Next” to go to the next step.
3. Choose ‘POP or IMAP’ and click ‘Next’.
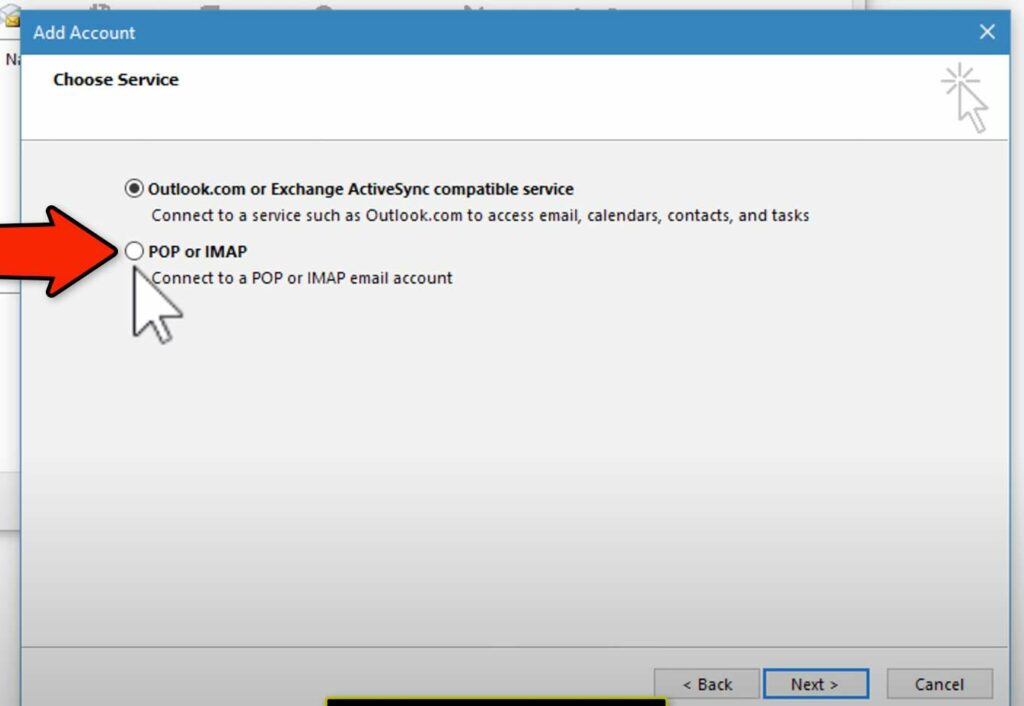
4. Fill up the form that appears with the required information. The information includes:

- Your name: Enter the name you want people to see when they receive mail from you
- Email address: Enter your Gmail address
- Account type: IMAP
- Incoming mail server: imap.Gmail.com
- Outgoing mail server (SMTP): smtp.Gmail.com
- User name: Enter your full Gmail address
- Password: Enter your Gmail password
5. Click ‘More Settings’ and select ‘Outgoing Server’. Now select ‘My Outgoing Server (SMTP) requires authentication’. Select ‘Use same settings as my incoming mail server.
6. Click on the ‘Advanced’ tab. Fill up the form that appears with the following details:
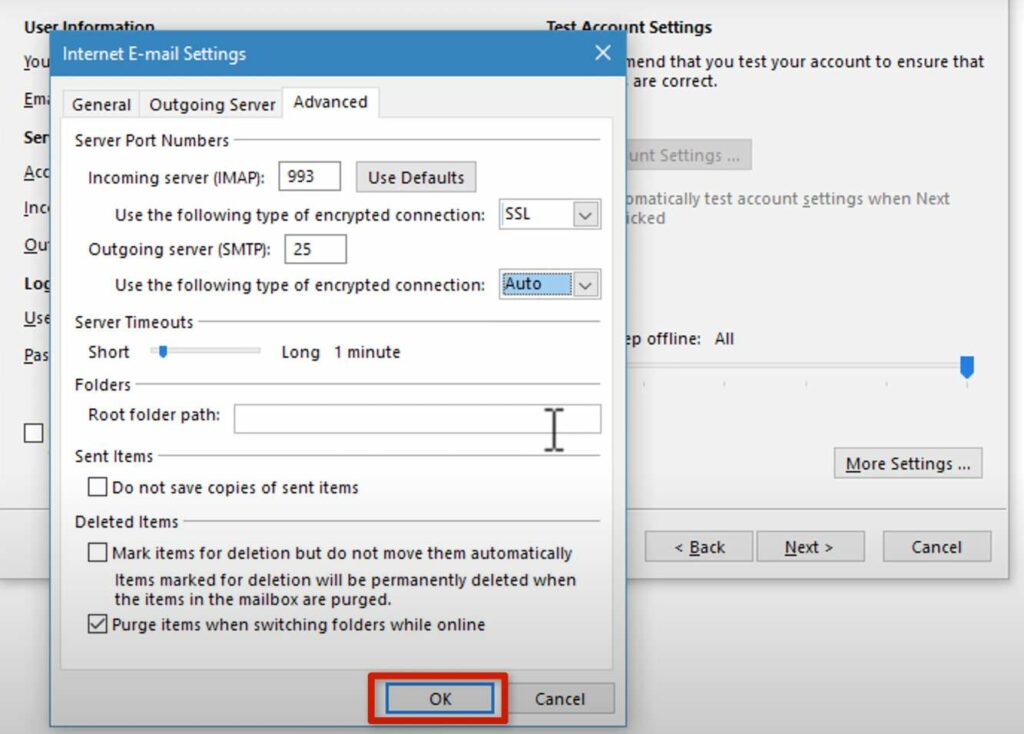
- Incoming server (IMAP): 993
- Use the following type of encrypted connection: SSL
- Outgoing server (SMTP): 25
- Use the following type of encrypted connection: Auto
Click ‘OK’ to close the settings dialog box and return to add account dialog.
7. Select ‘Next’. Outlook will take a few minutes to test the connection.
8. Select ‘Close’ and then click on ‘Finish’. You can now send and receive your Gmail in Outlook.
The successful addition of Gmail to Outlook means that you can compose and view emails within Outlook. It also means that you will have offline access.
Conclusion
Get the best of Outlook and Gmail by connecting them through the processes outlined above. The steps in this guide are for Windows. Similar actions with few changes should be followed when using a Mac machine to add Gmail to Outlook.
As one of the co-founders of Codeless, I bring to the table expertise in developing WordPress and web applications, as well as a track record of effectively managing hosting and servers. My passion for acquiring knowledge and my enthusiasm for constructing and testing novel technologies drive me to constantly innovate and improve.
Expertise:
Web Development,
Web Design,
Linux System Administration,
SEO
Experience:
15 years of experience in Web Development by developing and designing some of the most popular WordPress Themes like Specular, Tower, and Folie.
Education:
I have a degree in Engineering Physics and MSC in Material Science and Opto Electronics.



Comments