Wondering how to create a WordPress portfolio website?
Portfolio websites are used by solopreneurs and agencies to showcase their work, skills, and accomplishments to potential clients, employers, or collaborators.
A portfolio site can also help build credibility, establish your brand, and make it easier for interested parties to contact you.
In today's digital age, a portfolio website is a powerful tool for anyone looking to demonstrate their capabilities and display their work online.
In this article, we will show you how to create a portfolio website with WordPress using a dedicated portfolio theme called Remake. If you aren't so familiar with WordPress you can take a look at the Best Website Builders for Portfolio

Let’s get started.
How Much Does It Cost to Build a Portfolio Website?
To build a portfolio website you need 5 things: domain name, hosting plan, SSL certificate, premium theme, and plugins.
Let’s take a look at the average cost for each of these items:
- Domain name: $10
- Shared hosting plan: $80
- SSL certificate: Free/$8
- Premium theme: $59
- Plugins: Free
So to get your portfolio website up and running you need to spend $159 in total.
There are 3 things worth noting here:
The first thing you need to know is, these are not monthly but annual expenses. This means that after getting the site up, you won’t have to spend a dime for at least a year.
The second thing you need to know is that most hosting providers offer a free SSL certificate for the first year. So your expense is likely to come down to $150.
And lastly, most domain sellers offer a discount during registration. So next year, renewing your domain name could cost $15-20.
Now that you know the cost of building a portfolio website, let’s dive into the tutorial.
How to Create a Portfolio Website?
To create a portfolio website you need to take the following steps:
- Step 1: Buy a domain name and hosting plan
- Step 2: Buy an SSL certificate
- Step 3: Install WordPress
- Step 4: Configure WordPress settings
- Step 5: Install a dedicated portfolio theme
- Step 6: Modify the about and contact pages
- Step 7: Install plugins
We are going to dive into each step and show you what you need to do. By the end of step 7, you will have a portfolio website up and running.
Step 1: Buy a Domain Name & Hosting Plan
The name of a website (i.e. codeless) along with the TLD (i.e. com) is called the domain name.
A domain name has to be picked carefully because it can’t be changed after it is registered with a domain name seller.
How to Pick a Domain Name
You can use your own name as your domain name (like https://sufiabanu.com) or use the name of your registered business (like https://codeless.co). Just keep the name short and easy to remember.
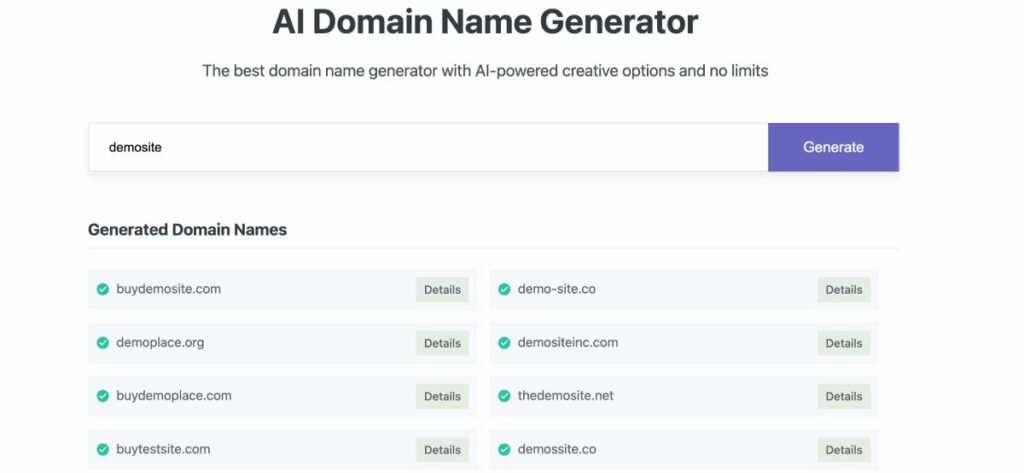
You can generate your domain name by using AI through our tool here: AI Domain generator.
After you pick a domain name, you need to select a TLD, short for top-level domain. TLD refers to the last part of a domain name. The “.co” is the TLD of our domain name, codeless.co.
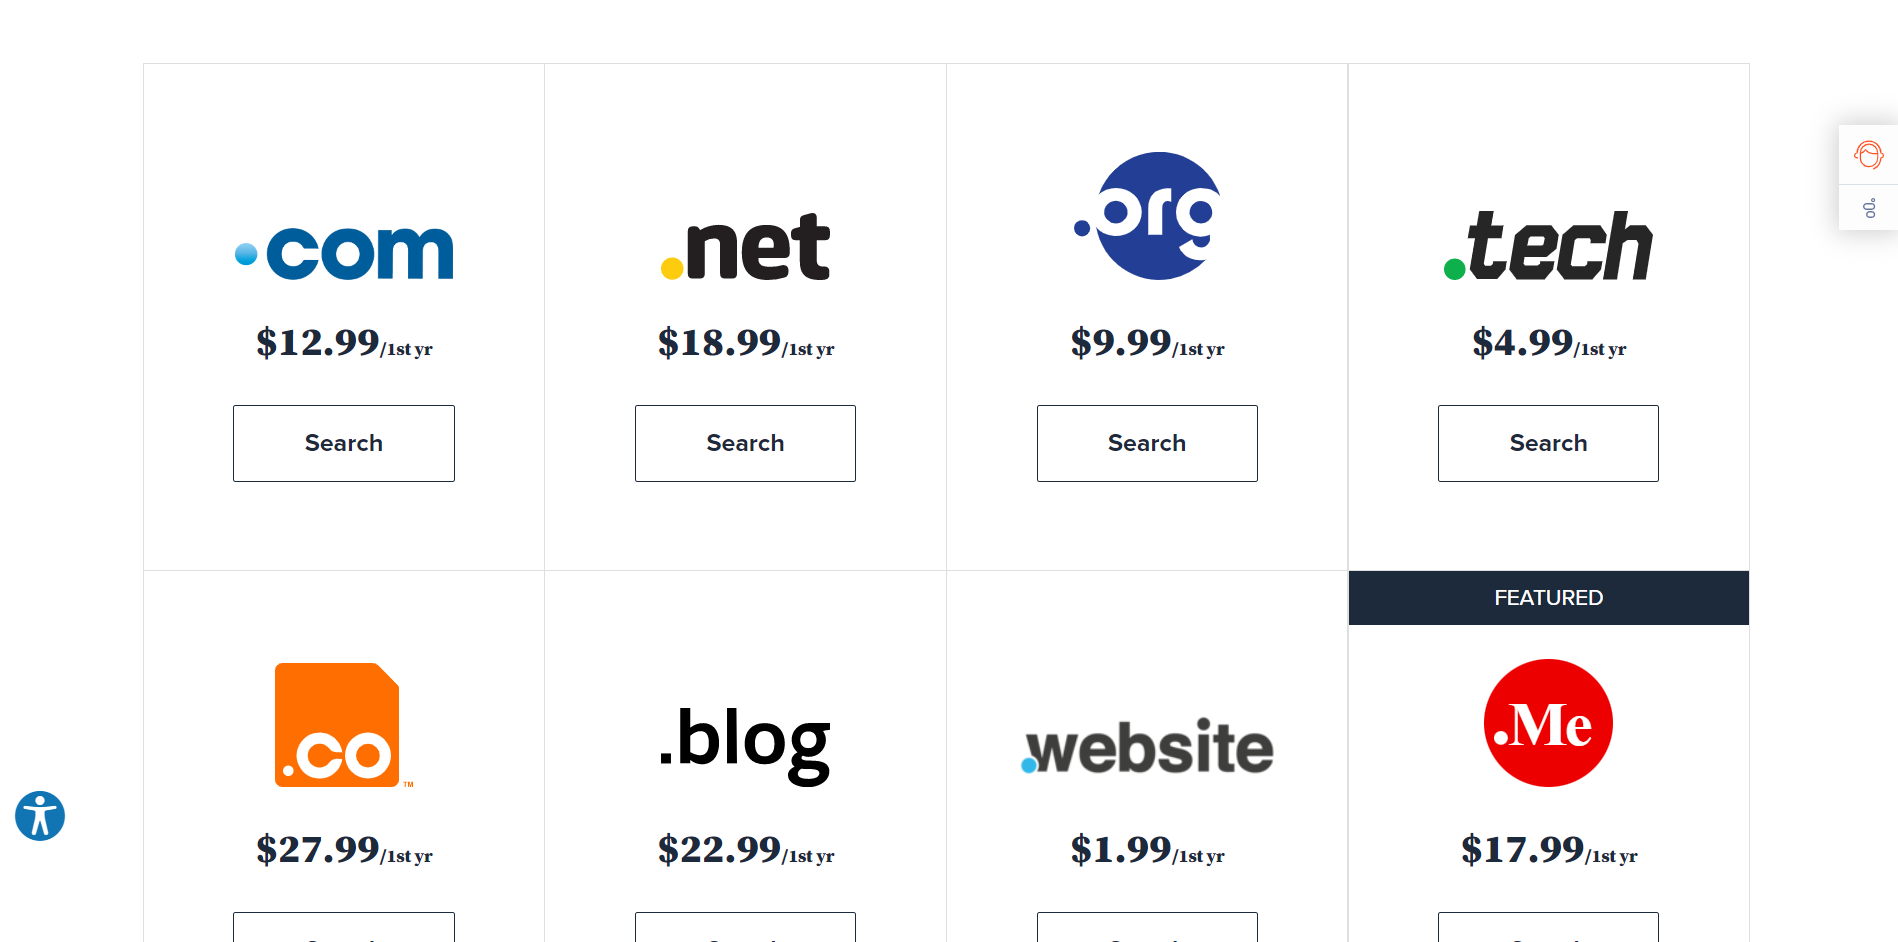
There are two types of TLDs – country-specific TLDs and generic TLDs.
Country-specific TLDs are used to indicate the location of the domain. For instance, businesses located in Europe use .eu, .fr for France, .nl for Norway, .de for Germany, .co.uk for the United Kingdom, and so on.
You can use a country-specific TLD if your portfolio site targets clients from a specific country.
But if you are targeting clients located anywhere in the world then use generic TLDs like .art, .blog, .business, .club, .dog, .life, .design, .events, .tech, .reviews, .cafe, .fun, etc.
The most popular generic TLDs are .com, .net, and .org (meant for only organizations). We strongly recommend that you select either .com, .net, or .org because these are trusted more than any other TLDs.
So far you have learned how to pick a domain name and a TLD. Next, you will learn how to purchase them both. And while there are several domain registrars to choose from, we recommend getting the domain name from a hosting provider as it reduces hassle. More on this in the next section.
How to Pick a Hosting Provider
A portfolio website is made of files and folders. You need a space to store these files and folders online.
A hosting provider offers a service where you can rent a space for storing your files or folders (i.e. your website).
There are numerous hosting providers to choose from. The popular ones are:
Most hosting providers offer 4 types of hosting plans: shared, managed, dedicated, and VPS hosting.
Managed, dedicated, and VPS hosting is the most expensive hosting plan. These plans offer plenty of resources and significant control over your hosting server. To operate them, you need to have advanced skills.
Shared hosting is the cheapest plan because the storage space is shared with other websites. These hosting plans are completely safe and the resources are equally divided. New websites should opt for shared hosting plans because it is cheap and can be operated by a newbie.
In case you are using the AI name generator after selecting the domain you will redirect to Bluehost.

All the hosting providers we mentioned above offer shared hosting plans. Be sure to purchase a hosting plan along with a domain name and an SSL certificate. More on the SSL certificate in the next section.
Step 2: Buy an SSL Certificate
An SSL certificate is a digital certificate that help authenticates a website's identity as a legitimate blog or business.
The certificate appears at the beginning of your domain name in the form of a lock and the “https” protocol.

Installing an SSL certificate is mandatory. Websites without an SSL certificate are marked as insecure by web browsers. A visibly insecure website does not encourage trust and it could impact your potential clients negatively.
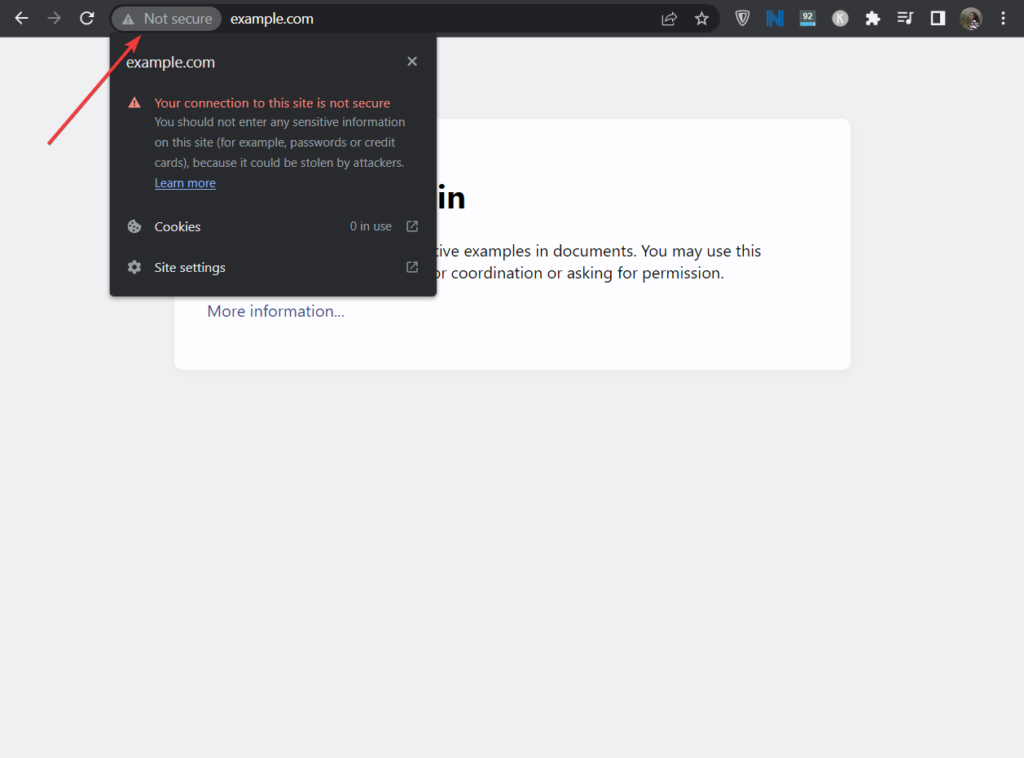
There are several SSL certificates sold by hosting services and dedicated SSL certificate providers. You need a basic certificate which you can get from your hosting provider for free for the first year. Be sure to purchase the certificate along with the domain name and hosting plan.
NOTE: If you will use Bluehost the SSL certificate comes free with hosting and the domain. So I recommend choosing hosting providers that come with free SSL certificates.
To install the certificate look for help docs from your hosting provider or seek help from your hosting support.
Step 3: Install WordPress
WordPress is a website-building platform. Just like the domain name, hosting plan, and SSL certificate, a website-building platform (also called CMS) is a mandatory part of your site.
While there are a number of CMS’ to choose from, WordPress is the most popular one.
Note: You can also choose to build your website with dedicated portfolio website builders.
We will show you how to install WordPress on your website. This can be done via the cPanel on your hosting account. Locate the cPanel and then go to Softaculous Apps Installer and select WordPress.
Here you can find the best cPanel web hosting providers.
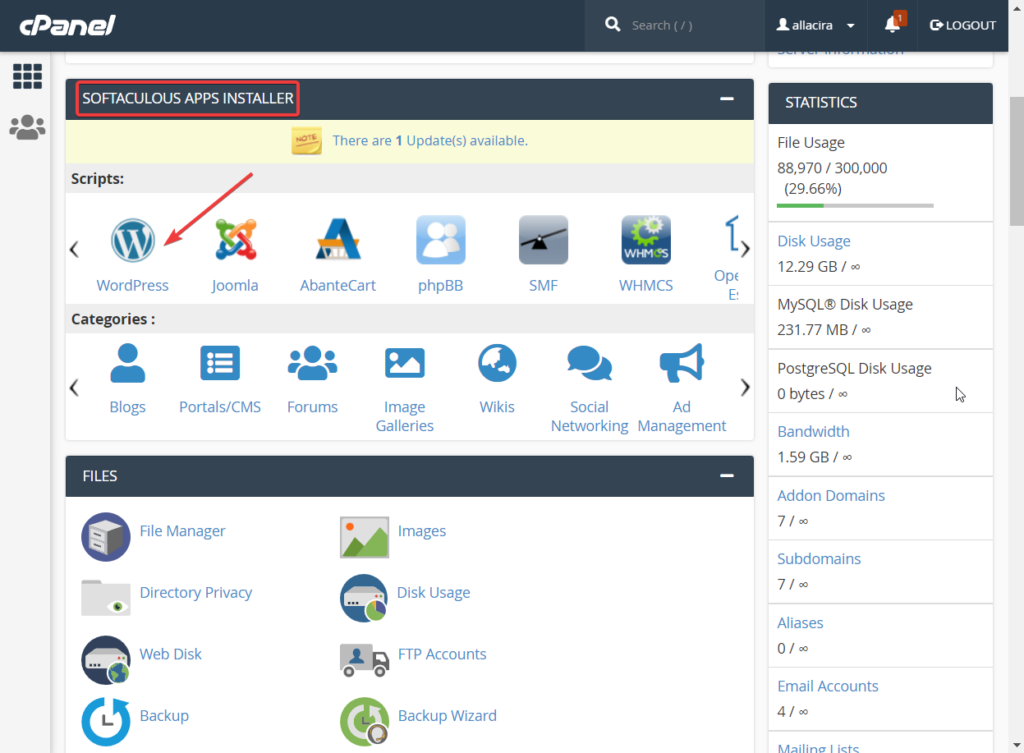
You will be taken to the Softaculous dashboard where you can install WordPress to your website. All you need to do is choose the protocol, specify the domain name, and hit the Quick Install button.
The installation should take a couple of seconds.
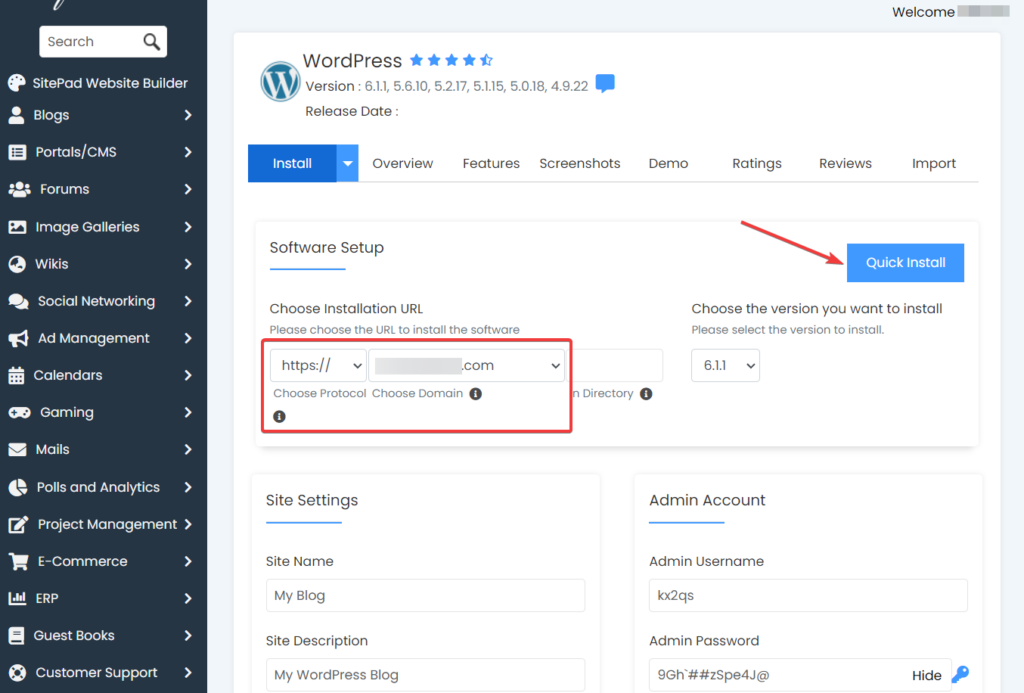
After the installation is complete, Softaculous will give you the URL of your site’s login page along with a username and password. Note this information down somewhere because you’ll need them in the next step.
Step 4: Configure WordPress Settings
After installing WordPress, you must configure it properly before doing anything else.
You will need to log into your WordPress website using the login URL, username, and password.
After logging in, you will be taken to the wp-admin page, also called the WordPress dashboard. On the left side of the dashboard, you will notice a menu with several options. Go to the Settings option and it will reveal 7 pages. You will visit each page and configure them according to your needs.
The following guides will help you do just that:
Step 5: Install a Dedicated Portfolio Theme
Remake is a dedicated portfolio WordPress theme built in-house by Codeless. The theme has a minimal design and focuses on a smooth and easy user experience.

Users love Remake because it gives them a fully customizable prebuilt website with options to modify the design of the site.
There are 10 different prebuilt minimalist static or video-style skins (also called demo sites) and a couple of different blog layouts to choose from.
The theme fully integrates with Elementor, a drag-and-drop visual page builder, that comes with premade design blocks to help create responsive designs. It also offers the ability to live edit and preview your work among other things.
Since Remake is built for both individuals and agencies who want to showcase their work to clients, you have prebuilt sections dedicated to showing off portfolio items, client testimonials, and staff details.
The theme will also create an eCommerce store where you can sell your merchandise and even add coupons to offer discounts to your site visitors.
In case you want to check another portfolio WordPress Theme please check our article here.
We will show you how to access these features but first, you will need to install the theme on your WordPress website. We will show you how to do just that.
Installing Remake Theme
Remake is a premium theme and comes for an annual fee of $59. You will need to purchase the theme and download it on your local computer.
Next, open your WordPress dashboard and go to Appearance > Themes > Add Theme, and select the Upload Theme button.
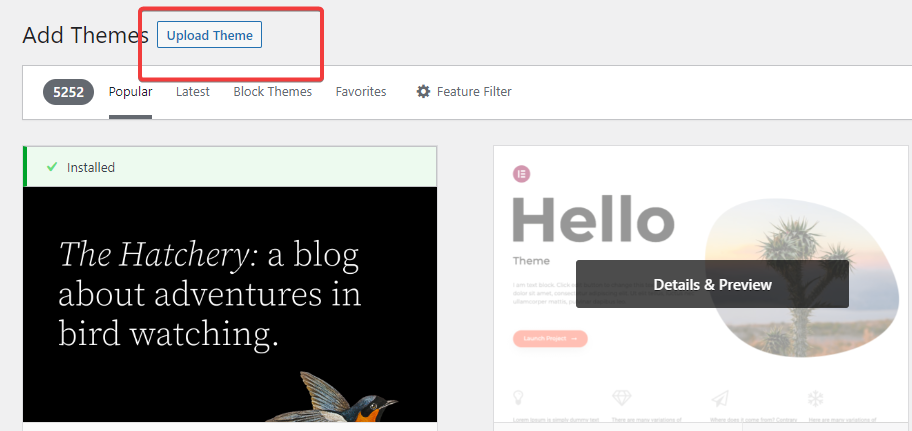
Then upload the theme using the Choose File option and hit the Install Now and Activate buttons to install the theme on your site.
That’s it. You have now installed a dedicated portfolio theme on your website. Next, you will need to install a demo site.
Installing Remake Demo Site
After installing the theme, you will be taken to the Appearance page where the Setup Wizard is located. To initiate the setup select the Setup Now button.
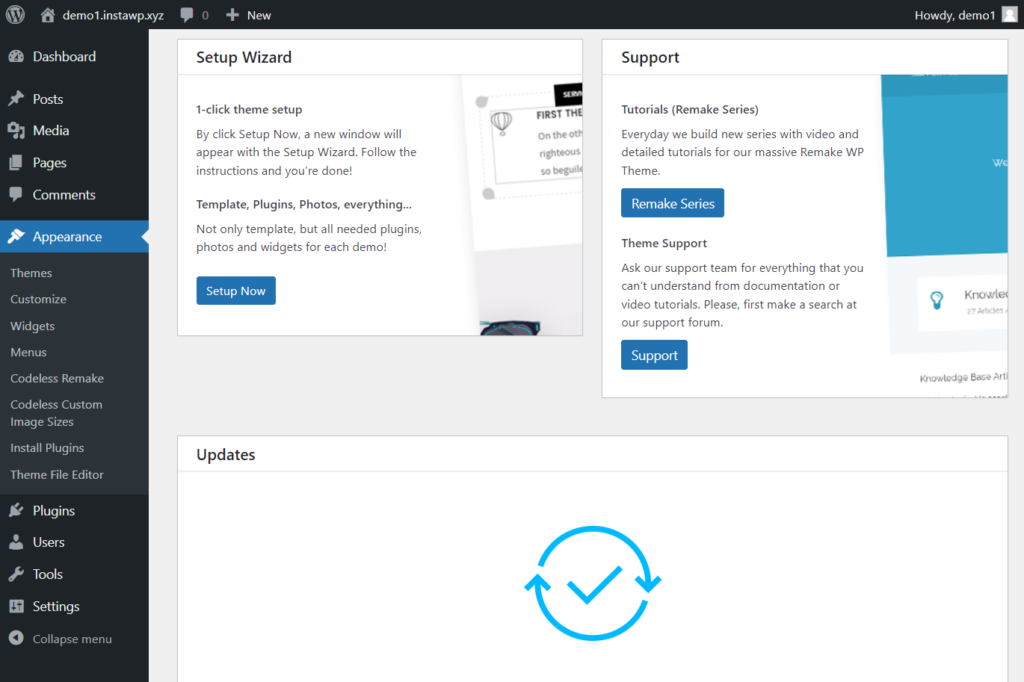
It will take you to a page where you can select a skin or demo site to install on your site. We recommend previewing the sites before hitting the Install Demo button.
Note: In case you accidentally closed the tab, you can access the demo site by going to Appearance > Import Demo Data.
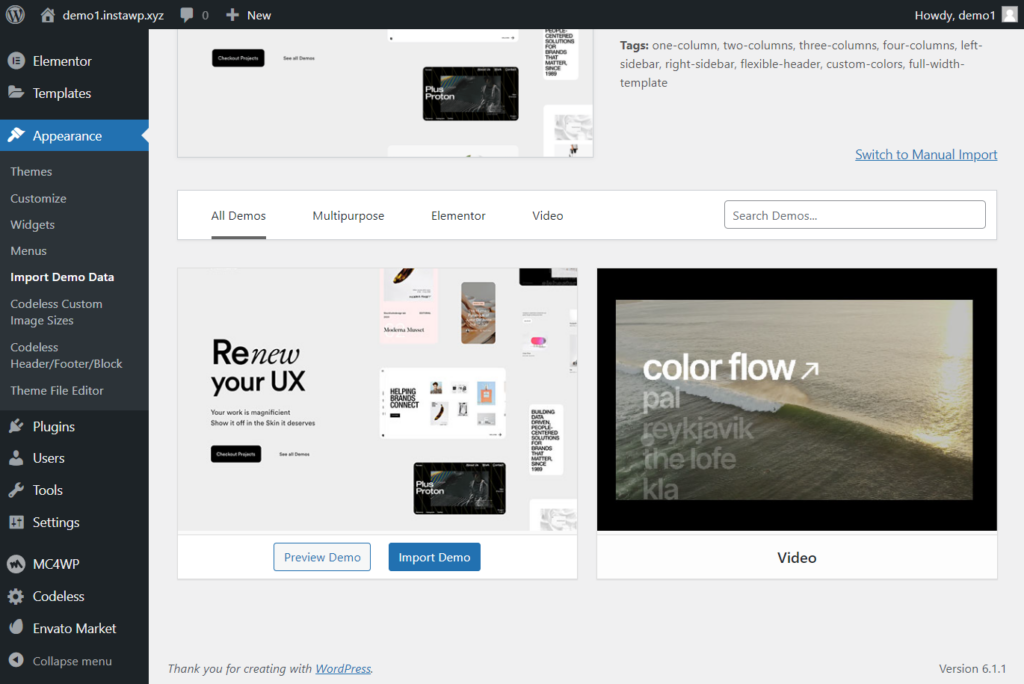
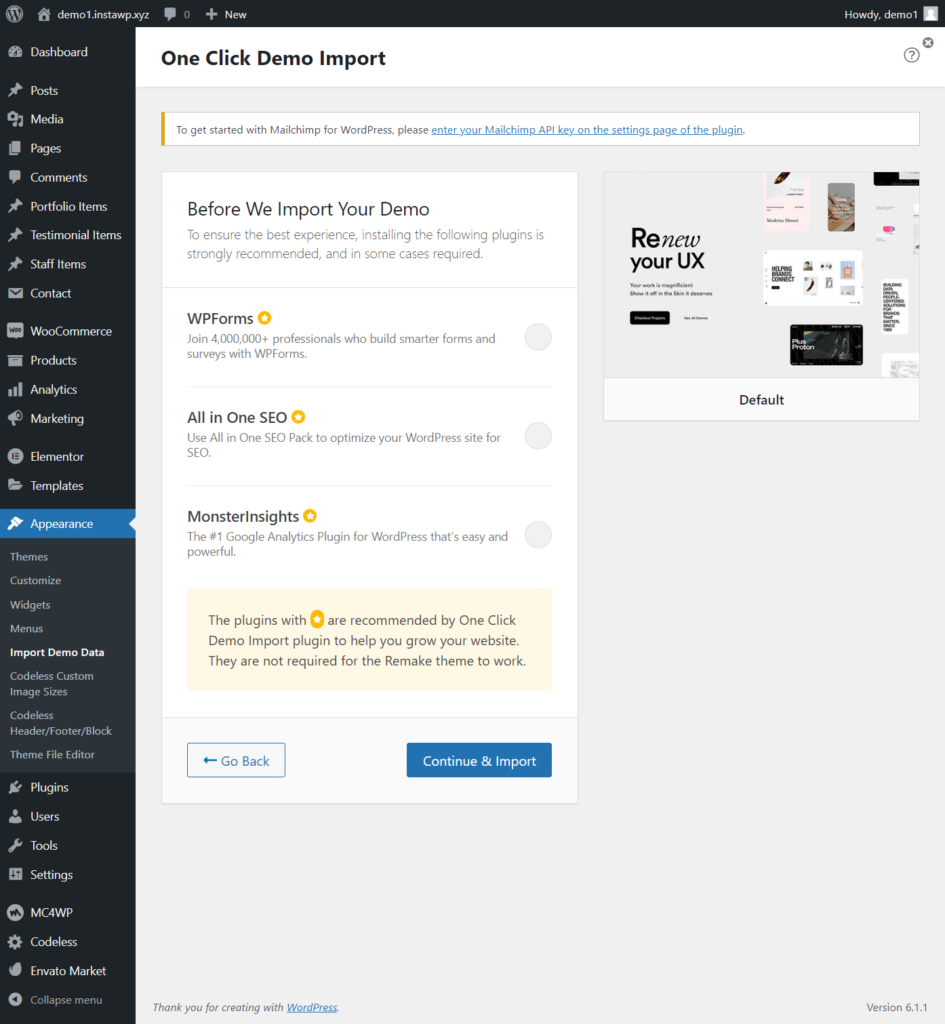
After selecting the Import Demo button, you will be taken to a page where you will be asked whether you want to install these 3 plugins: WPForms, All in One SEO, and MonsterInsights.
You will need WPForms to create a contact form and the All-in-One SEO will help optimize your posts and pages for search engine ranking. We recommend keeping these two.
MonsterInsight gathers data about your site’s visitors and displays them on your dashboard. Since this is a new website there won’t be enough user data and it will just clutter your dashboard. So we recommend stalling the installation of MonsterInsight for now.
Select the first two plugins and then hit the Continue & Import button.
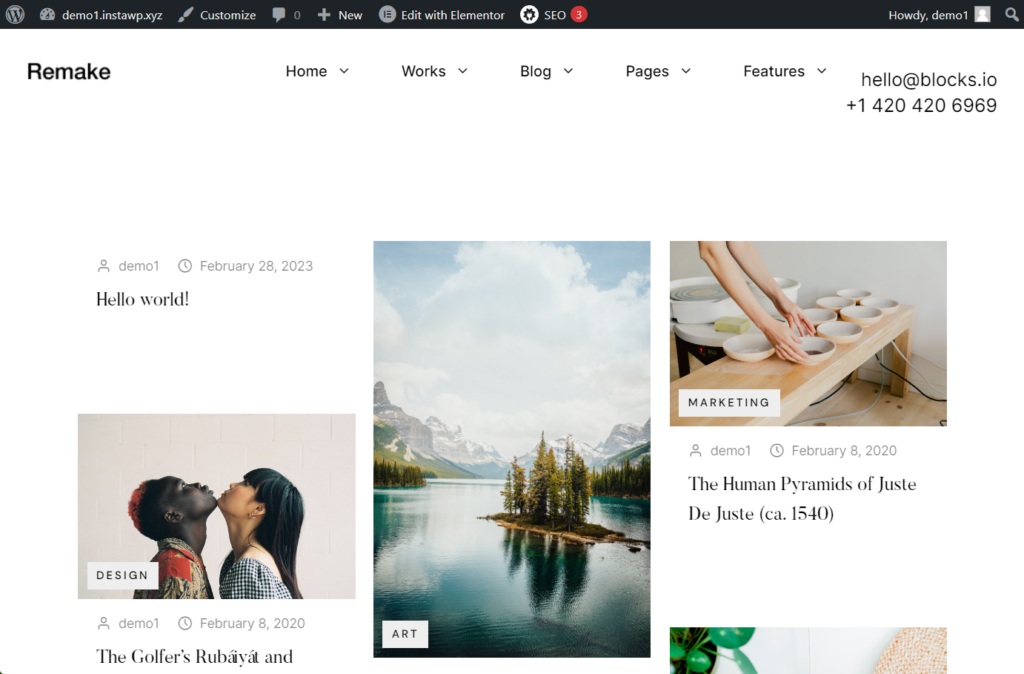
It will take a few seconds for the import to complete. When it’s over, your homepage should look something like this:
Configuring Remake Theme
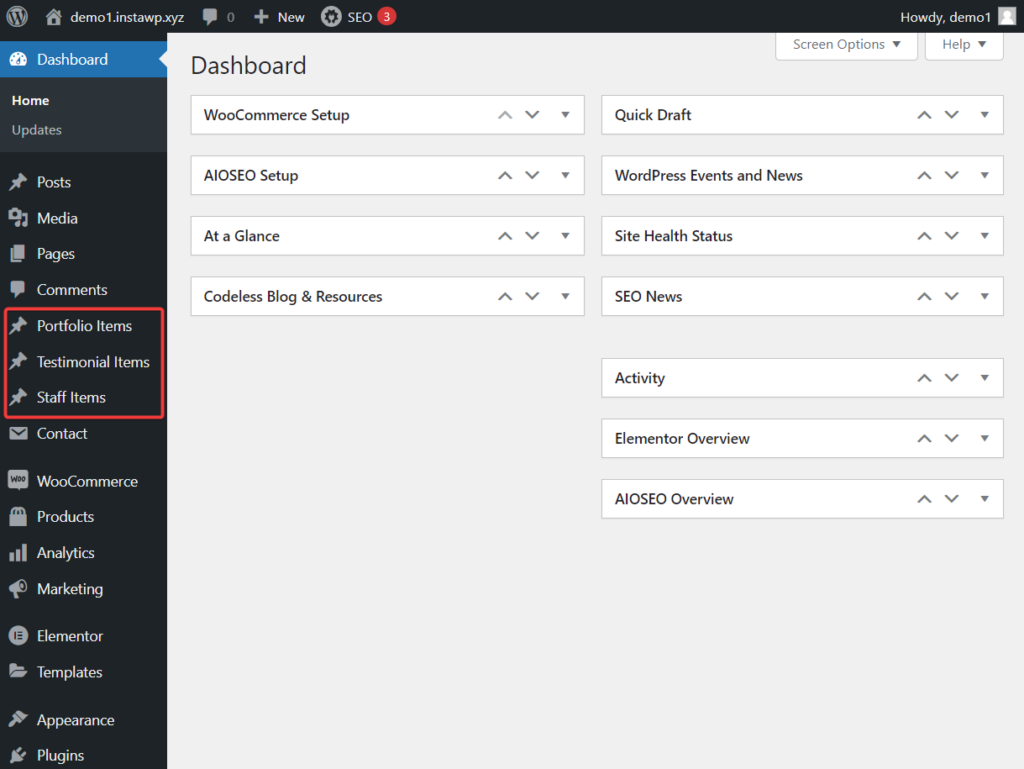
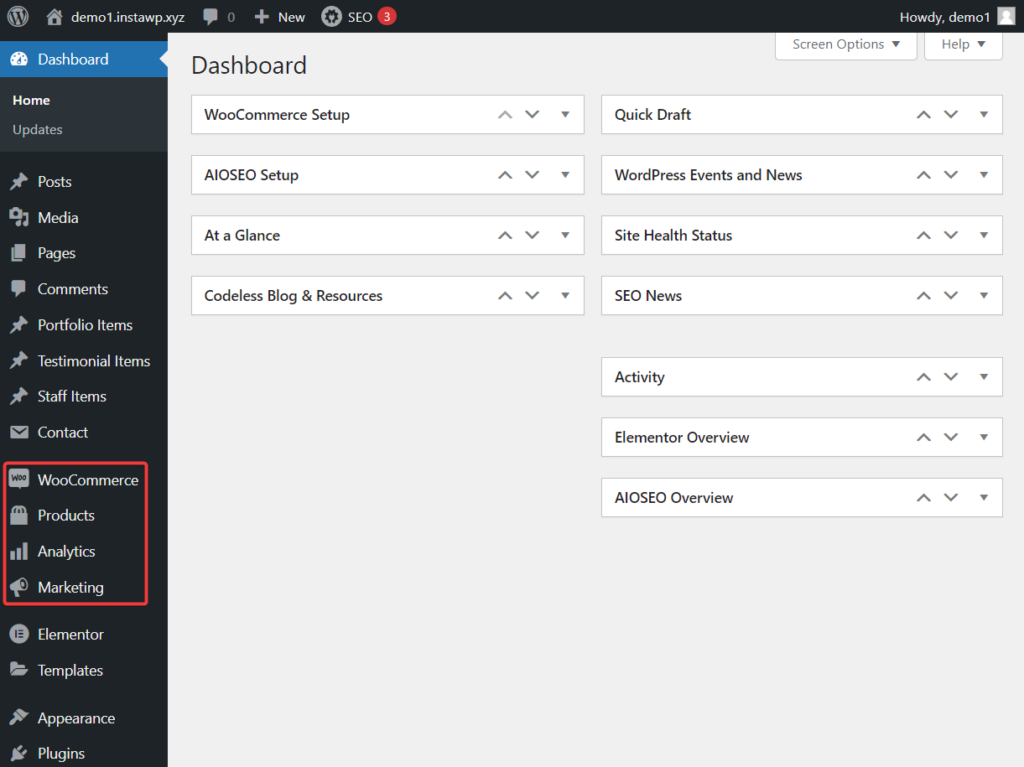
After installing the Remake theme, if you visit your WordPress dashboard, you will notice new options in the left-hand menu. Let's take a quick look at these options and learn how you can use them.
Portfolio Items contain prebuilt portfolio pages that can be modified any way you want. Testimonial and Staff items are particularly useful for agencies. They can showcase client testimonials and staff details as a way to gain the trust of potential clients. Preexisting testimonial pages can be modified using the Elementor page builder.
As we have mentioned earlier, Elementor is a drag-and-drop visual page builder that can be used to modify existing content and design. The tool also offers prebuilt design blocks that you can use to add new design elements to an existing page or to create a new page from scratch.
The WooCommerce, Products, Analytics, and Marketing options offer an eCommerce space where you can sell your merchandise to promote your brand and nurture your relationship with your clients and customers. Use these help docs to configure WooCommerce settings and learn how to add products, coupons, and other things.
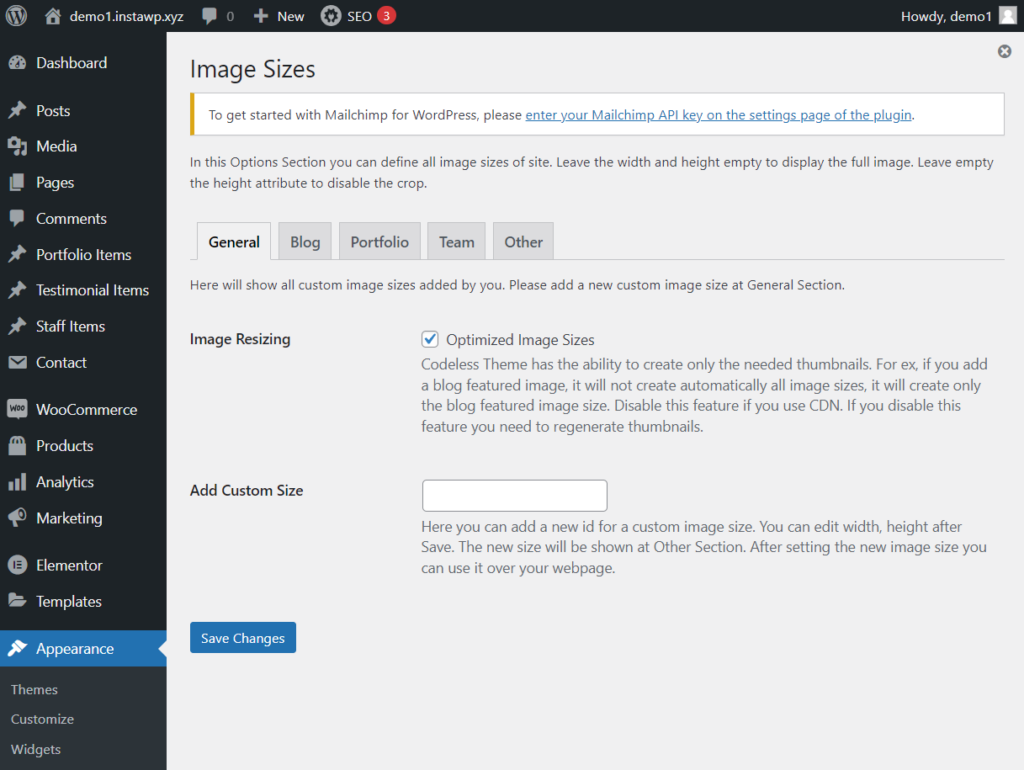
Codeless Custom Image Sizes found under the Appearance option of your wp-admin help define the image sizes of websites.
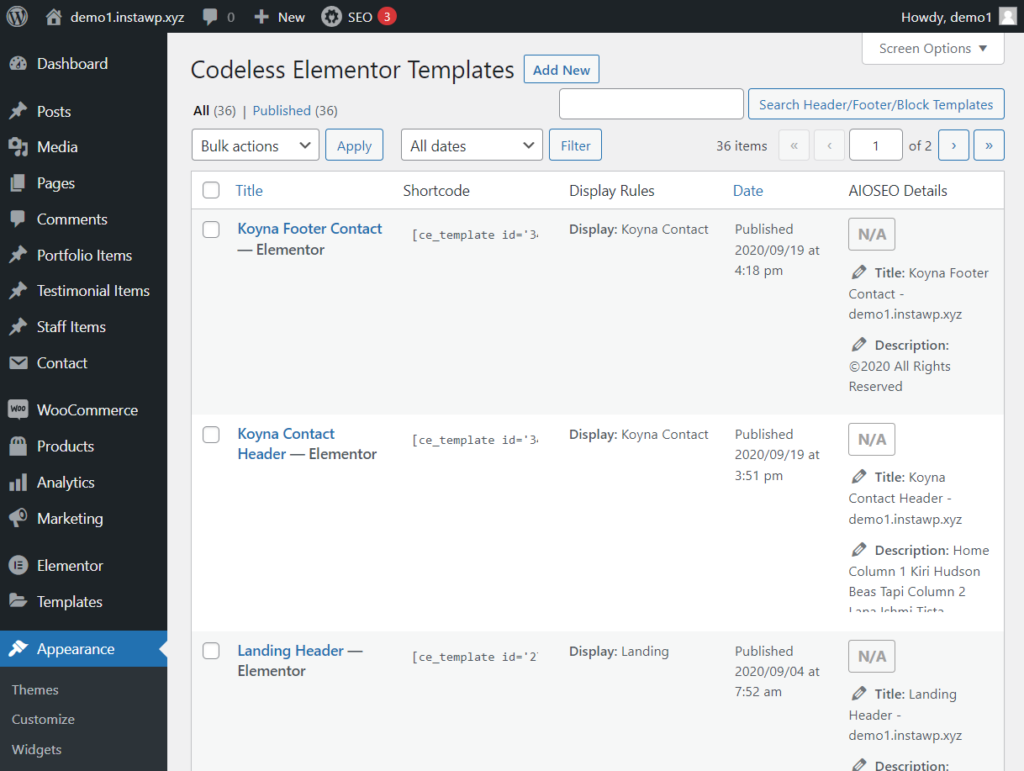
And Codeless Header/Footer/Block contains the header and footer designs of various pages of your website. Needless to say, these designs can be modified using the Elementor page builder.
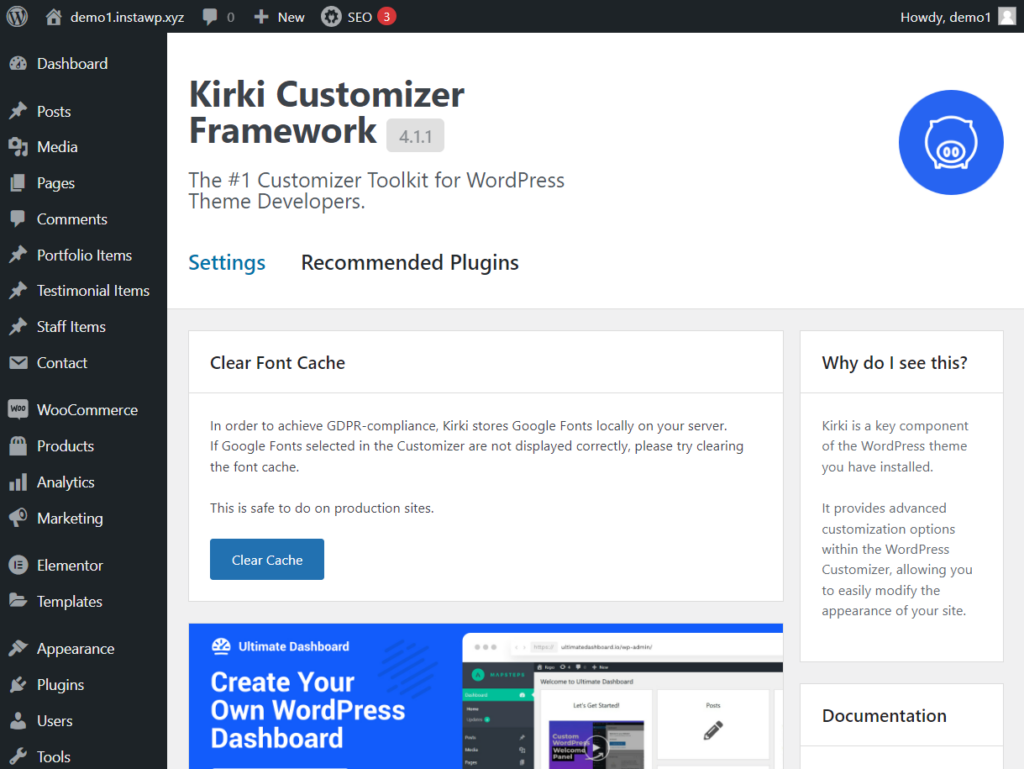
Another feature worth mentioning is the Kirki Advanced WordPress Customizer. It can be accessed from the Settings option. The customizer will allow you to expand the capabilities of your site’s theme (i.e. Remake). You will need this tool in the near future when you want to add more features to your website.
After configuring the Remake theme, your website is nearly ready. All that’s left to do now is to create two important pages. More on that in the next section.
Step 7: Modify the About & Contact Page
Two of the most important pages of any portfolio website are the about and contact pages.
The about page promotes trust as it lets potential clients see the person (or people) behind the business.
And as you may have guessed already, the contact page allows potential clients to connect with you.
Luckily you don’t have to create these pages from scratch.
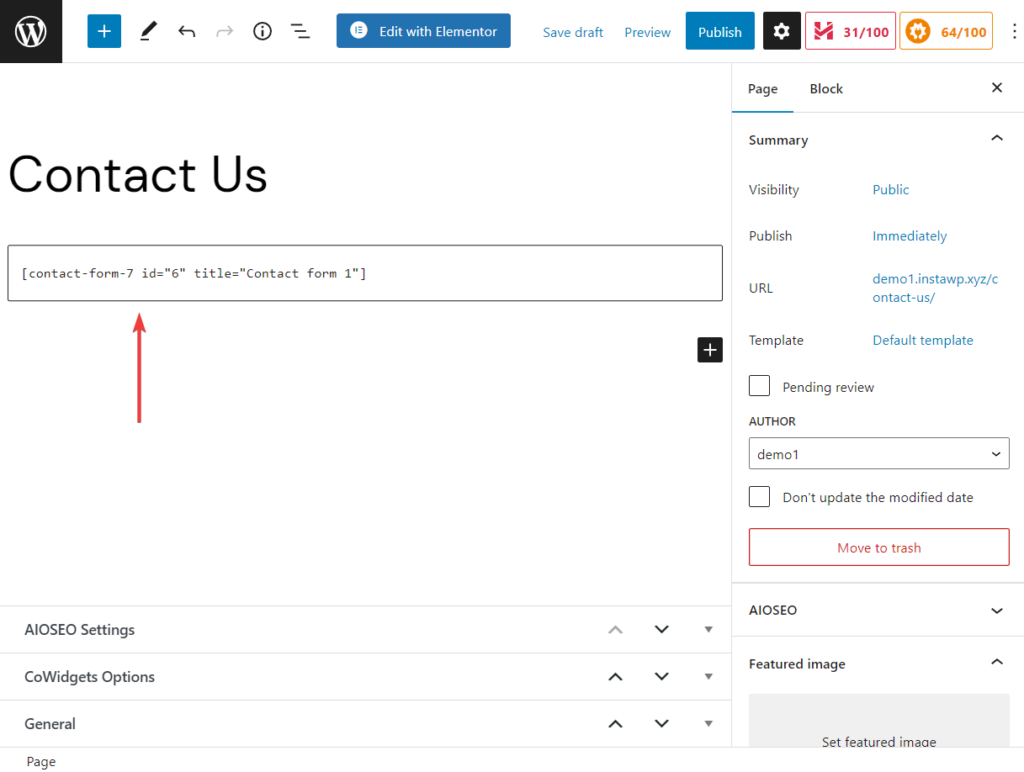
Upon installation of the Remake theme, an about page has been created on your website. All you need to do is go to Pages > All Pages and then edit the Contact page.
If you want a new contact page, you will need to create one. There is a preexisting contact form that can be accessed by going to Contact > Contact Forms. Copy the shortcode of the form, add it to a new page, and publish the page.
After you create these two pages, your portfolio website is ready. But before we move on to the conclusion, a word about the installation of new plugins.
Step 6: Install New Plugins
Over time you may need to install more plugins to add more features to your site. For instance, if you want to allow your visitors to sign up for your newsletter, you will need to use an email subscription plugin.
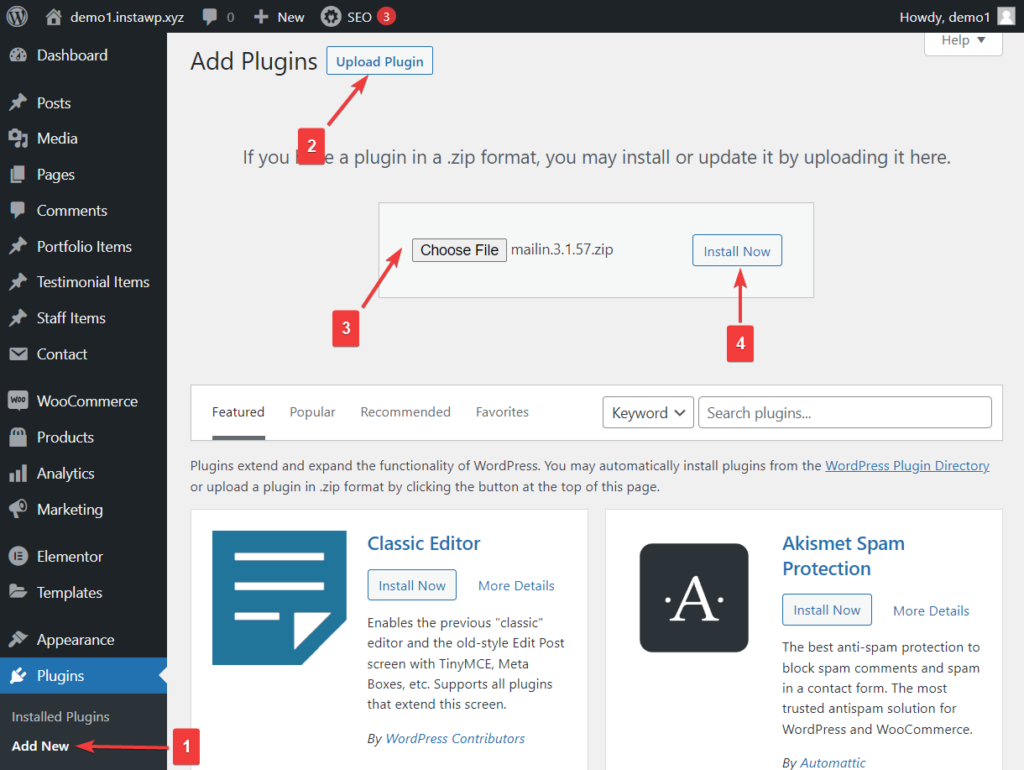
To add new plugins to your site, go to Plugins > Add New. Type out the name of the plugin in the search box. When you find it, hit the Install Now and Activate buttons.
Conclusion
Creating a portfolio website is not difficult but it is a time-consuming task. It should take you a few hours to get your site up and running. All you need to do is follow the steps below:
- Purchase a domain name, hosting plan, and SSL certificate
- Install SSL certificate and WordPress
- Configure WordPress
- Install a dedicated portfolio theme
- Configure the theme
- Modify the preexisting about page
- Add the contact form to a page and publish the page
- Install the new plugin, if needed
That's it for this one folk! If you have any questions, let us know in the comment section below.


![49 Best Portfolio WordPress Themes 2026 [UPDATED]](https://codeless.co/wp-content/uploads/2023/01/portfolio-wp-theme-460x275.jpg)

![25+ Best Minimal Portfolio WordPress Themes 2026 [Free+Paid]](https://codeless.co/wp-content/uploads/2017/03/remake-compressed.jpg)

Comments