
- Step 1: Choose and Sign Up with an eCommerce Builder
- Step 2: Create your eCommerce WordPress Website
- Step 3: Setup WooCommerce Website & Basic Configuration
- Step 4: Add Your Products
- Step 5: Extra Content & Plugins
- Step 6: Test and Launch your eCommerce Website
- Why Create an Ecommerce Website?
- Ecommerce Website Statistics
- Conclusion
Do you want to build your eCommerce career? It is a fantastic decision because running a business idea is more challenging than ever. eCommerce is an excellent platform for those with a business mindset and who want to run their own business with unique ideas.
Now you are lucky that you will have plenty of ecommerce platforms to learn about eCommerce sites and business. These platforms make it easier and increase the success rate by two folds. On an eCommerce website, you can sell your services, products, and digital products through an online platform.
Building an eCommerce website requires a lot of patience and efficiency to have a user-friendly interface. Keep in mind that your website is for potential clients who are average persons and don't understand the complicated terms. So keep your eCommerce website easy and user-friendly to make it successful for your business.
If you find yourself struggling a lot, don't let your website and future business suffer because of that. Instead, we kindly advise you to find help. A good example is one of the best-performing Miami web design companies out there. They can help rise to the stars in the field of e-commerce!
Almost all the modern and new eCommerce platforms are economical and user-friendly with a quick interface. Moreover, the building platforms of eCommerce websites are also reliable and helpful with fast systems, plugins, and many more.
Previously building a website required a lot of coding knowledge and effort. But as the technology grows, you don't need that much coding for creating your eCommerce website.
For example, many modern websites have the option of secure payment, shipping, and many more. So it doesn't look straightforward but doesn't require coding experience. So you can create an effective eCommerce website by having the proper guidelines and suitable plugins.
You will get a variety of guides with hands-on experience to create your effective eCommerce website. But if you want a step-by-step guide with detailed discussion, then you are in the right place. here we will share the detailed guide for your help so you make an effective eCommerce website
So let's dive into the step-by-step procedure.
Step 1: Choose and Sign Up with an eCommerce Builder

The first step of building an eCommerce website is to choose a website builder. The site builders provide full support for making a business website as they make the process quick and straightforward for their users.
However, decide the domain for the website that also refers to your eCommerce site's URL or web address. Moreover, we can say that it's the home of your website on the internet. So when your potential clients want to search your platform, they will enter this in the browser bar.
It is essential to choose your website's domain name for branding and to increase the success rate. You can also select the business name according to the product you want to sell to boost the search engine ranking factors. I prefer using descriptive keywords that represent your business purpose or the products that you sell.
SEO factors are also essential that boost your rankings and increase the organic leads at your eCommerce websites.
For example, if you want to sell organic honey or sunglasses, then include it in your domain name like organichoney.com. in simple words, we are trying to name your business by business-focused keywords.
Now the question is where to get the domain for an eCommerce website?
When you decide the name of your website, then you can get the domains from plenty of services. The reliable domain sellers are GoDaddy, Bluehost, Hostgator, Google Domains, and many more.
Visit any of the sites and enter your business name. Unfortunately, your selected keyword for a domain is often already sold, and some other person is running the business with the same name. So it's not available for you.
But if you choose the unique keyword, it will tell you that it's available and suitable for your eCommerce website. However, it would help find other keywords but ensure that you stick to the domain with dot com at the end. Keep in mind that most potential users only believe in websites with .com at the end of your domain name.
If you don't get the domain name with .com, then move towards doing net or the dot co because it also has a good recognition. Now the cost of domain names also varies according to the domain website. The average price of your website term ranges between $12 to $25 per year.
The variation in cost depends on different factors: live services added on or privacy factors that you choose. Some eCommerce website developers also have packages like a free domain with your purchase. So it will bring many more opportunities for you in the future.

Dedicated Ecommerce Platforms
Now next, you need to understand the eCommerce platforms. So it is the place from where your website goes live. There are plenty of eCommerce platforms that you can choose according to your requirements. You will also find some free eCommerce platforms, but they have limited features. So ensure that you can make your eCommerce website a popular platform for getting enough support in the future.
Select the dedicated eCommerce platforms so you can quickly launch your website after completing its backend workings. It helps you to set the robust and powerful functionality. Check for built-in functions like payment methods, shipping tags, and multichannel sales support.
We know that these built-in functions are not free and cost for the per month installations. So check these functions according to website building or coding experience and budget for enhancing the experience.
Here, we will share some dedicated eCommerce platforms that you can consider while building your website and making it robust.

BigCommerce
BigCommerce is a famous eCommerce platform that supports multichannel sellers. If you are starting your small business and want to make a powerful website, BigCommerce is a good option. However, it has different plans that you can choose according to your required features. The starting price is $30 per month. Now decide your budget and check its features with suitable plans.
Shopify
Shopify is one of the trending eCommerce platforms that give the ideal setup for featuring your websites. Moreover, it gives you the platform for selling your products, dropshipping, and many more. Now the Shopify plans also have many variations, and the starting rate is $29 per month.
3dcart
3dcart is the top contender website building platform that is mainly for eCommerce sites. It has affordable plans for all small businesses and beginners to kick start their business and make a powerful website. Now its price range starts from $19 per month. That is amazing.
Now you have a list of top-rated eCommerce website platforms. Every platform provides a free trial for testing its services. So you can take the free trial and clear all your doubts. It reduces the risk factor of your investments.
Other Popular Website Builders with ECommerce Features
Previously we shared the easy-to-use and quick website platforms. Now here are the popular website builders that you can choose and enhance your experience. The popular website builders are Wix, Weebly, Squarespace, and many more. All of these website builders have specific features that you can get according to their plan variations.
Wix
Wix is a trending and popular website that gives easy-to-use templates. It provides all the features at $23 per month.
Weebly
Weebly is similar to Wix and it allows quick access to create a website. Its starting plan is for $25 per month that gives impressive features.
Squarespace
Squarespace also brings with its quality features and robust structure. It gives plenty of amazing templates that you can choose with a few clicks, and it's good to go. Now the starting rate of Squarespace is $30 per month.
Choose the popular eCommerce website according to your requirements and ensure that its plan meets your needs.
Moreover, website builders' simplicity is popular and has easy and DIY steps to make it effective. Suppose you intend to grow more and earn your potential income from eCommerce platforms that keep it easy to use for your potential clients. It helps to bring or generate organic leads and sales.
Recommended: Bluehost + WooCommerce (WordPress)
Now you may get confused about choosing a suitable platform for your eCommerce website. So here we will give you our recommendations that you can choose when you don't have any idea.
First, WordPress is a powerful platform for your informational website and eCommerce website. Around half of the popular and leading eCommerce websites are based on WordPress. So it has the potential to make your eCommerce websites.
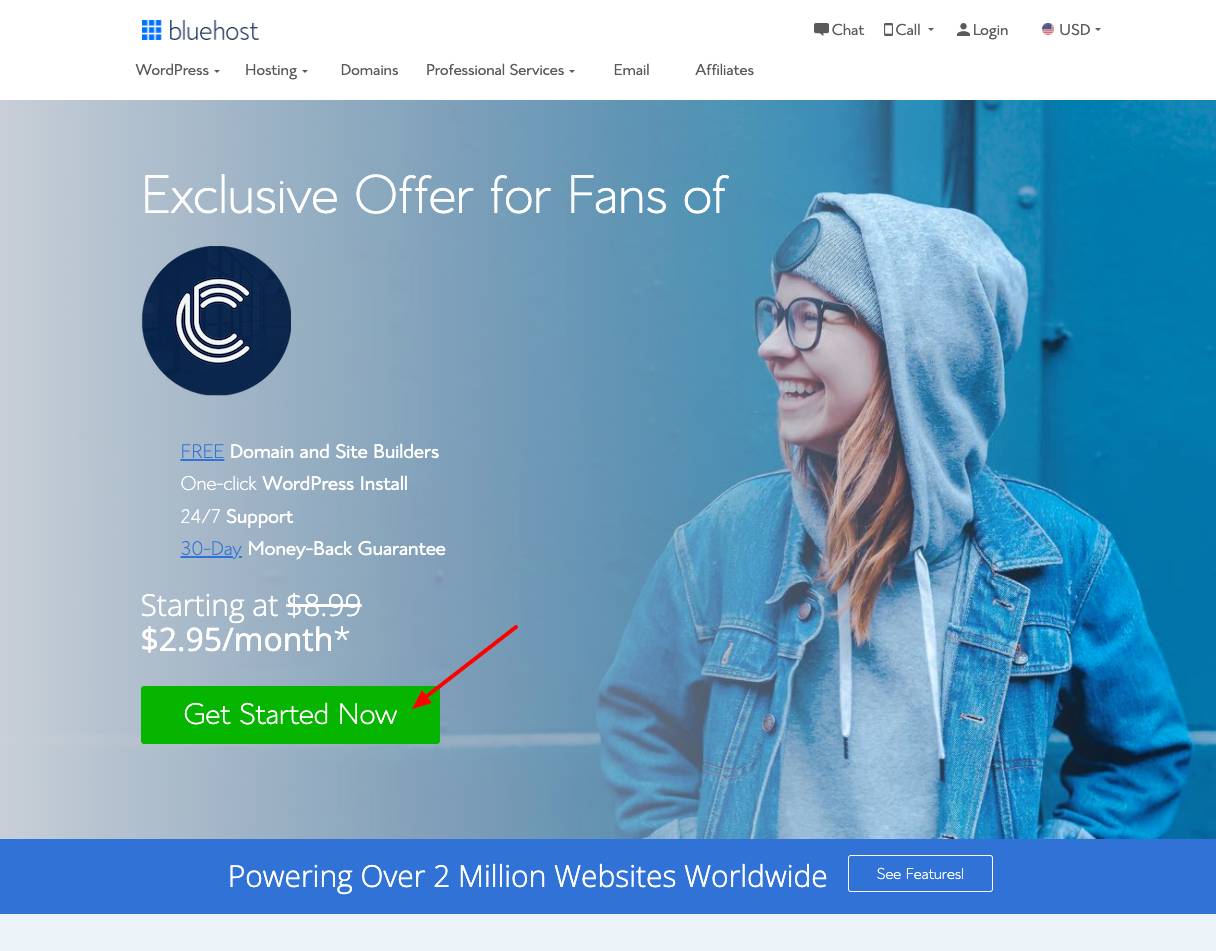
Bluehost offer a powerful host for your ecommerce website with WordPress. This kind of combination is our top recommendation in terms of ease and price. Our readers can get it only for $2.95/month.
If you are not sure about Bluehost you also check our post here that compares the best WooCommerce hosting provider.
Now the primary reason behind choosing WordPress is its limitless virtual features. You can build anything according to your requirement at WordPress and with suitable plugins. Moreover, it is a cost-effective website platform that gives you enhanced features and functionality.
Keep in mind that WordPress plugins are also essential in free-of-cost or paid plans. Of course, you can choose the plugins according to your consideration. But if you are new and want to build your eCommerce website, select the following plugins to enhance its functionality.
- Woocommerce is the leading plugin for WordPress to build your eCommerce website. It provides all the functionality features to your website.
- WP EasyCart is similar to WooCommerce, which is also suitable for building eCommerce with full functionality and features to sell products or services.
- BigCommerce is also a dedicated plugin for WordPress to build the eCommerce website in full functionality. It helps to generate multi channel sales with multi channel brands. Moreover, you can also do blogging with an eCommerce website.
Step 2: Create your eCommerce WordPress Website
WordPress is the best option to create your eCommerce website. However, when you decide to create an account at any recommended platform, you need to make an account. Making an account at the blue shot, WordPress, and woo-commerce sites is an easy and quick process.
The WordPress eCommerce website is easy to build and makes it user-friendly. First, you will create the account and then subscribe to its features plan according to your budget and requirement. Every plan has a perfect mixture of plugins, security, and related tools. When looking at the pricing plan, ensure that you check its duration for a month or a year.
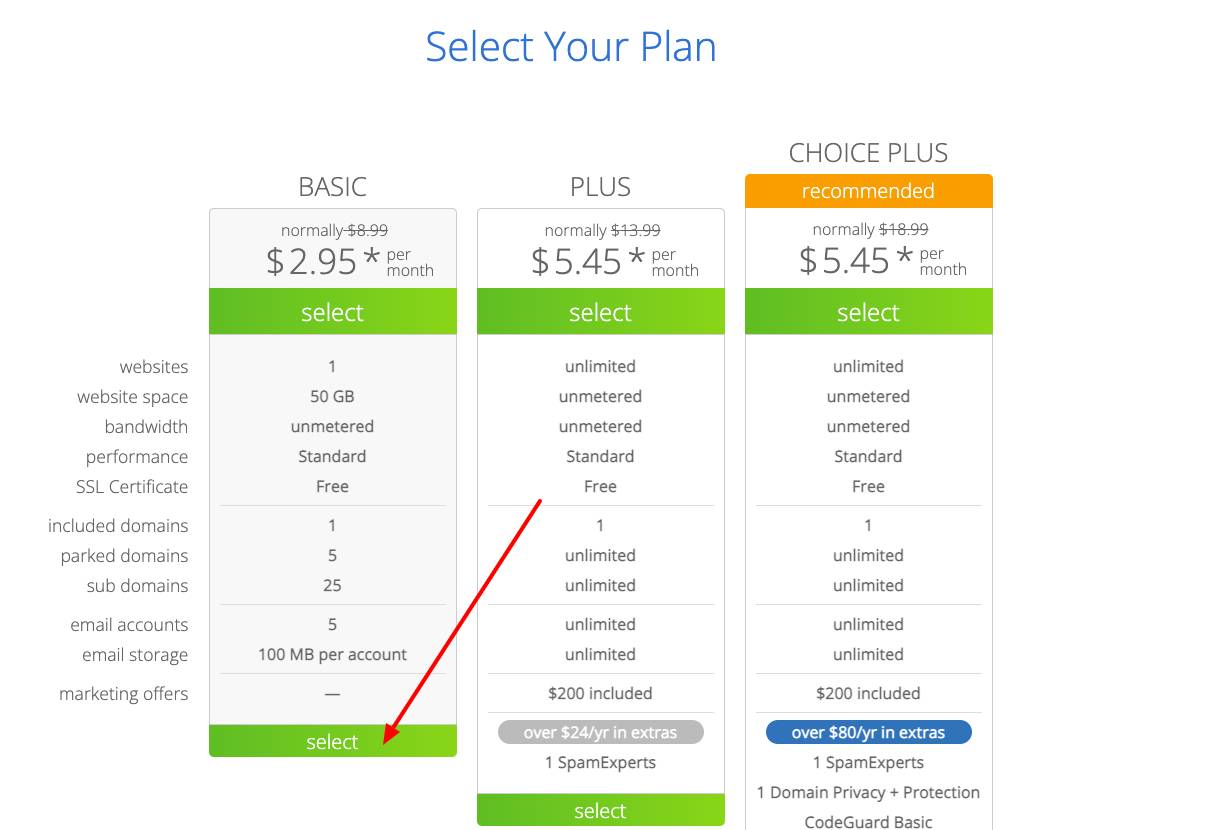
Most users prefer to choose the 36-month plan as it is cheaper and best for the long run of your website. However, as you want to build your eCommerce store, always select the standard plan that gives a better experience than basic or premium features.
Choose Domain Name
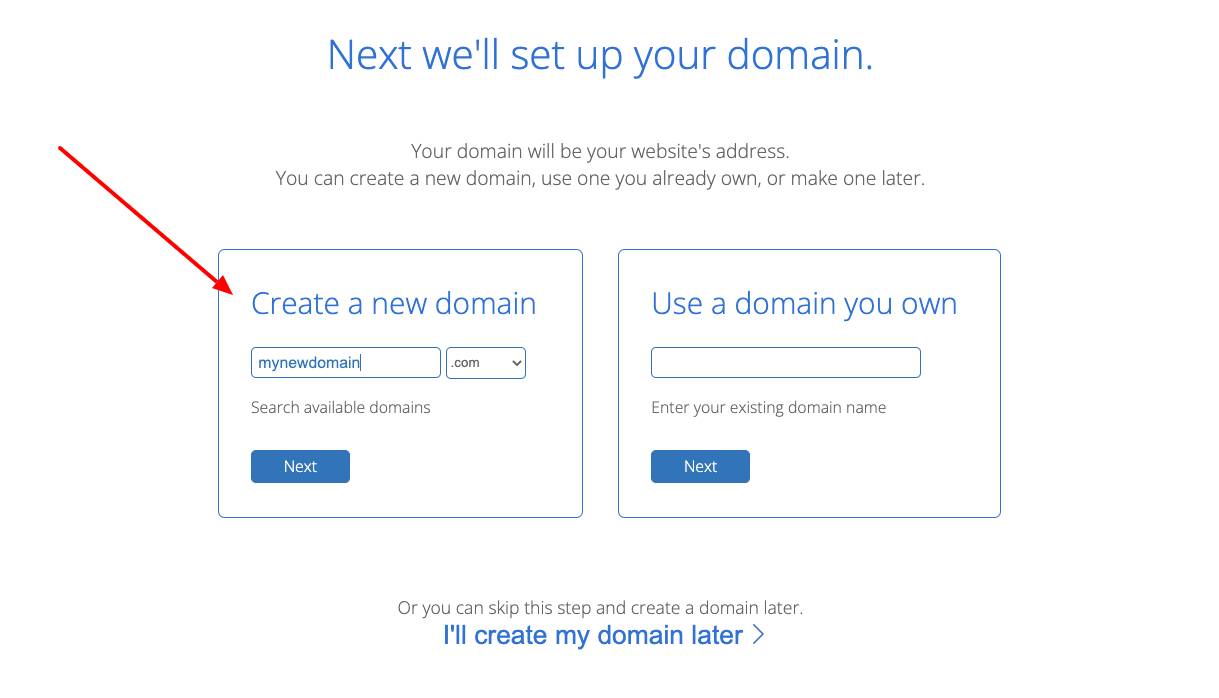
As we already said, choosing the domain name is essential and plays a significant role in search engine rankings.
So when you get the WordPress subscription plan, then choose the domain name. When you visit WordPress, you will see the two options of creating a new domain and using a part you own. When you select the make a new domain button, you will have the section to enter the prospective domain name you want to create and choose the extension like .com, .in. and many more.
Moreover, if you previously have a domain or purchased it from somewhere, you can put it in the bar under Use a domain you own.
If you don't have the domain or cannot select a suitable one for your website, skip and move to the next part. You can also choose your domain afterward.
Create Bluehost Account
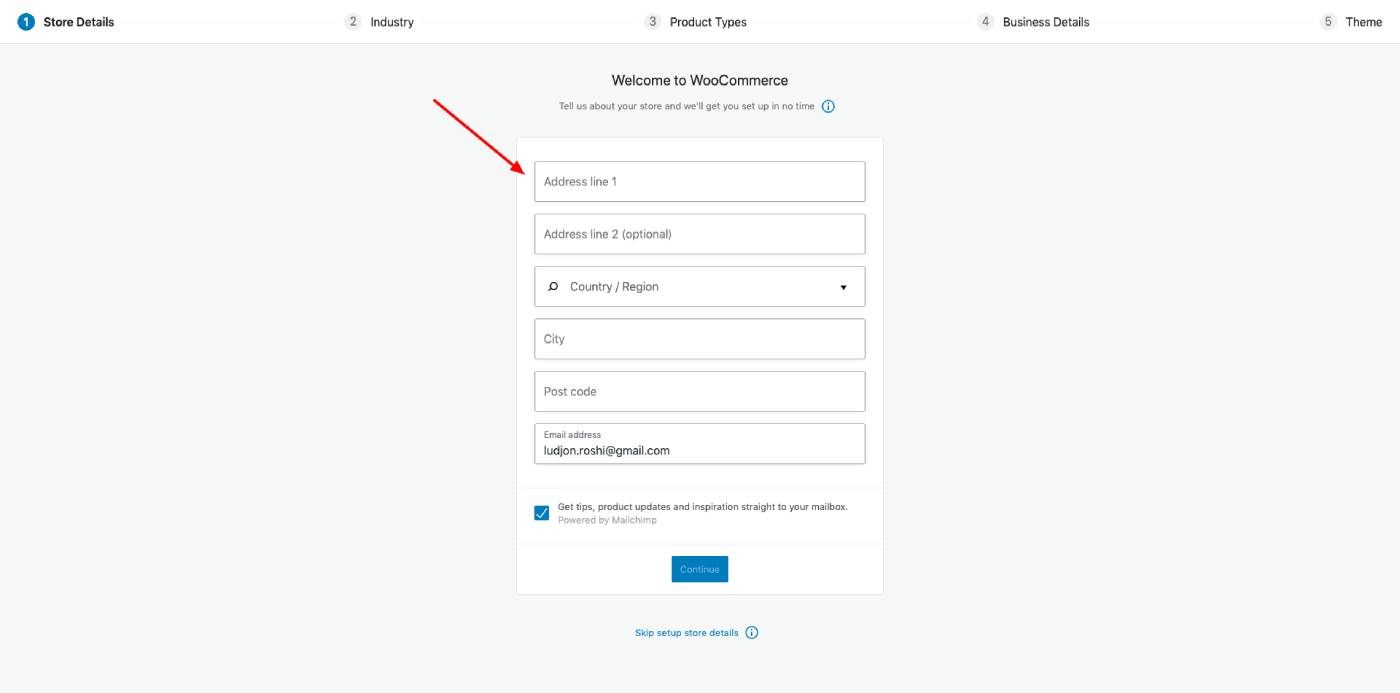
A Bluehost account is also essential. It is easy to create the blue host account by providing your essential information. Then, fill in the data that they demand to create your account.
Ensure that you enter all your data and payment information in the relevant sections; otherwise, you will not be able to sign in at the Bluehost platform. Moreover, you will have the option to purchase some additional features or plugins for your eCommerce website to enhance the website's functionality.
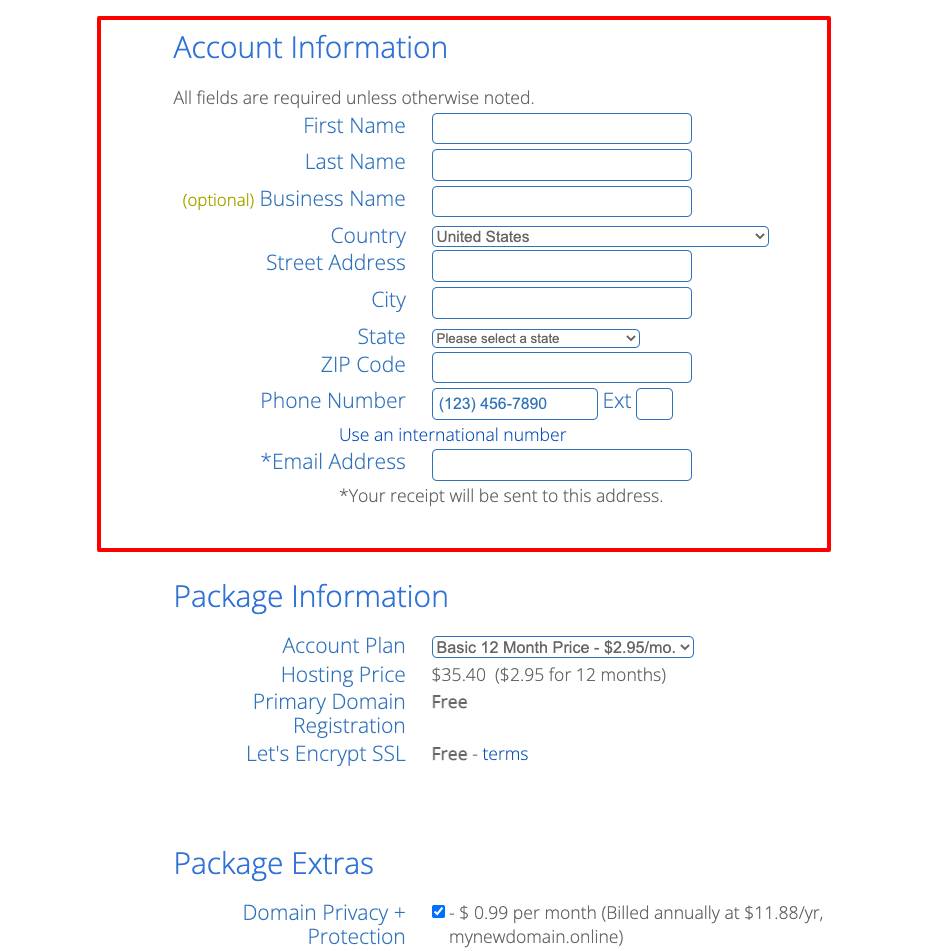
Press the submit button when you fill in all the relevant information. Now your payment will be made in a while, and you will be able to create your professional account for all the fun and exciting features.
Now move to another step of creating the passwords. Ensure that you set a strong password with a mixture of some characters and numbers.
Here appears the Bluehost privacy policy that is essential to read. Once you read all the privacy policy points and agree with them, then hit the agreed button.
Now you have your Bluehost account with incredible features and functionality. The Bluehost account is best and essential for making the eCommerce website and giving robust features to potential clients.
Choose Theme or Find a Developer
Bluehost is an amazing platform with millions of free and premium themes. If you want to beat your competitors, it provides an extraordinary experience and edge for leading them.
Choose the theme that complements your products or services. You will have many free and paid templates that you can choose according to your suitability. Then, specify the result by clicking on the view eCommerce-specific options. When you are at the home page, you will notice the eCommerce tab at the menu bar. Choose the specific theme from this list.
Explore the themes deeply and choose what you like. After selecting the theme, you can click on it and pop it up on a bigger screen.
Once you select the theme, the Bluehost will automatically start installing it over WordPress.
Moreover, if you want something extraordinary, then contact professional website developers. They know the eCommerce website development and its suitable themes.
Also, you can find professional and free eCommerce WordPress themes that can match with your style outside Bluehost panel.
Step 3: Setup WooCommerce Website & Basic Configuration
Now you have your eCommerce website ready to set up for selling after adding your products or services. Moreover, your website plugins, shipping methods, payment plans, and all others are ready.
Collect all the information that you want to set up at your website. Here is the step-by-step guide for setting and configuring your website.
Add Shop Basic Information
In the first step, you will add your store or basic business information. Describe your information clearly that helps the potential users to deal with you.
Ensure that you enter all the relevant data to help potential clients know more about your products and services. It is like the homepage of your website.
So try to make it more effective that viewers don't go back without purchasing your items. Try to add the easily accessible information of your shop that helps the users to know more about you.
Logo and Brand Imagery
Now the brand logo represents your business in the online market. Every eCommerce platform also helps you to create your simple logo with many variations.
But if you don't like that brand logo, then you can use the Canva. It is a free or paid tool that helps you to create appealing logos. Choose the logo template and make the modifications to make the brand logo that describes your products.
Keep in mind that the brand logo is effective in describing your business story. So make it right that also represents your skills and professionalism.
Set-up Payment & Shipping Options
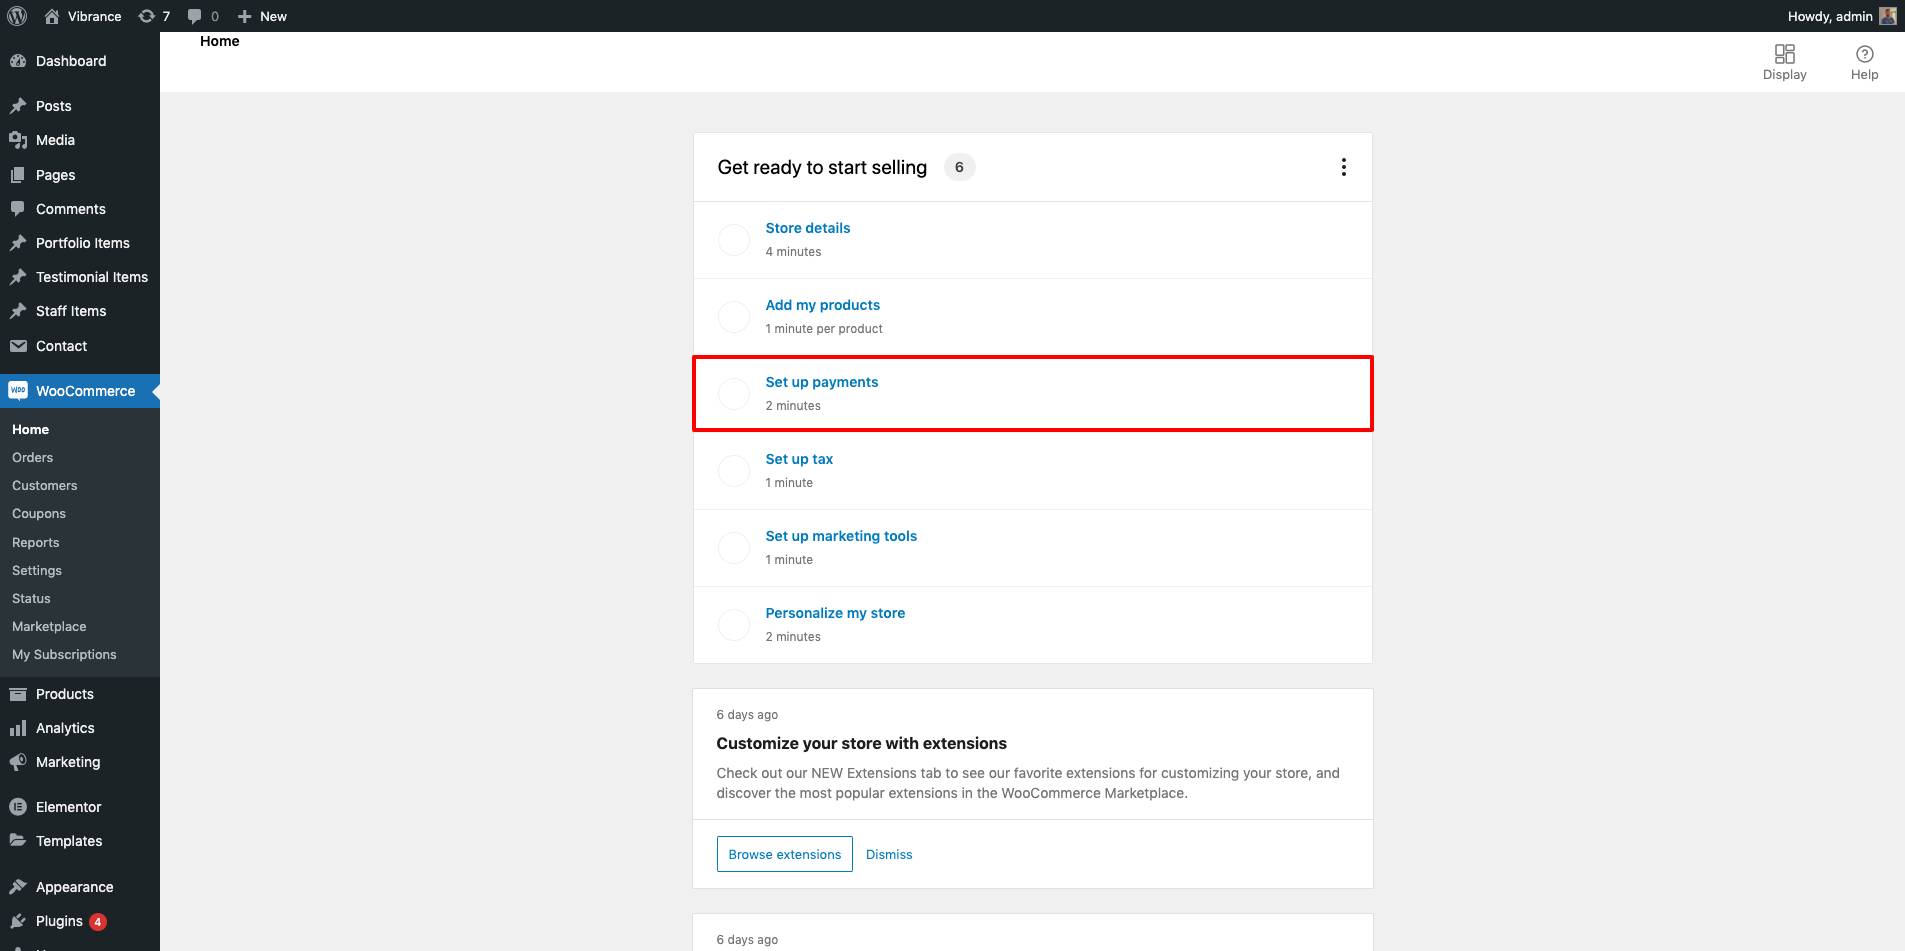
It is the most critical step that determines the success of your business. However, how you handle your business website depends on the eCommerce website platform. So, as we already said, choose the platform according to your requirements like BigCommerce, Shopify, and many more.
Woocommerce has built-in payment processing methods, tax calculation, printing, and shipping labels. Moreover, they also have built-in marketing tools that help your business's branding, specifically with email marketing strategy.
However, you may also need some outside sources or services to handle the payment and shipping tasks.
Set up your payment processing and tax table according to the eCommerce website platform. You can select suitable plugins like Paypal, Stripe, and many more. Shopify also has its building payment processing unit that helps users find solutions to their problems with a few clicks.
Many users want to use their merchant account to receive payments. So, many platforms also give access to this opportunity for enhancing the eCommerce business services. However, according to experts, it is advisable to use built-in plugins that provide better quality services.
Now you have your payment set up categories that you can choose according to your requirements.
The next step is to configure the taxes on every sale and rates that shoppers collect after selling a product. Almost every eCommerce website supports the sales tax calculation and applies it to the products according to suitable criteria. However, the sales tax applies to the average sales volume in some cases, but it varies from every eCommerce website platform.
Now the payment and taxes are made, but how do you set up the shipping methods?
Again choosing a reliable and popular website platform gives you many more benefits, and the shipping methods are one.
The shipment process is streamlined according to the order fulfillment process. It will automatically connect the orders to shipping software. Before that, you must select the courier service and click them with your brand.
However, the shipping methods, label printing, and customer notifications are automatic processes when the order is ready for shipment.
Keep in mind that when you set up the shipping methods, it is wise to set the rates or shipping fees for your potential clients. Many platforms only let you set the real-time rates you charge for delivering the product without getting any commission. You can also set up flat rates according to the total rate and offer free shipping above a specific package size or amount.
Step 4: Add Your Products

Here is the turn of your products front, center, or back of your website for the clients. It is a vital part of your eCommerce store, so you need to be extra careful. When you add the product, ensure that all the information is reliable and provided according to customer interest and benefit.
Here are a few tips or checklists that you can follow to add your products to an eCommerce store. These tips will also help you to market the product effectively and increase the ranking factors.
Product photos
Your product photos are the way to create a visual impact. When a person visits your website, the first thing that he does is look at the product pictures and then move to other factors. So ensure that you capture creative quality photos. Also, ensure that you take the images from different angles that help the potential client decide about your website.
Videos
Product video enhances the selling ratio of your product. You don't need to capture the pricey videos for selling the products. The primary purpose of adding videos is to show the authenticity and prove the quality of the product.
Product description
The eCommerce website owner can't answer every email and answer the queries of potential clients. The best solution to reduce these emails and messages is to create a detailed product description. Ensure that it covers all the details and aspects of the product. Add the product size, weight and material, and many more features to clear the customer's doubts. Moreover, ensure that you add the targeted keywords in your title to increase the rankings on search engines.
Product options
If you are selling a product with many variables based on its size, color, and dimensions, ensure that you add them accordingly. Ecommerce websites can add multiple variables of the product that customers can choose according to their suitability.
Product pricing
Now, if you are selling the desired items in a single unit, you will add the price of one product. But some products are also in demand for group selling or purchasing. So you will directly add the cost of the whole group instead of the single items. Moreover, when you add the group pricing, then ensure to mention the discounts. So it helps the potential clients to compare the price quotes.
Item size and weight
The item size and weight help the eCommerce website platform to determine the shipping cost and labels. It is the optional factor, but if you add the item size and weight, you will notice a clear difference in your time consumption as the shipping process moves to an automated system.
Inventory
Inventory stock is also essential that you should connect with your eCommerce website. It helps the platforms to track your inventory and make changes in it after every sale.
Step 5: Extra Content & Plugins
Now you have the products on your website for the consumer preview. So it's time to add all the additional content and suitable plugins for enhancing the selling experience.
So here is the list of content that you need to add to your eCommerce website.
Create a Story

Every website has the about us page, also known as creating a story in developers' language. To create an account that has the potential to connect with your buyers. You can share your personal story that helps you bring this business or brand in front of them.
It is also a fun side to talk with your potential clients to develop their interests. You can share whatever you want to describe your business, the story behind the brand, and many more.
Moreover, add some interesting photos or videos to make it more entertaining for the potential clients.
Customer Service Pages
The customer page is for the help of clients to know about your services and strategies. Keep in mind that the customers will come back if they have a great shoppers experience at your platform.
So use the opportunity of the customer service page and make it according to the demand of your potential clients.
Many beginners do ask how they will know about the queries of their potential clients.
Effective research helps you understand your client's expectations and know what they want from your platform.
Now here is the checklist and tips that you can use to build your customer service page.
- Shipping rates and times are the first queries customers want to know when they will receive their parcel after placing the order. Mention the typical shipping rate that you will charge and set the average delivery time for a better experience.
- Mention the return and exchange policy for your clients. Ensure that you clear your payment returns and product return in clear words. Don't add the double-meaning sentences that affect your business with bad reviews.
- You can get the privacy policy from the eCommerce website platform, provide the stated privacy policy and make changes according to your requirement.
Blog Content
If you want to increase the eCommerce website ranking, then start doing blogging. Blog posts also trigger the marketing strategies and show enhanced leads. So create blogs with appropriate content that describe your products and their benefits to potential clients.
When you have the blog content, you can generate organic traffic from all social media platforms.
Navigation
Website navigation helps shoppers scroll at your website and visit the required products, blog, and website content. Make the navigation easy for your potential clients so they have a better experience at your platforms.
The eCommerce website platform will help you to make your main menu bar. So you can add your footer menus, sidebar menus, and many more. The main menu lets you highlight your online store categories and insert all the pages for quick assessment.
Make the main menu of the navigation bar with a reliable combination, and don't forget to add your product with categories and a list of top-selling products.
Install Plugins
WordPress eCommerce website has plenty of plugins that you may notice at its menu bar.
Select the plugins according to your feature requirements and activate them. The most preferable and trending WordPress plugins include woo-commerce, Yoast SEO, site review, and many more. These plugins help start particular payment setup, shipping methods, SEO assessments, security, and privacy.
If you are a beginner, then here is how to install the desired plugin and activate them.
Choose the plugin from the side menu bar of WordPress by clicking on the add new button. Then, you can quickly search your desired plugin by searching it in the top bar and pressing enter to select it. Next, click on the install now button, or you have the activate option for adding it to your eCommerce website.
Email Marketing and Social Media Setup
Marketing is crucial for every business's success—similarly, the eCommerce stores and their website demand marketing for getting the leads.
However, all the eCommerce website platforms have marketing tools that are practical and robust. You can also get the entire marketing toolkit from the Shopify and BigCommerce platforms.
Now when you have the built-in marketing tools, then ensure that you will take its full advantage. Make an email list and connect it to the customer portal. So it will automatically send the marketing emails at every update, promotion, and product selling guides.
If your eCommerce platform doesn't have a marketing tool, you need to do additional work. You can also add a suitable plugin to access the marking services and make it easy for future branding.
So it is clear that the time and effort you spend on marketing can be minimized by choosing the right dedicated and popular eCommerce platforms.
Step 6: Test and Launch your eCommerce Website
It is the last step in your eCommerce website creation. When you create all your website content and design it effectively, start it with a few test orders.
Every eCommerce platform has different testing opportunities for users. However, keep in mind that you should never launch your website without having some pre-launch orders. These orders help you to access your system, including shipment method, payment processing, and many more.
If you find any bug during this process, deal with it and make it clear for easy navigation. Now you are ready to launch your eCommerce website.
No one will get immediate orders after launching a website. So give some time to the search engine to find your website and make it available for clients after indexing it as the new online store. Meanwhile, you can verify your eCommerce store through the google search console.
Don't wait to get the orders directly. Instead, you have to start your marketing at social media platforms and Google AdWords. It helps you to give the true words to your visitors once you come to their notice.
Why Create an Ecommerce Website?
Now the time changes and every business requires an eCommerce website to enhance their growth. If you are new in the market, you will have plenty of reasons to make an eCommerce website. However, every old business may already have it, but they should also create an eCommerce website to grow more if they don't.
Here are some practical reasons for creating an eCommerce website.
Newmarket acquisitions
Every small business has the issue of how it can reach its potential clients. Keep in mind that just having a storefront is not enough to beat the mark competition. Create your eCommerce website to get more chances to get more clients. It increases your market presence from different platforms as you will also connect to social media sites.
Create unique shopping experiences
We all know that online businesses have more growth rate than storefronts from previous years. So when you have an eCommerce website, you will be able to give a unique shopping experience to your clients. Once your client has the fantastic products and services on your website, then keep in mind, they will come back to shop more.
It is also a way to increase the trust factor between you and your clients.
Strengthen your brand
Now brand strength in the market is essential for growing further. Commonly, many new business or brand owners sell their products on Amazon, eBay, or other sites. They have good sales, demand, and many more but don't have brand recognition.
So when you create your website, you will have complete control over your product selling, marketing, product presentation, and many more. In short, you will be able to make your market presence and beat your competitors.
Ecommerce Website Statistics
Keep in mind that the website statistics help you know about the results of your website and sales progress. Therefore, the eCommerce website analysis is the only way to measure the site performance.
Here are the traditional metrics or statistics that you should check your eCommerce website performance.
Bounce rate
The website bounce rate refers to the percentage of users who come to your sites and exit without doing any other activity. Moreover, the bounce rate is also referred to as the call to action strategy.
The bounce rate helps to determine the success rate of your website, and you can also analyze the sales funnel.
Exit rates
The exit rate of the website also gets to know how many people exit the website without scrolling to any other page. So if you have a high exit rate, make your website appealing that can bound your clients.
Average order value
The average order value is the measure of orders clients place on your online store. The statistical data is from the specific period that helps make future price decisions, promotional deals, and many more.
Conclusion
Now by summing up the above guide, you know who to create an eCommerce website. If we talk about the previous years, then it is a challenging task to create a website. At that time, only website developers with coding information could make the eCommerce website. However, now the time changes and also brings many technical advancements and makes the process effortless.
Keep in mind that choosing the right eCommerce website platform is essential and helpful in making website development easy.
Follow all the above guides and make a powerful eCommerce website that makes remarkable profit and successfully grows your business.
Congratulations! on your future eCommerce website.
Ludjon, who co-founded Codeless, possesses a deep passion for technology and the web. With over a decade of experience in constructing websites and developing widely-used WordPress themes, Ludjon has established himself as an accomplished expert in the field.


Comments
Hurrah! At last I got a web site from where I can actually get helpful data concerning my study and knowledge.|